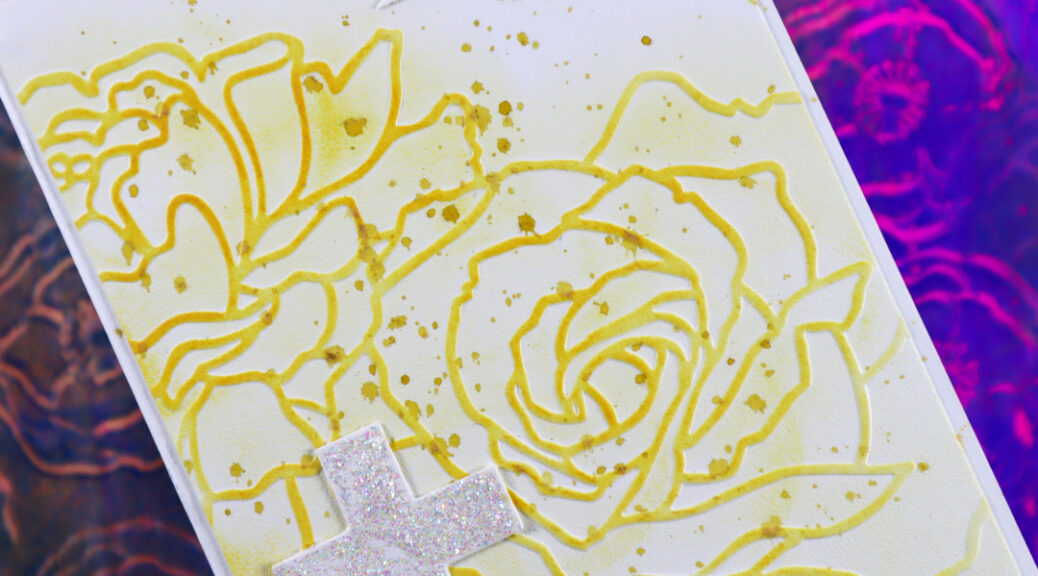
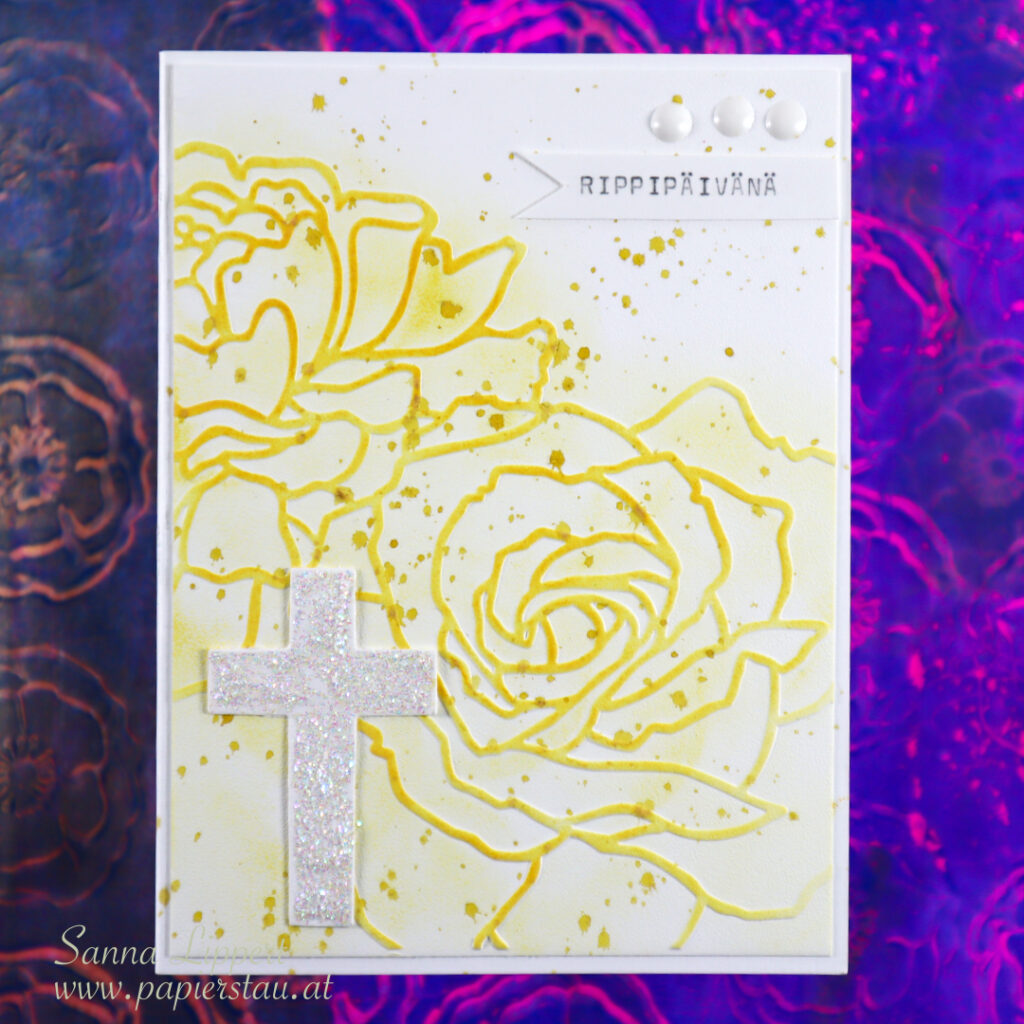
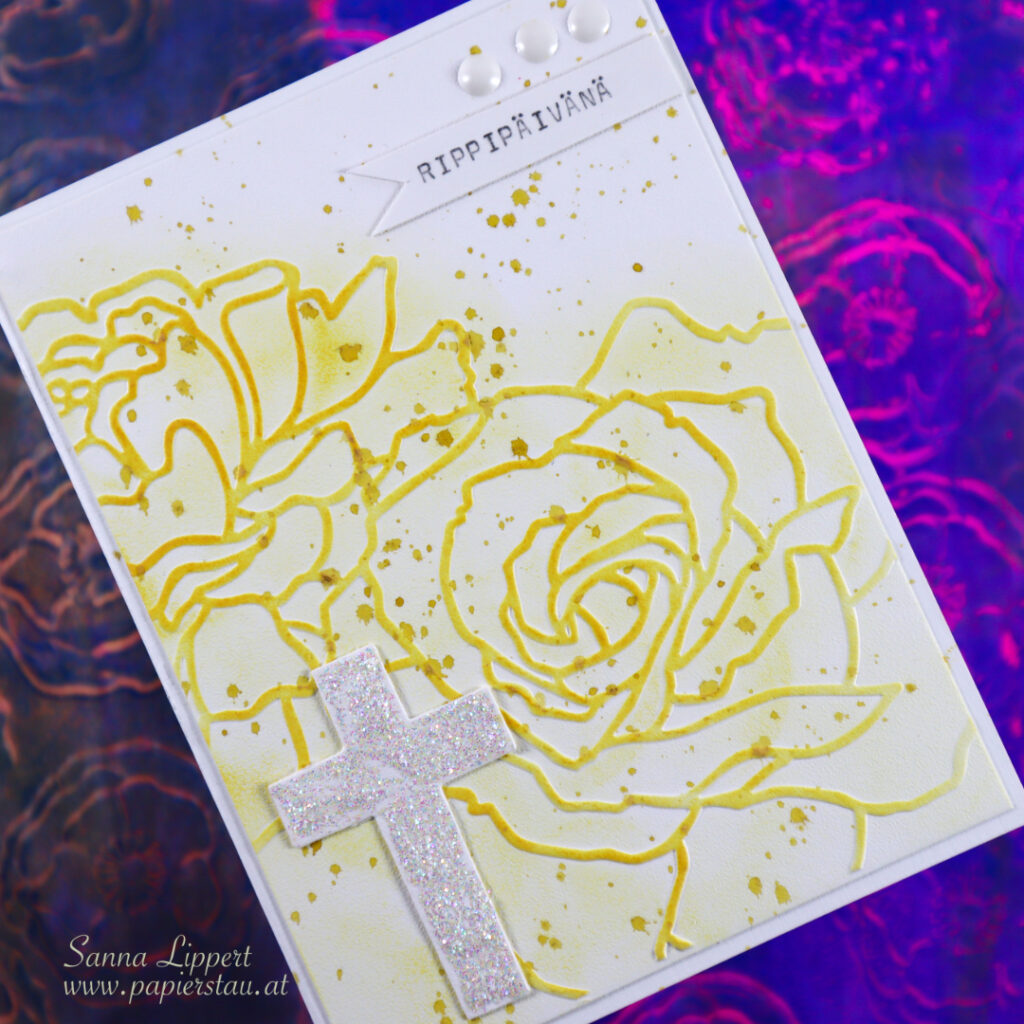
Hello! I have a card share today. It´s a card I made for a family member´s confirmation day celebration.
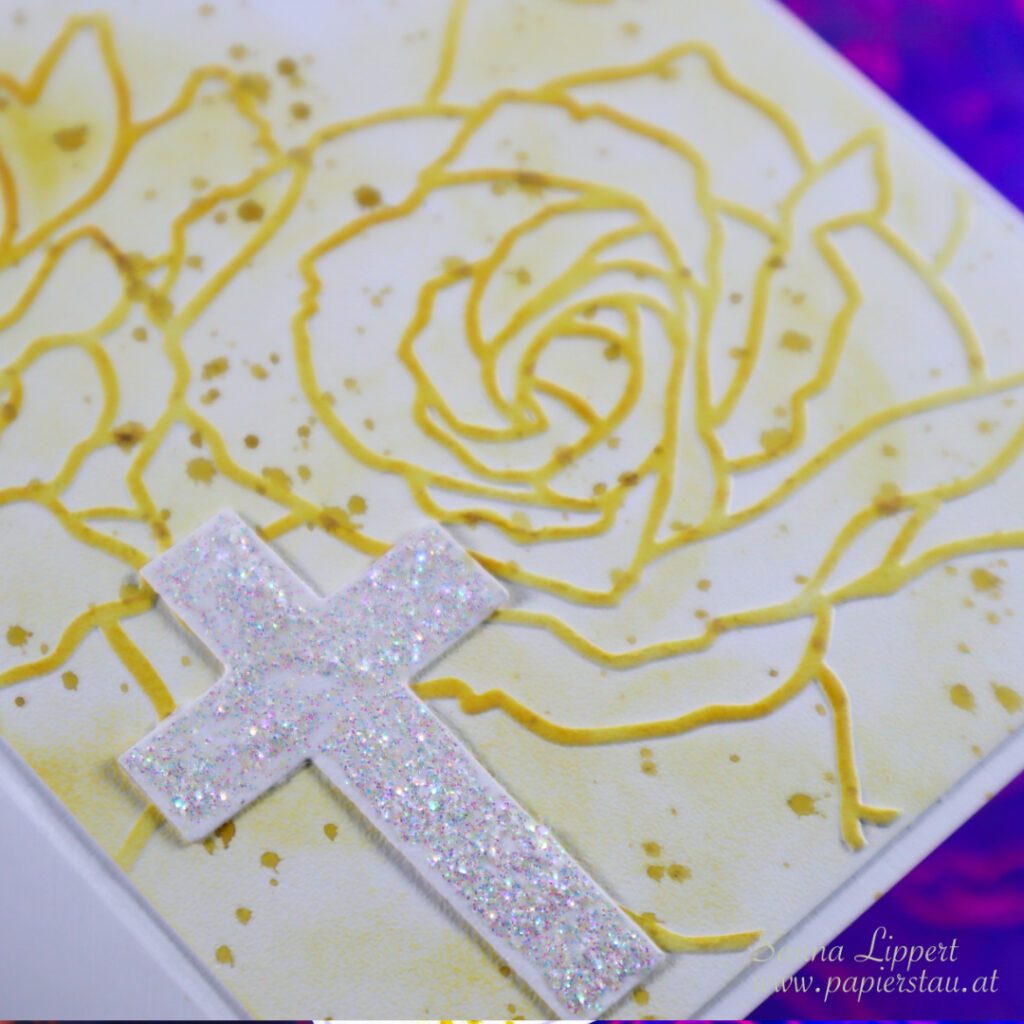
I used a Sizzix embossing folder on the background with white cardstock and then added some yellow Distress Ink with a blending brush on top. After that I added a layer of Glimmer Mist droplets in yellow.
The white dots on top right corner are Nuvo Drops. The sentiment is written with my old typewriter.
The cross is a very old Sizzix die cut die. Die cut with white cardstock and has a layer of Stickles on top. I hope the recipient loved her card.
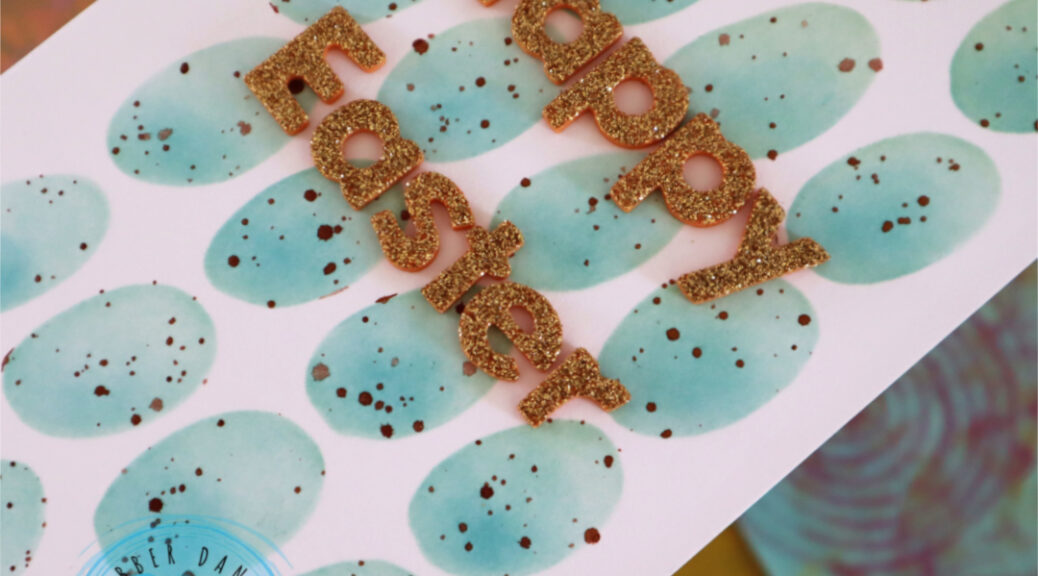
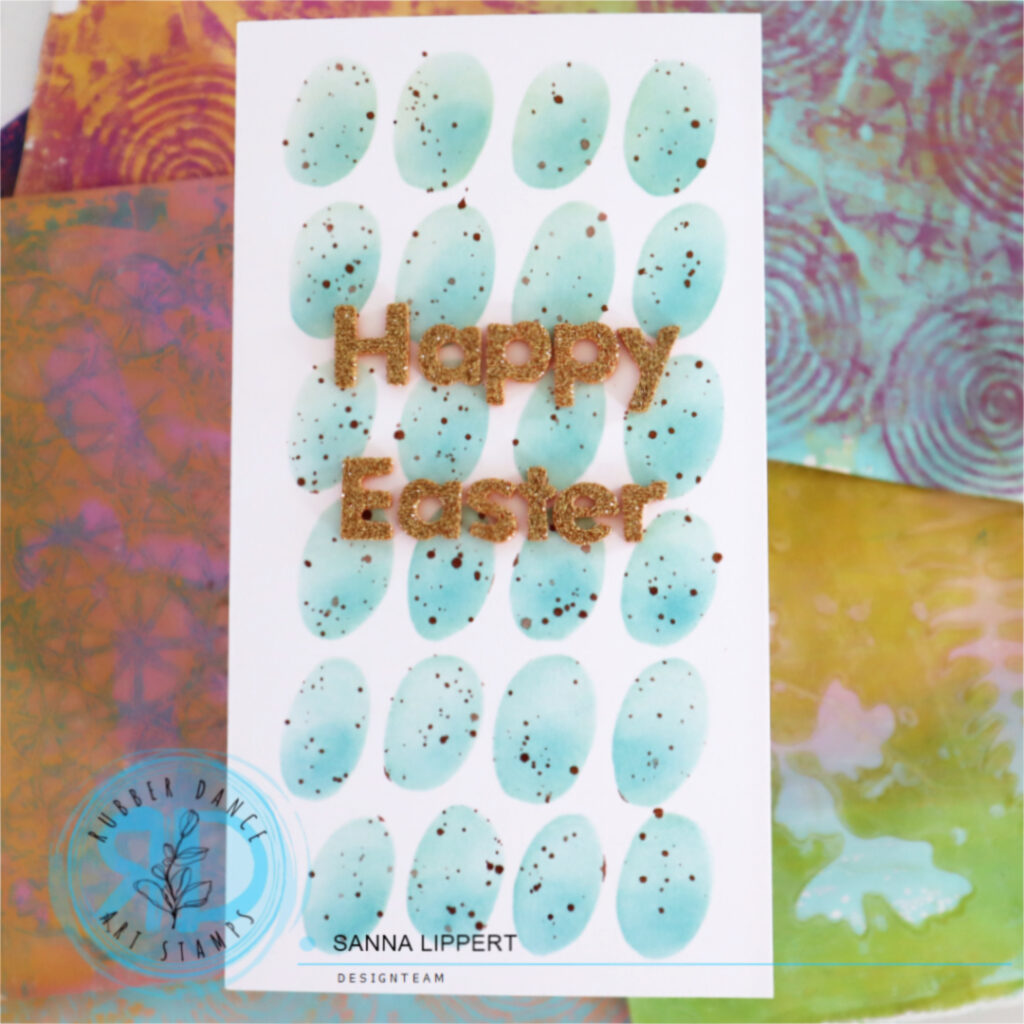
Hello everyone, I am up over at the Rubber Dance blog today again. This time with a really simple, but awesome, stenciled Easter card tutorial. You will need the Big Ovals stencil (one of my faves!), two tones of blue Distress Inks, a brown spray ink of some sort, washi tape and a white card base.
This was the kind of idea that when it hit me, I just immediately had to run to my craft room and try it out. And it worked out so great! I have this simple stenciled egg background for my Easter card and it is so easy to make.
First you need a slimline card base in white. Next take two tones of blue Distress Inks (I used tumbled glass and broken china). Start by adhering the card base with washi tape onto your working surface, next adhere the stencil on top and cover all unnecessary circle areas with washi too.
Now apply the lighter blue tone with a blending brush, then go over the lower circle areas with a darker blue tone. After that leave the stencil as is and splatter brown spray ink thru the stencil. Let shortly dry and carefully remove the stencil and the washi tape. Decorate with a “Happy Easter” sentiment, created with golden glitter alpha stickers. How´s that for a fast and easy-to-do Easter card idea with “Robins eggs!? Here is a video for you to watch – hope you like this idea.
You could also make yellow, light pink or light brown eggs. Whatever colors you prefer. I am going to make a few more in different colors for sure.
Hello, it´s my turn to share a project over at the Rubber Dance blog and I am up with a fodder bouquet card set. I have made piles and piles of fodder and gelli prints recently and what for? For projects like this. I used the Mix It Up 5, Mixed Sentiments 1, Pencil Marks 8 and the Doodle Flowers 2 stamp set with the Wheels stencil on this project.
I love making leaf and flower fodder. Creating random colored backgrounds and stamping onto them and only when fussy cutting the images, to discover the beauty of every single piece on it´s own, is something very exciting.
So for these cards I used some recently made flower and butterfly fodder as well as gelli printed backgrounds. Have you tried making some yourself? It is a very inspiring process, so I truly recommend, you try it out.
Here is a video on how I built the cards together:
And I´ve prepared 2 different short videos on some fodder making, just for fun:
I hope you enjoy this card idea and the videos and that they inspire you to play with Rubber Dance products!! Have fun! xxx, Sanna
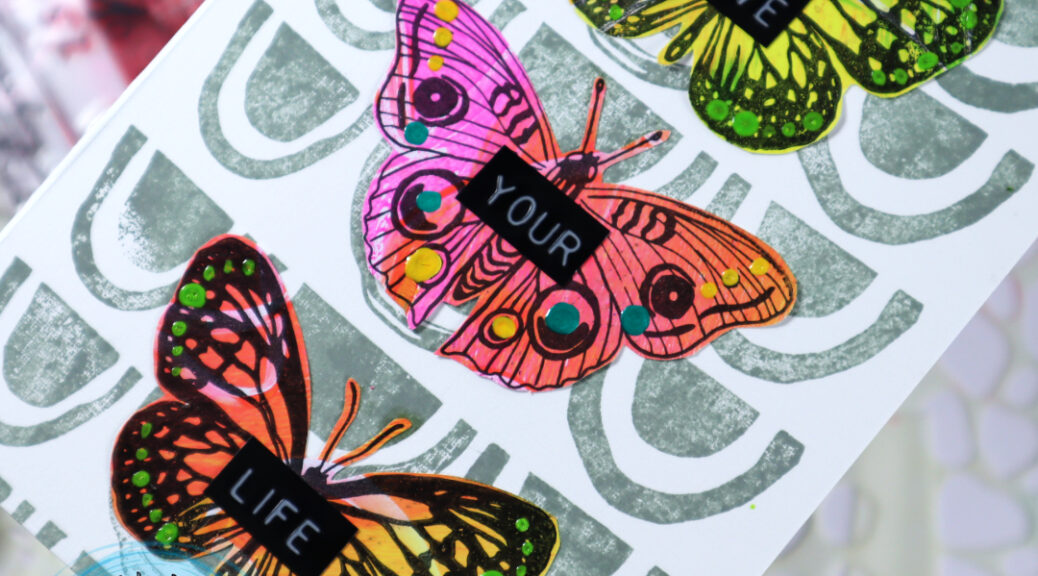
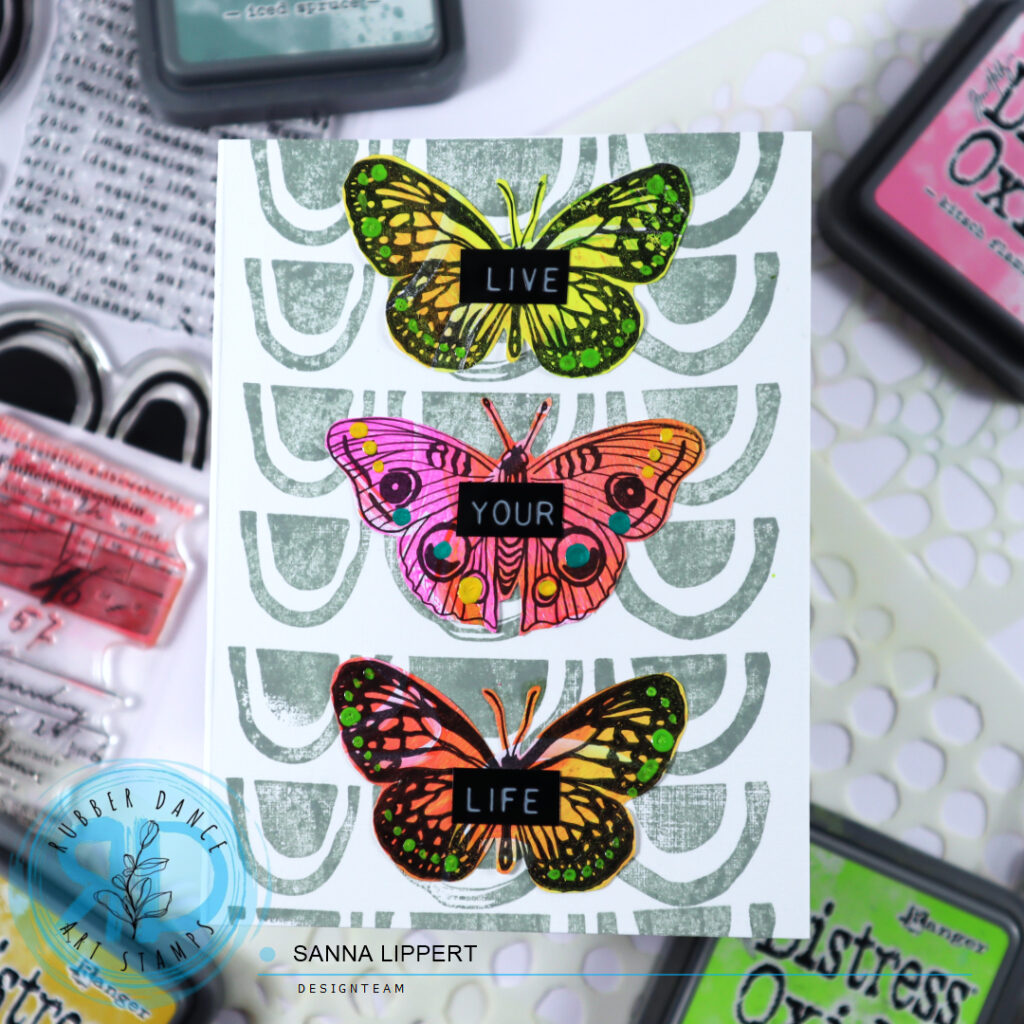
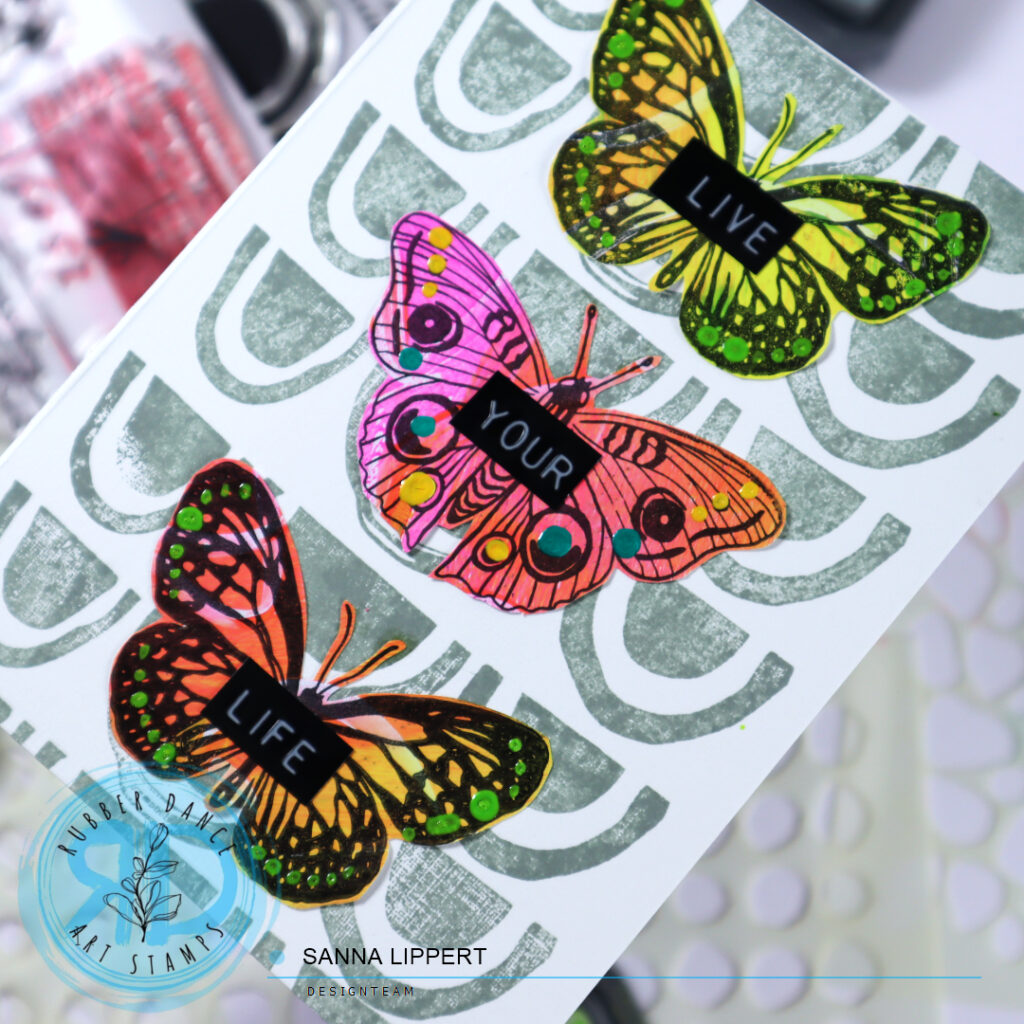
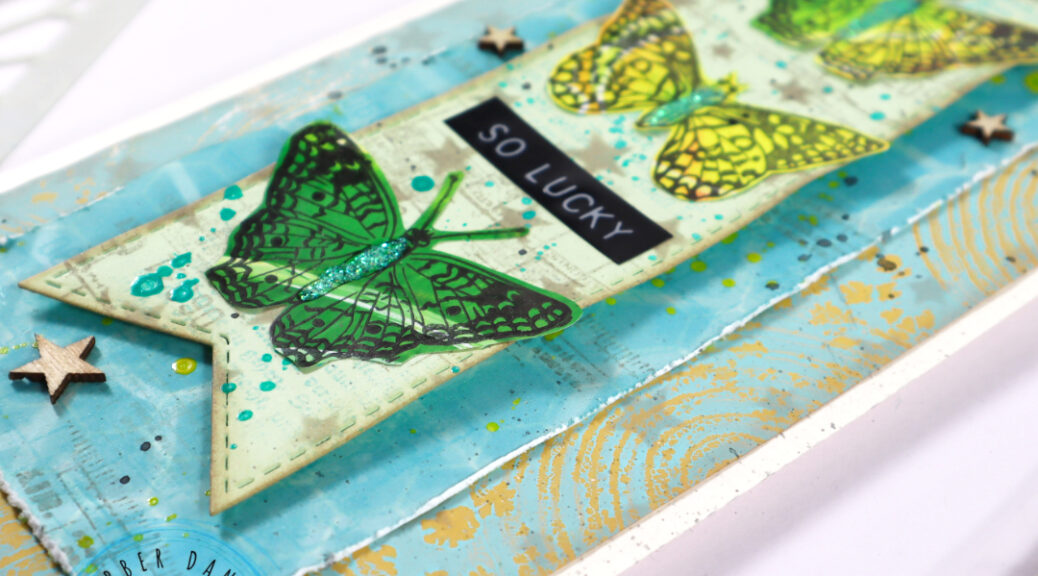
Happy Wednesday! Here is another card share, again created using Rubber Dance stamps. For this one I used the Butterflies and Moths fodder and the Mix It Up 4 stamp set.
I stamped the background pattern with Iced Spruce Distress Oxide ink and the Mix It Up 4 stamp set repeatedly. After that I grabbed the butterfly fodder I had previously created using a gelli printed paper and with black ink stamped and fussy cut butterflies.
You can find the how-to reel for the butterfly fodder on my Instagram under reels.
I adhered the butterflies directly onto the stamped card base, then added a Tim Holtz label sentiment and some Dina Wakley Gloss Spray droplets to the butterfly wings.
Hope this card gives you some spring “feelz”!!! Happy crafting, xxx, Sanna
Hello, it´s my turn again over at the Rubber Dance blog today and I am up sharing another take on residue gelli prints turned into card focal points. Like on my last post, I created another set of die cut focal points out of residue gelli printing papers. This time using different color combinations and stenciling the card backgrounds, instead of stamping.
I first die cut the residue gelli printing paper with die cut dies into different forms and sizes (banners, circles and squares). I then added some stamping with black stamp ink and some heat embossed details with red embossing ink and the Pencil Marks 8 stamp set.
After that I took the Ornament 1 stencil and added brown Distress Oxide Ink thru it onto the die cut pieces. Then I took the Mix It Up 4 stamp set and added some stamping with blue StazOn ink here and there onto the background.
Next I took out some premade Sketchy Leaves 5 stencil fodder and adhered them onto the die cut pieces. On top of those I added some yarn and a fodder butterfly, created with a gel plate and Butterflies and Moths stamp set.
I also wanted to add a stamped word onto the focal point elements and took out the Mixed Sentiments 1 stamp set. I just used one word from each sentiment, instead of the whole quote.
Instead of adding a stamped background, I chose to stencil Distress Oxide Inks thru the Ornament 1, Dotted 1 and Organic 4 stencils onto the card bases and then adhered the die cut pieces with fodder onto the cards.
I also wanted to add a stamped sentiment to every card, so I used an older German birthday sentiment stamp set from my own stash for stamping them.
After finishing the cards, I added some Gloss Spray droplets to the butterflies wings here and there for additional color and interest.
Here is a video on how I created the Sketchy Leaves 5 stencil fodder that I used on some of the focal point elements:
And here is a short video on the focal point elements and how I put the cards together:
I hope I could inspire you to play with your Rubber Dance stamps and stencils and create colorful cards.
Hello, it´s my turn for a project share over at Rubber Dance blog today. I am up with a fun card project, created using residue gelli printing paper that I turned into card focal points. For this project I used the Dotted 1 and Organic 4 stencils and Mix It Up 4 as well as Butterflies and Moths stamp sets.
When gelli printing, I always take a sheet or two of paper to brayer the residue paint and/or lift paint from the gel plate on to. So sometimes these paper sheets are full of paint layers and I figured, I could upcycle them and make something fun of them.
I first took some die cut dies out and die cut the paper sheets into smaller pieces (circles, banners etc.). Next I took out the Dotted 1 and Organic 4 stencils and added some white and golden heat embossing powder areas to the die cut papers. Next I mixed white modeling paste with magenta acrylic paint together and applied the paste thru the Dotted 1 stencil onto the die cut pieces.
After that I took the Mix It Up 4 stamp set and added stamped details with black and light grey stamping ink to the pieces. After that ink and tinted modeling paste was dry, I added some Gloss Spray details in yellow, turquoise and fuchsia on top.
Now all I needed to do, was to stamp some details to the white card bases with Distress Oxide Inks and the Mix It Up 4 stamp set. I chose lighter colors as a contrast to the bold focal point pieces here. I then adhered the die cut focal point pieces with 3D foam tape onto the card bases, added some Butterflies and Moths fodder to go with them and chose a sticker sentiment to each card. For finishing touches I added a few Gloss Spray droplets alongside the card sentiments for additional interest.
Here is a video on the creating process for you to watch. I hope you get inspired by it!
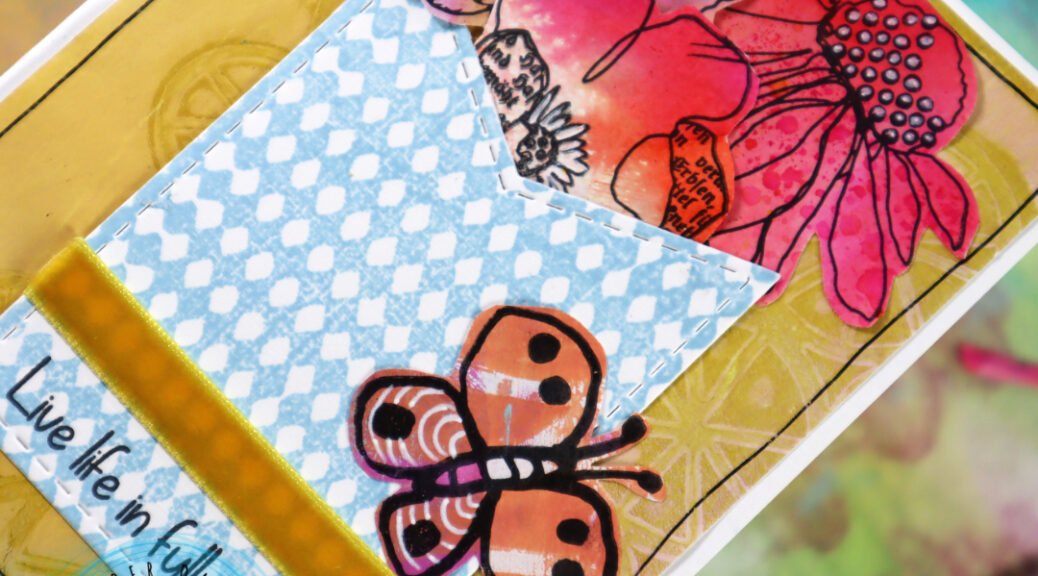
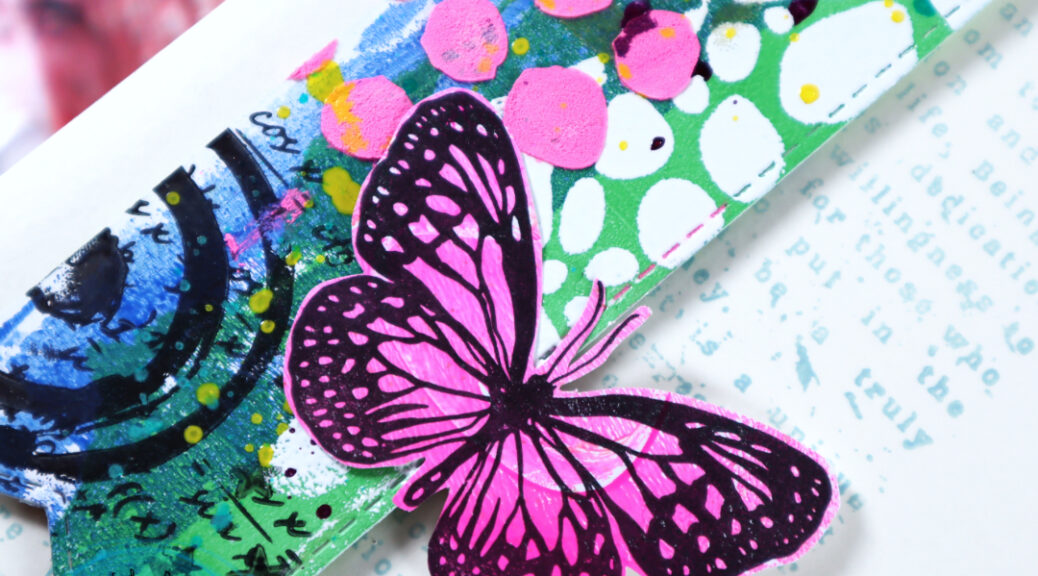
Hello everyone, it´s again my turn to share a project over at Rubber Dance blog today and I am up with a video tutorial to a heavily stenciled and lightly layered butterfly card. For this card I used the Stars 1 and Lattice stencils as well as the Mix It Up 5 stamp set. I also used the Butterflies and Moths fodder I had created for my last share.
I used a gelli printed background paper on the card. I created that one using the Mix It Up 4 stamp set with my gel plate. You can find videos around gelli prints with Rubber Dance stencils and stamps here.
I wanted to keep the colors on the card very light and matching. I therefore added stenciling with pumice stone & tumbled glas tones. They go very well with the background and don´t create a contrast too strong.
After stenciling, I added some stamping in same colors to the papers to create more interest and details. The edges of the paper are distressed and inked and the die cut flag is adhered to the paper with 3D foam for more depth.
I´ve also used Gloss Sprays to add splatters to the paper layers. I am a big fan of splatters. I think they add a fun element to projects. For finishing touches I added the gelli printed and stamped butterfly fodder (made using the Butterflies and Moths stamp set), a Tim Holtz sentiment sticker and some very old wood veneer stars. The black splatters are done with a wet brush and a watercolor crayon.
For more info, here is a full start-to-finish video for your to watch:
I also can not resist a little bit of glitter here and there sometimes. So the bodies of the butterflies got a little coat of Stickles in the end. I hope you like the idea and try it out yourself! Happy crafting, xx, Sanna
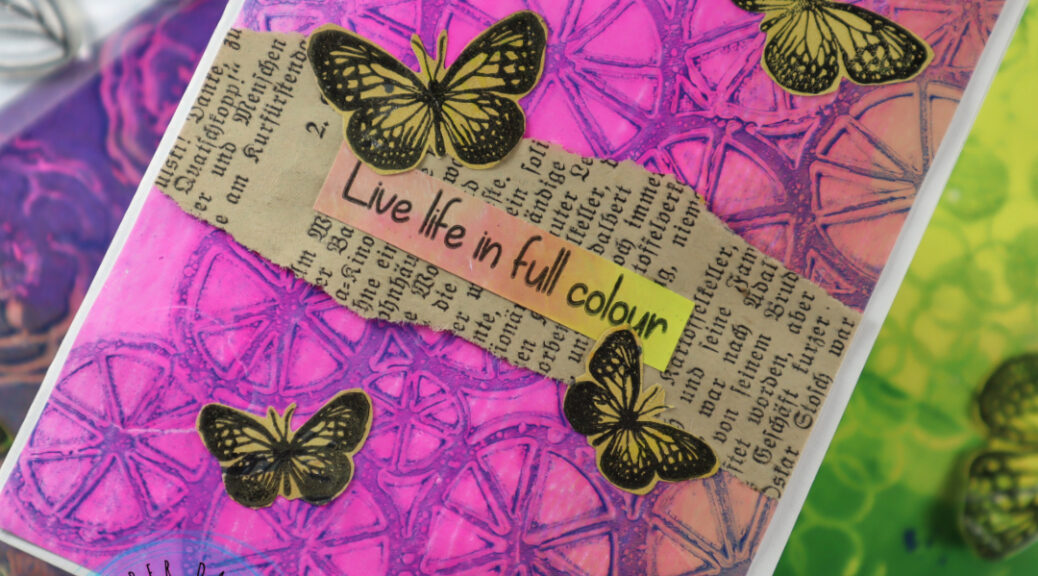
For these cards I first created gelli printed background papers with Wheels and Leaves 2 stencils and acrylic paints. Next I took a more plaint gelli printed paper and stamped the Butterflies and Moths stamp images with black ink onto it and fussy cut the images. I then used these images as centerpiece on the cards. The sentiments on the cards are made with the Mixed Sentiments #1 stamp set.
For this card I used strips of the gelli printed paper with old book page strips.
This card has a full gelli printed Leaves 2 image as background and plenty of butterfly fodder as a centerpiece.
On this card I used a piece of a gelli print with a Wheels stencil image.
For the last card I used another piece of a Wheels gelli print image and added a longer sentiment to accompany the butterfly fodder.
Here is a video how I created the gelli prints and the on the end of the video you can see the piece I used for the butterfly fodder:
I hope you get inspired by this idea. I wanted to use bold colors on these prints, but if that is not your cup of tea, just change the paint colors to something else and have fun printing!!
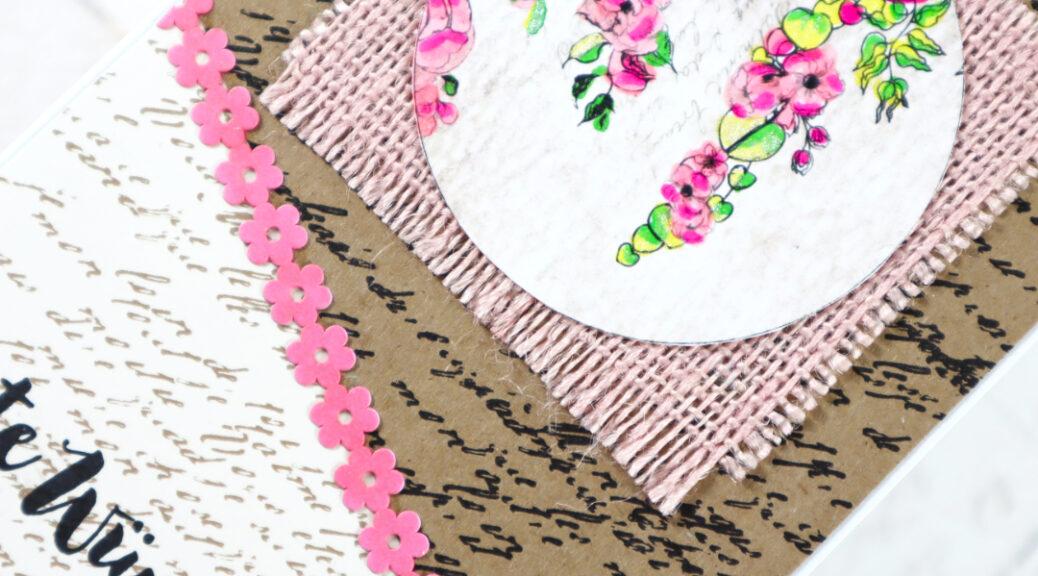
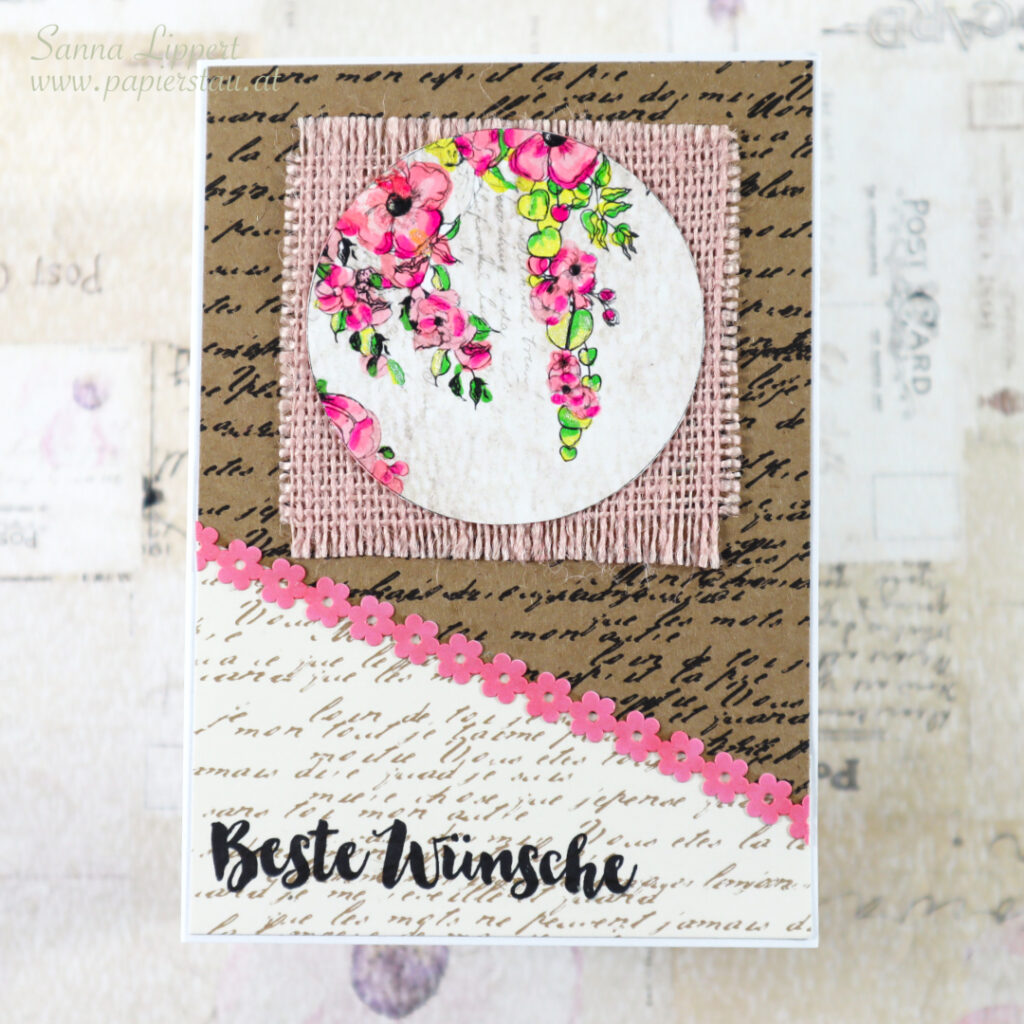
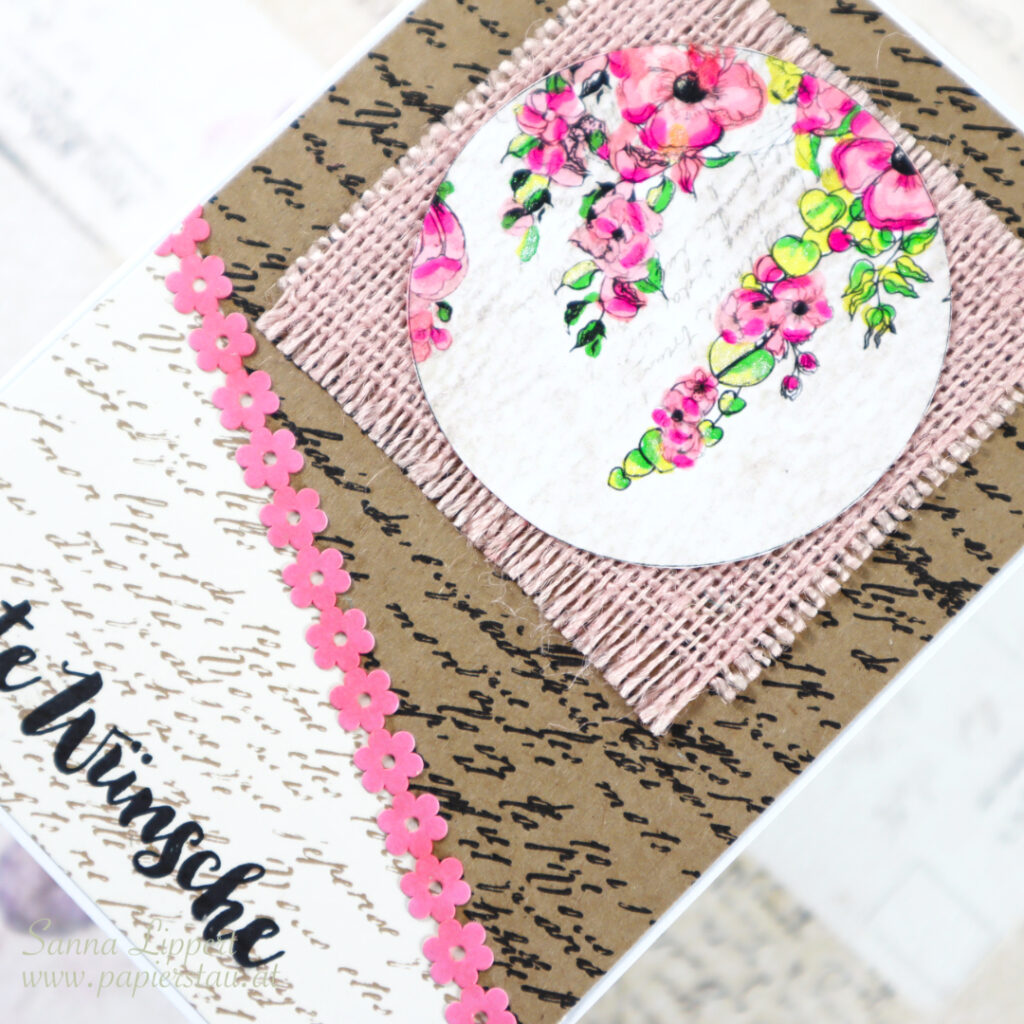
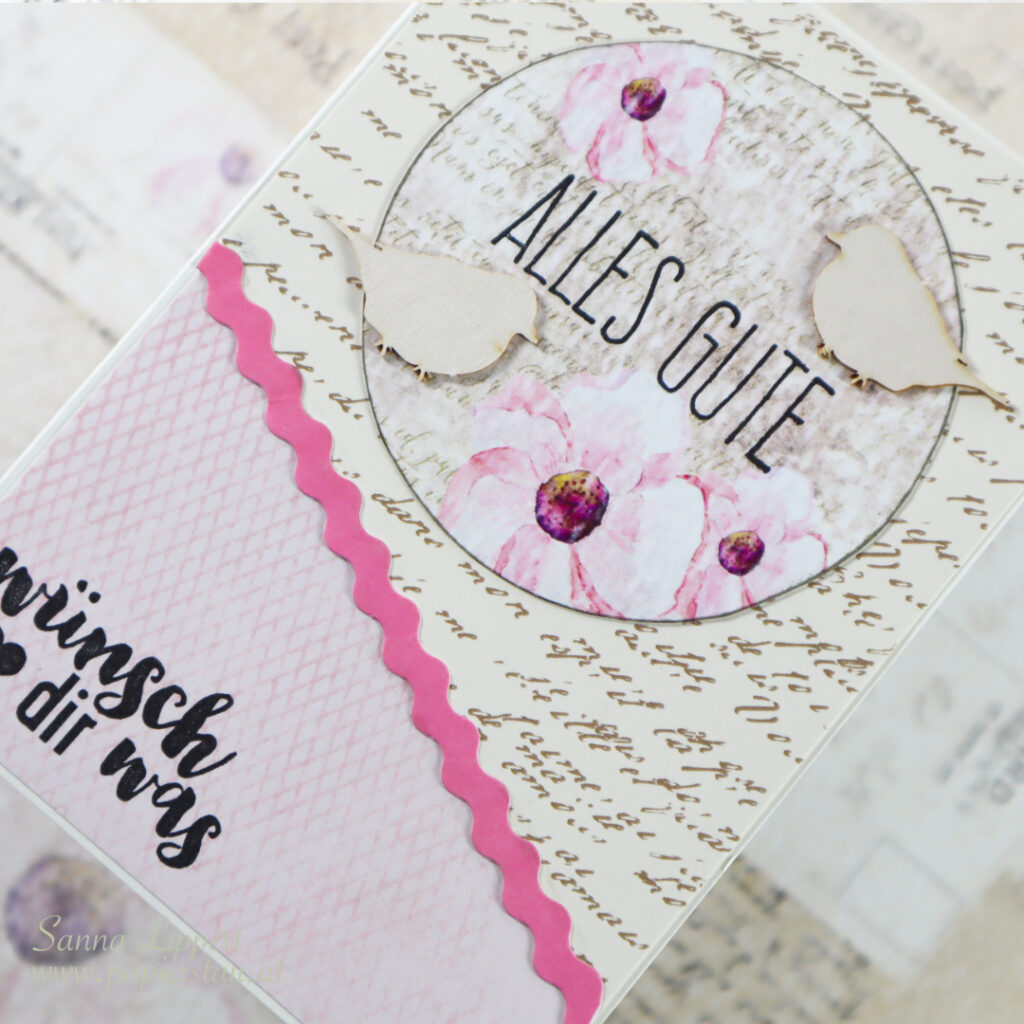
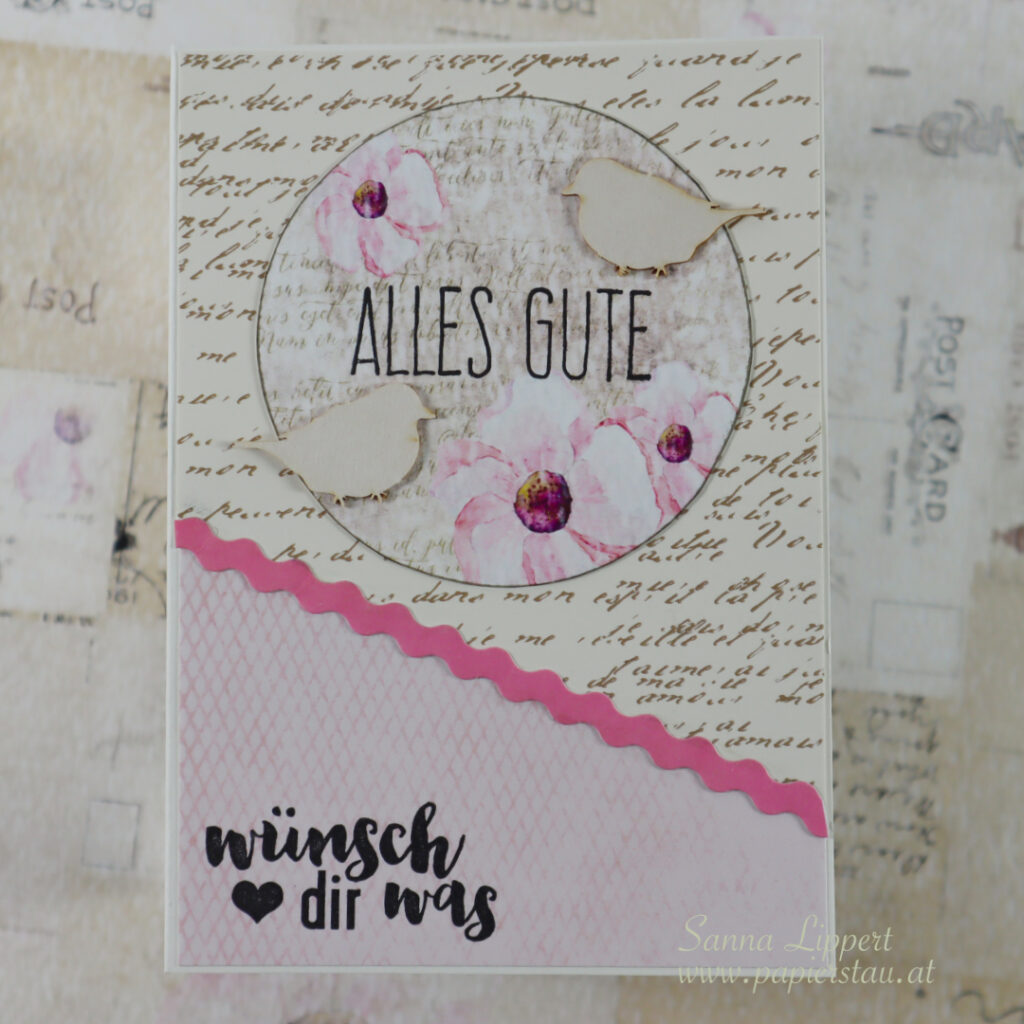
Hello, it´s Sanna here again. Here is a set of birthday cards I created using some of my older stash products. Can you guess what is the oldest product on these cards?
I still have plenty of Canvas Corp Brands products in my stash and while I was cleaning my craft area, I stumbled upon these papers. Here is card number one – everything else, except for the stamp and the paper flower “ribbon” ist by them.
Also the second card has the same materials on it. On the first one I colored the flowers with Edding glitter brush pens and some Nuvo alcohol markes in pink tones.
The stamps are by Klartext and the ribbon is (I believe) by American Crafts and it´s definitely the oldest of all product used here. I bought them at least 15 years ago (if not longer ago) and I still have some left. So I am happy to have found a place for them on these cards.
So, as a crafter, how much product do you have in your studio? I bet lots. We all hoard them, right? Well, I am trying to change that – one paper (or paper ribbon) at a time and use them. I mean, I bought them once, because I like them, so I should use them. If you have project ideas for me to older product, let me know in the comments!!!
Happy crafting, xxx, Sanna
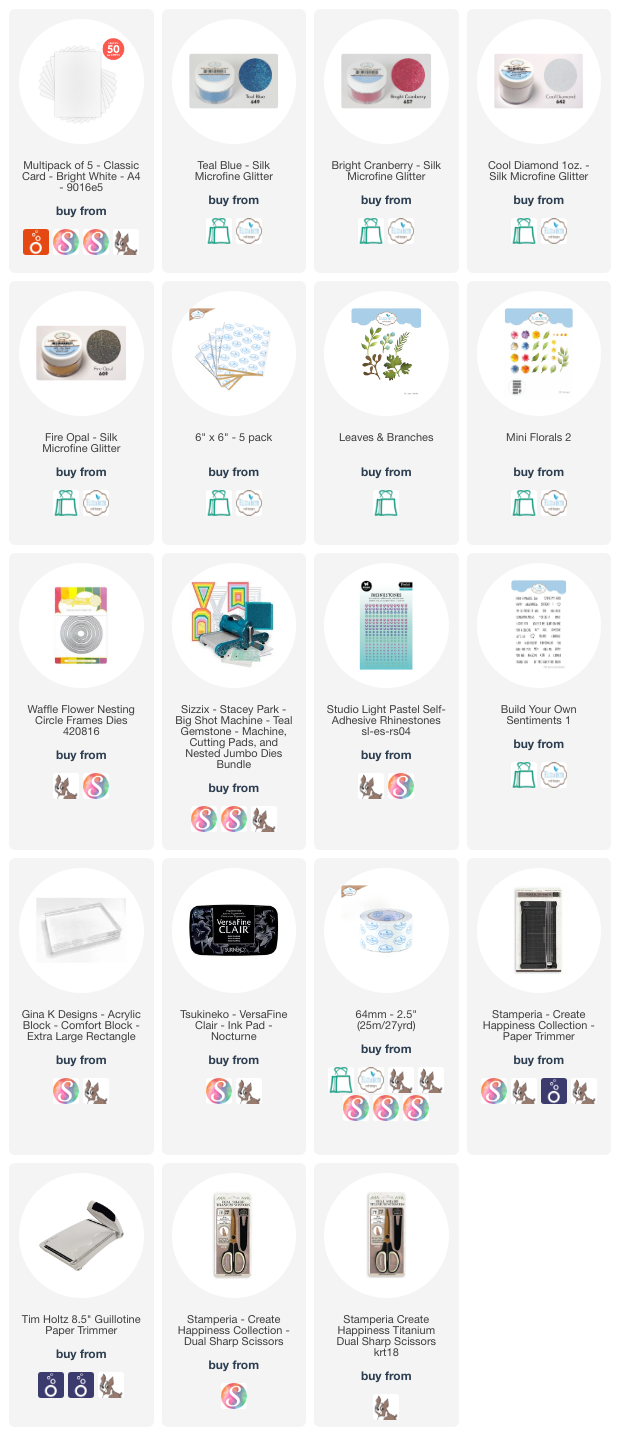
Supplies (with alternative suggestions for similar product,too):
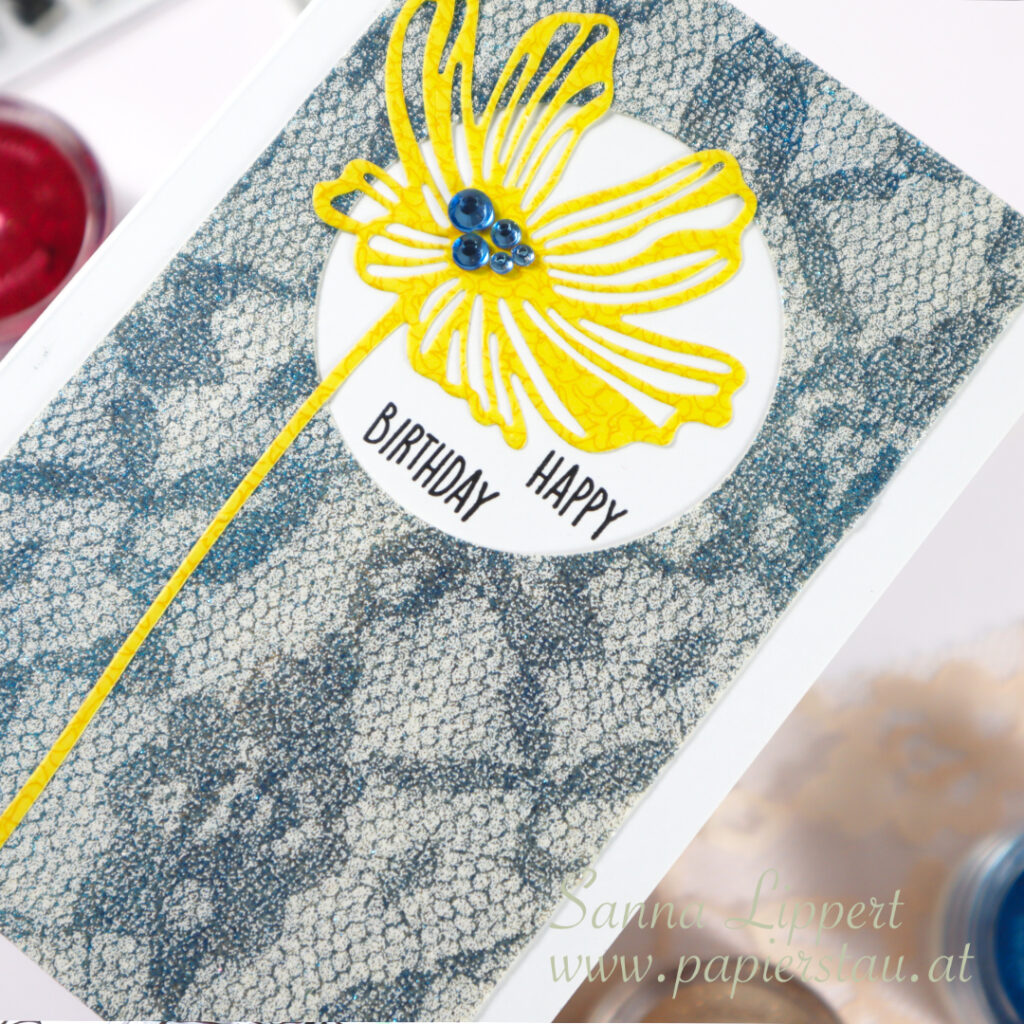
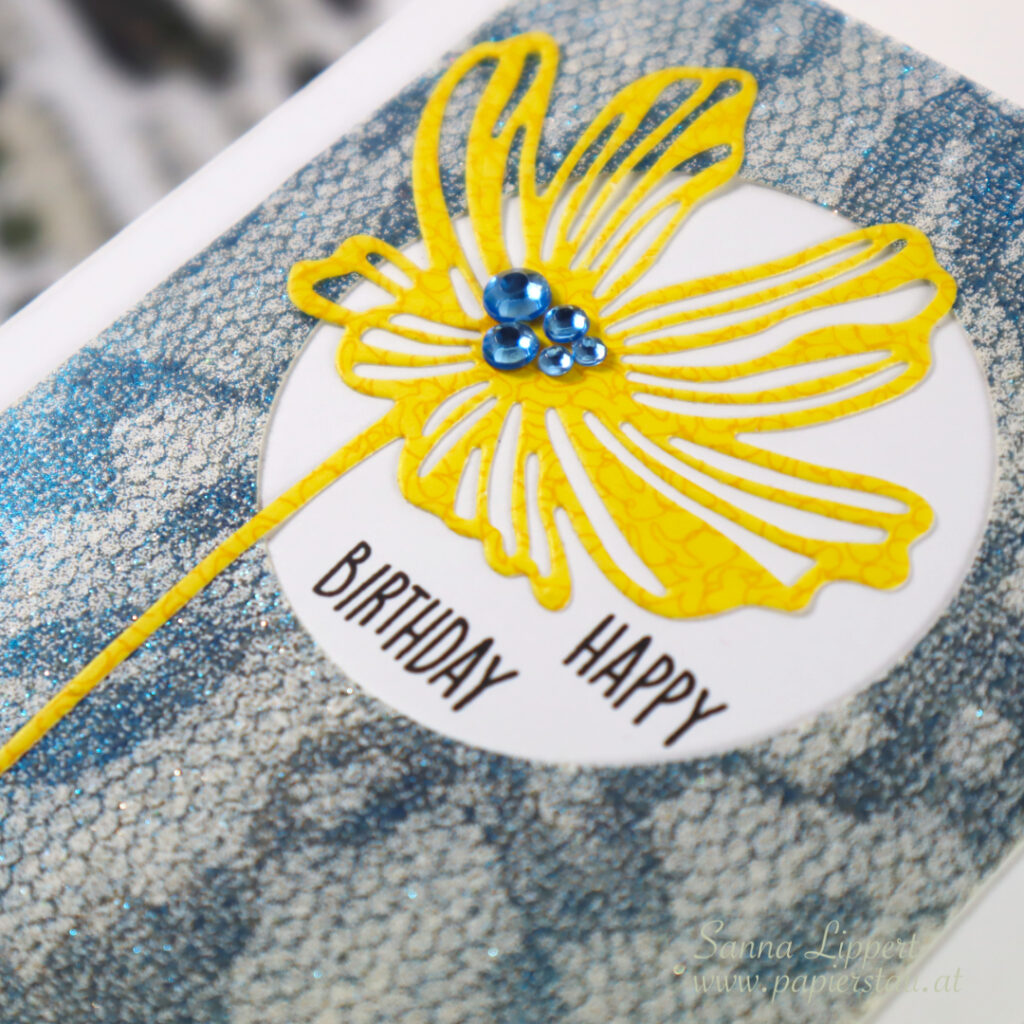
Hello, I don´t know what it is with January, but I always get the urge to play and craft alot in January. Thus, today I am sharing something I created yesterday evening :). A set of sparkly birthday cards:
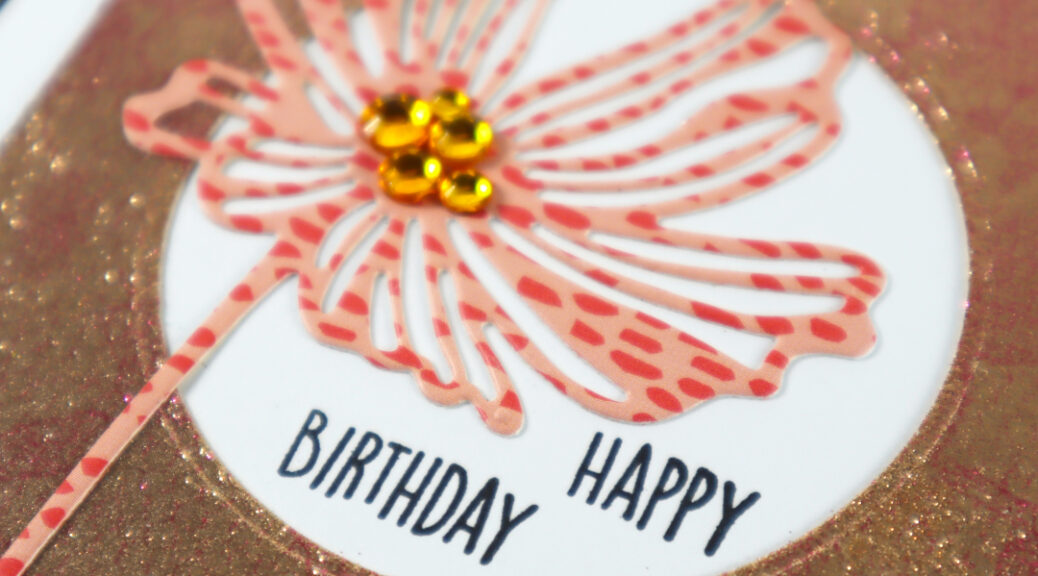
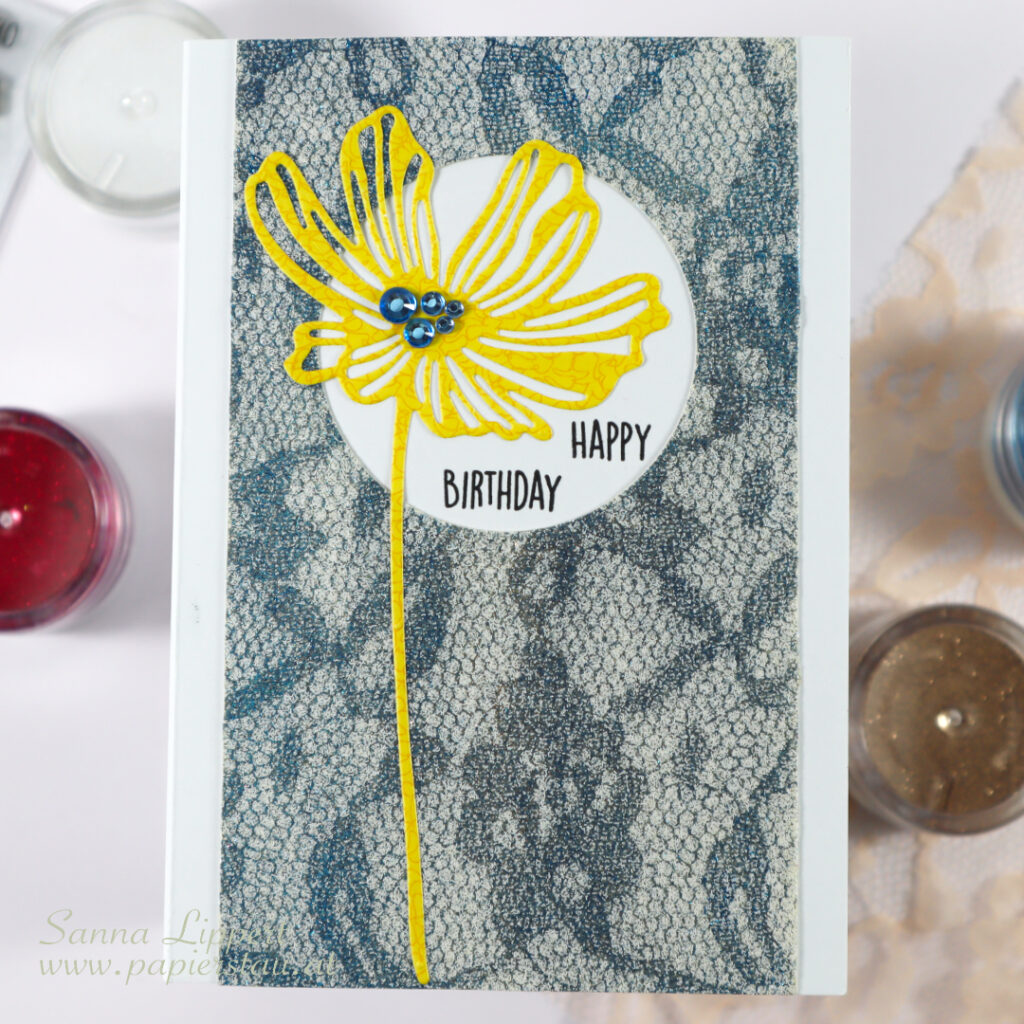
I created these using my Elizabeth Craft Designs stash – silk microfine glitter, stamps and die cut dies. Only the rhinestones are from another manufacturer (my very old stash).
I started with a piece of lace and golden and pink glitter, but since I hadn´t done this for a while, I forgot that a stronger contrast in color makes the pattern more visible, and ended up with a shiny, sparkly golden background with hardly any noticeable pattern. Thus, the second one in blue and white :).
As you can see here. Hardly any pattern to be seen. Oh well, I still kept the paper, because of this beautiful sparkle. There is very little going on else on the cards, just a die cut flower and a stamped sentiment.
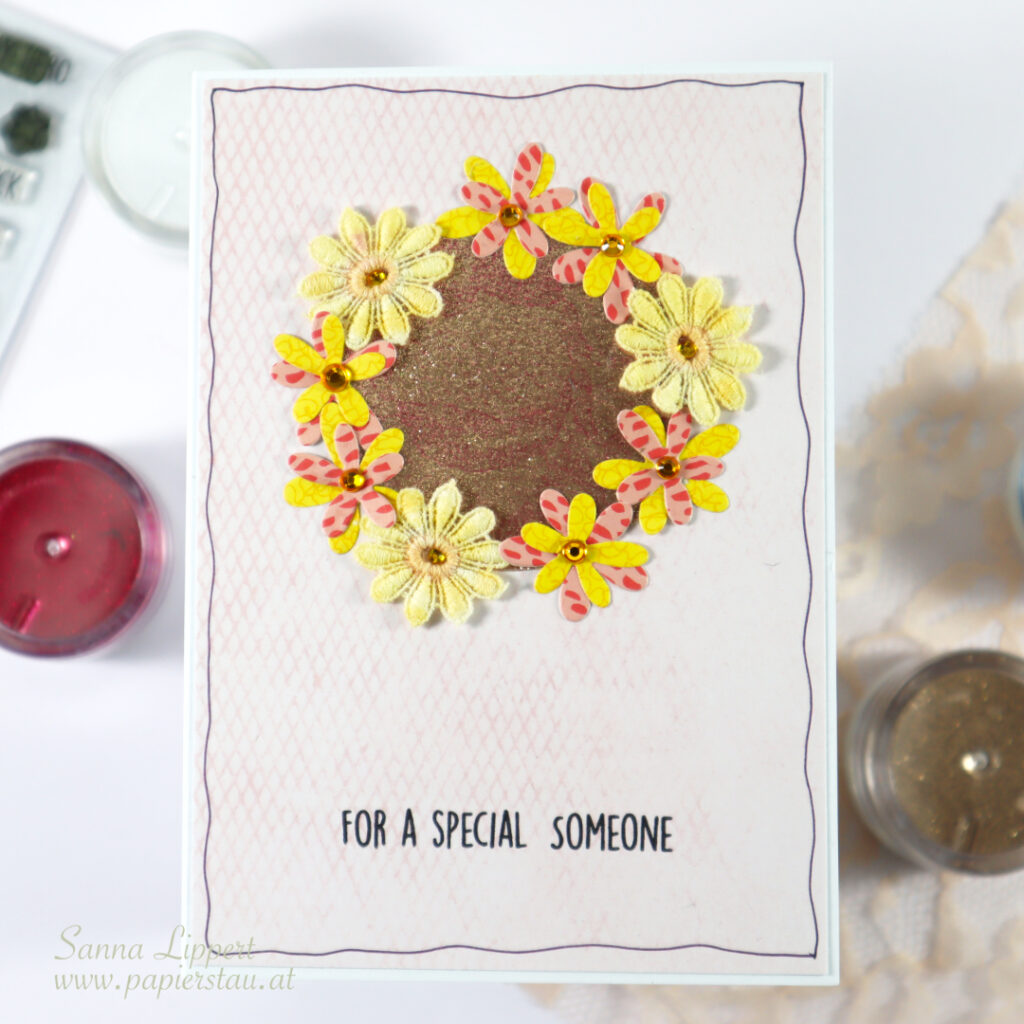
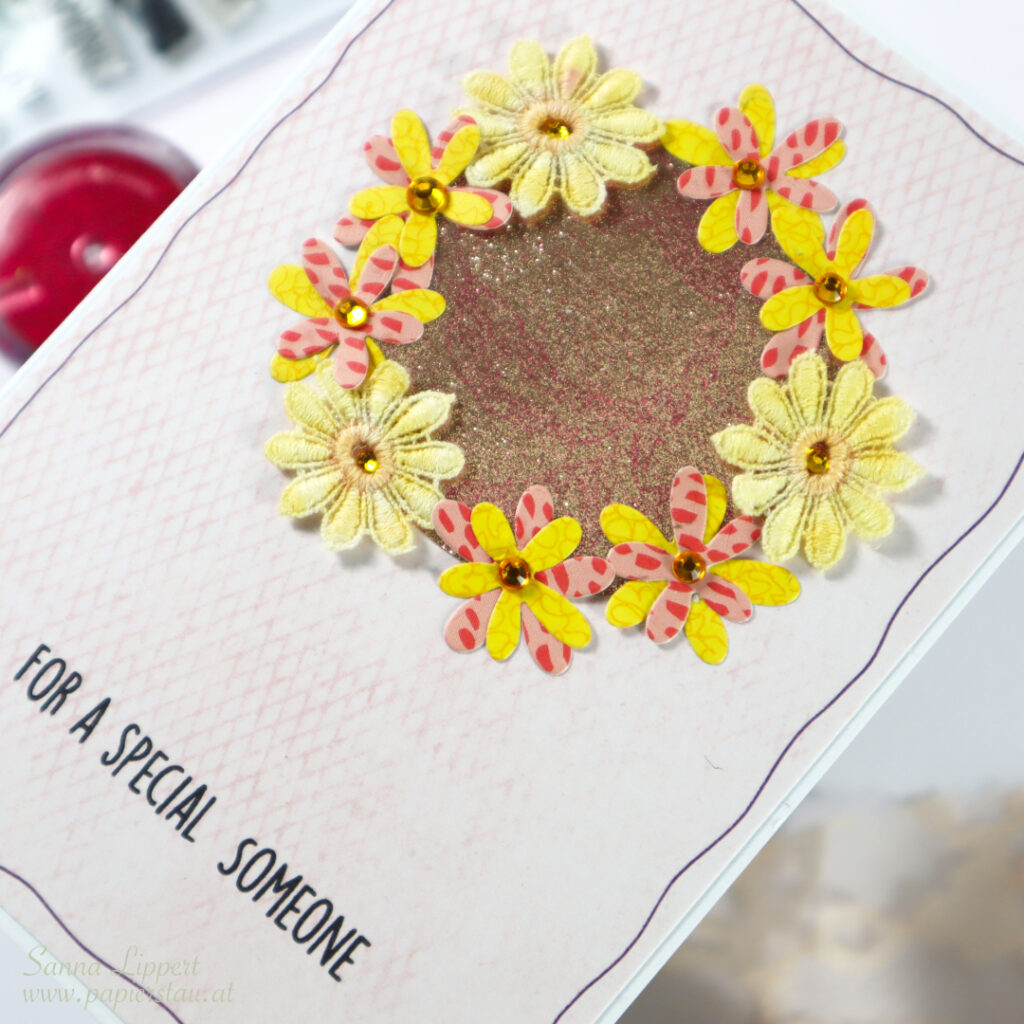
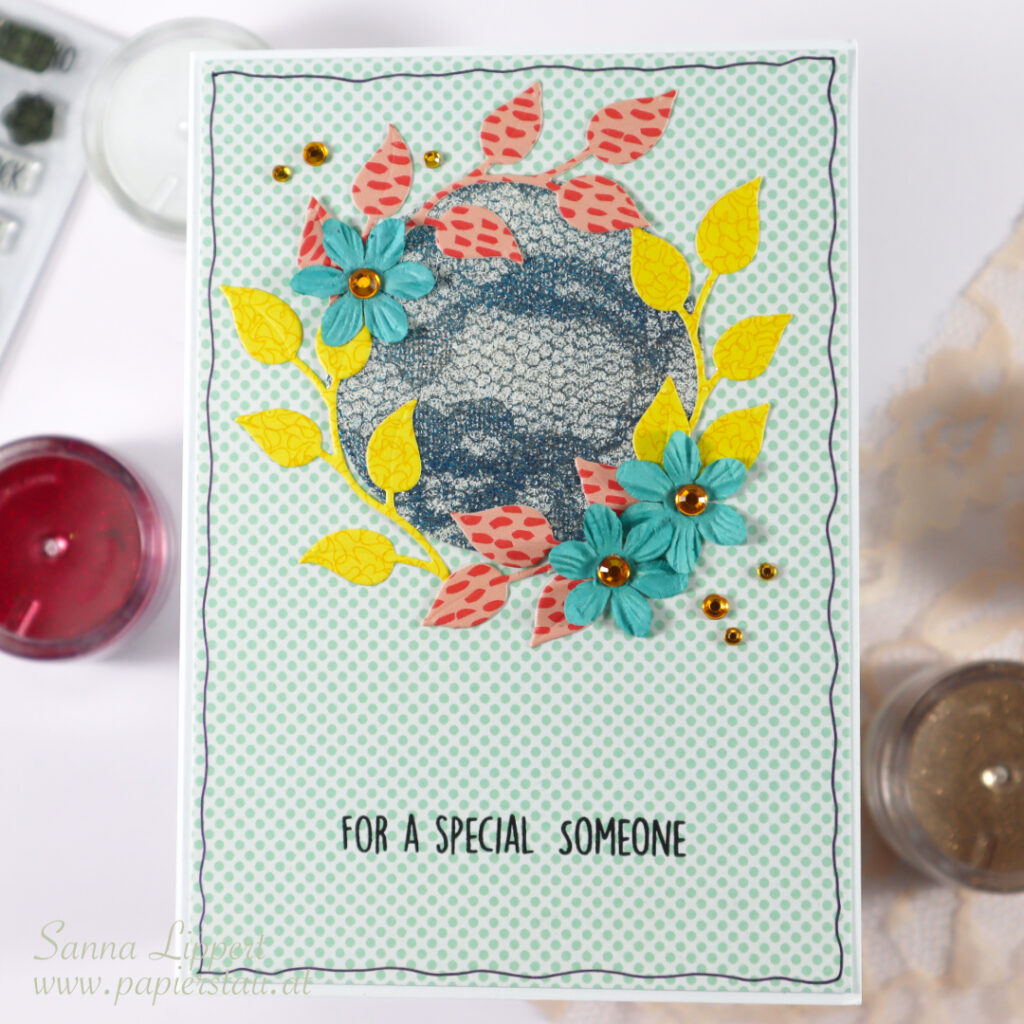
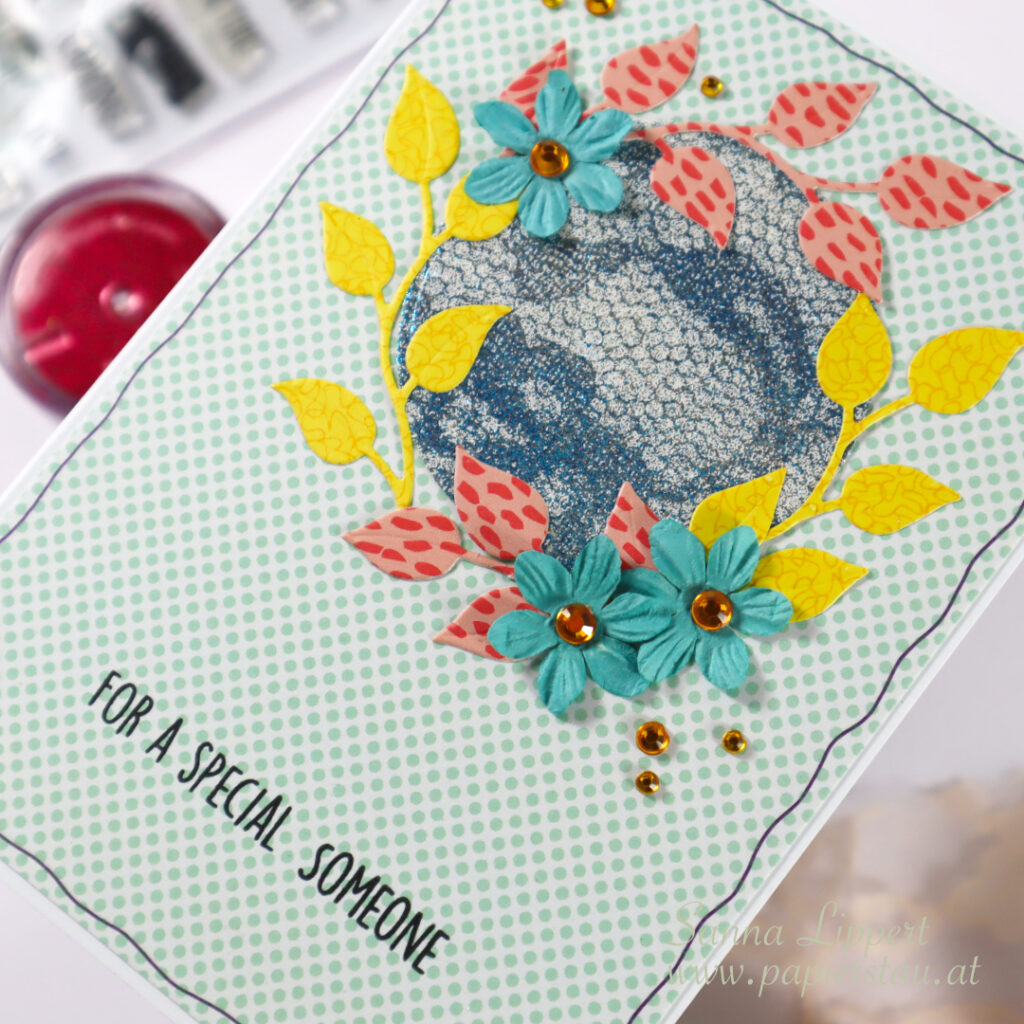
I had originally planned on using the postcard paper as is, but ended up die cutting a circle in the center and going on from there. So I had leftover pieces which I then used for these two “residue” cards. I used up all the glitter bits and the patterned paper pieces left from die cutting the flowers for the first two cards.
I created a cluster around the leftover glitter circles from die cut leaves and flowers and adhered everything on lightly patterned papers. I then embellished with rhinestones again and stamped a sentiment.
I made a little start-to-finish video, too, while I was at it – hope you like it:
Thanks for stopping by!! It was fun to go back to this technique. I haven´t done it in a while and still have plenty of lovely glitter here, so I should probably do this more often :). Have a great Sunday and happy crafting! xxx, Sanna
Supplies (also added alternatives to my older die cut dies):