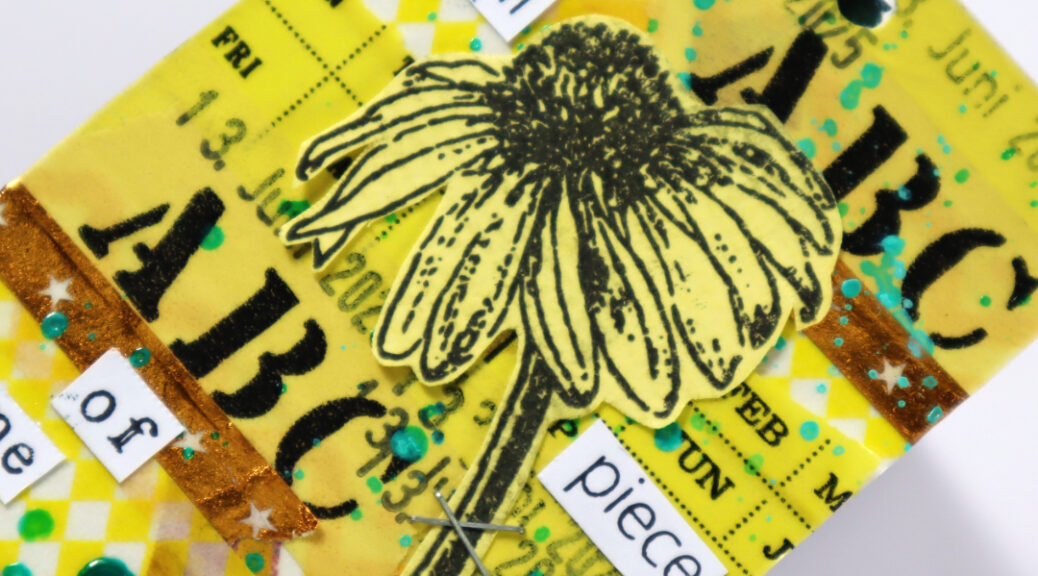
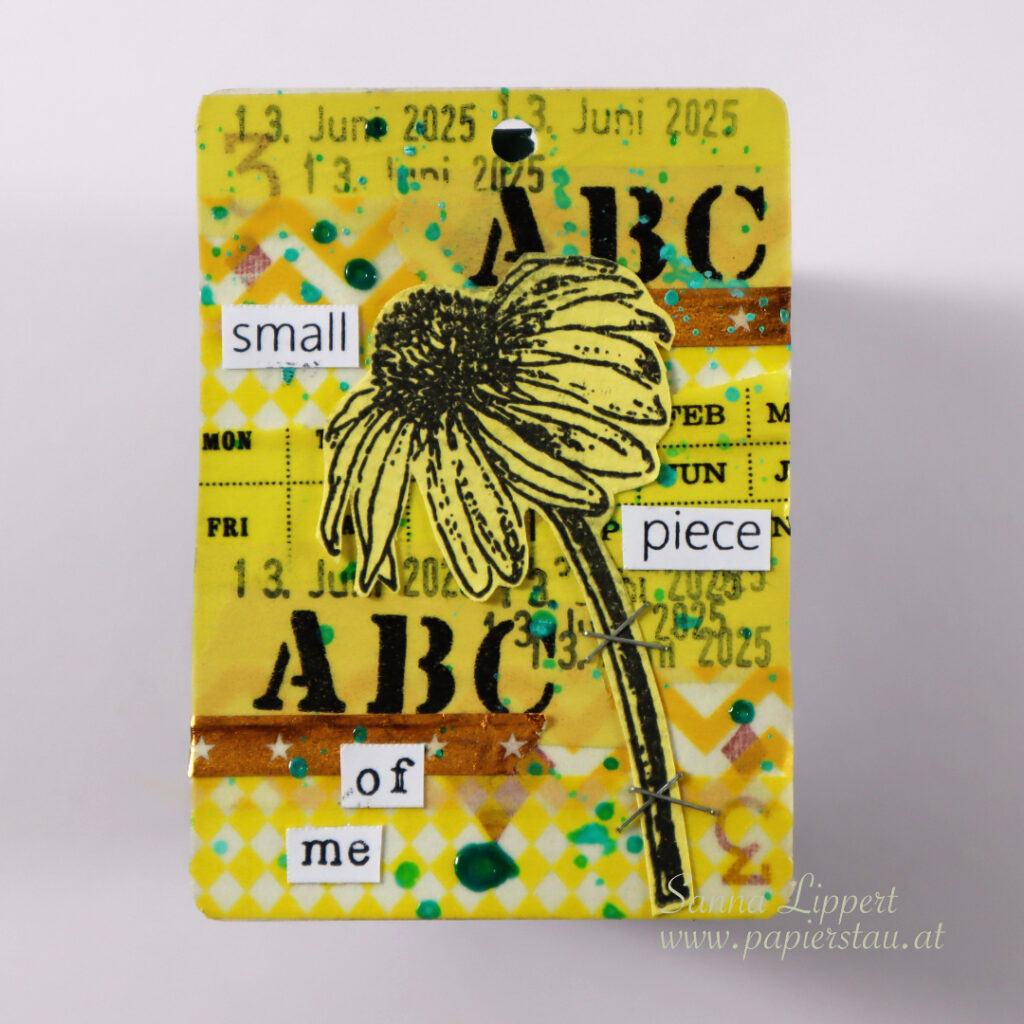
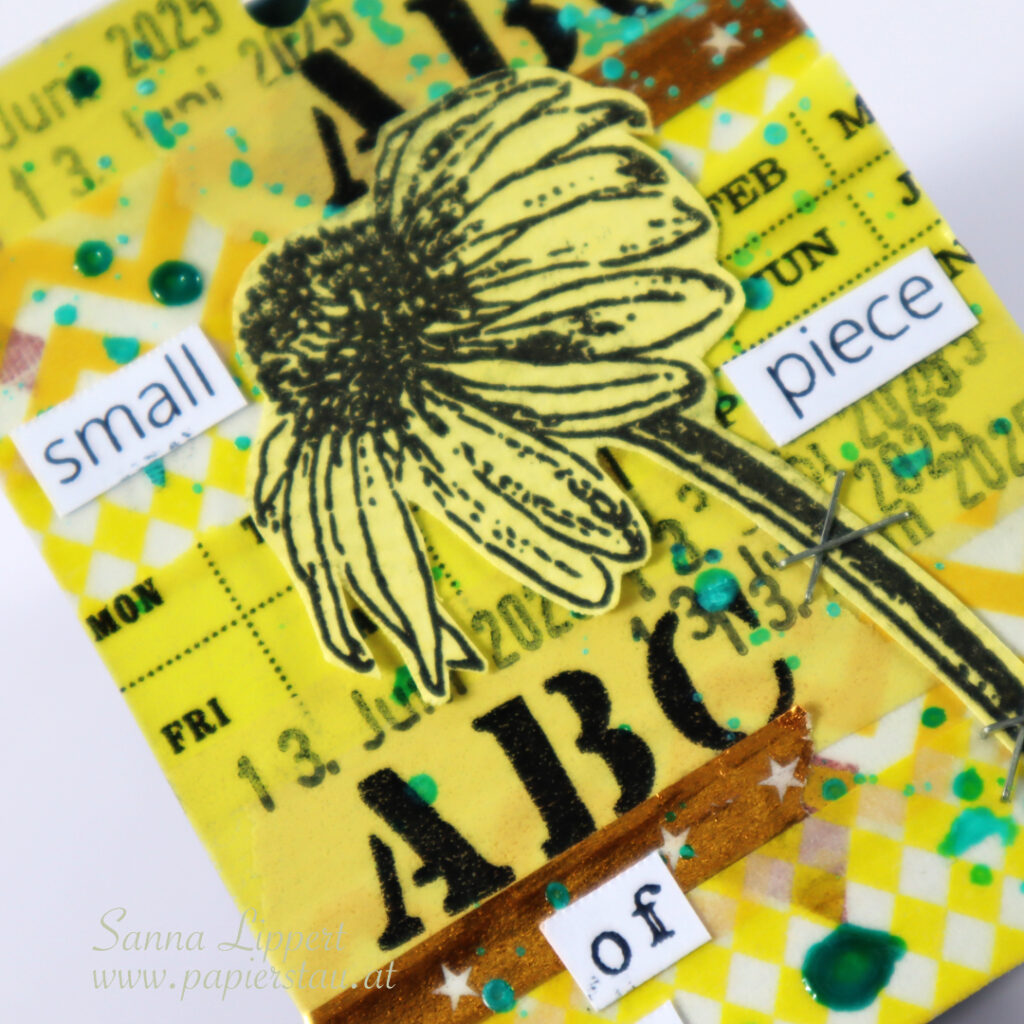
Hello and happy Thursday! Here is my take for the ShanoukiArt 2025 “Full Deck Challenge” number 23: repeat. I used yellow washi tapes in repeated order on the background. I repeated the color as well as the order the washi was added.
My constant is the date stamp and my carry over item from last time is the attacher. I´ve added turquoise Gloss Spray and stamped words and a flower (stamps used are by Rubber Dance).
And here is the start-to-finish video:
See you next week with another FDC take! Happy crafting, xxx, Sanna
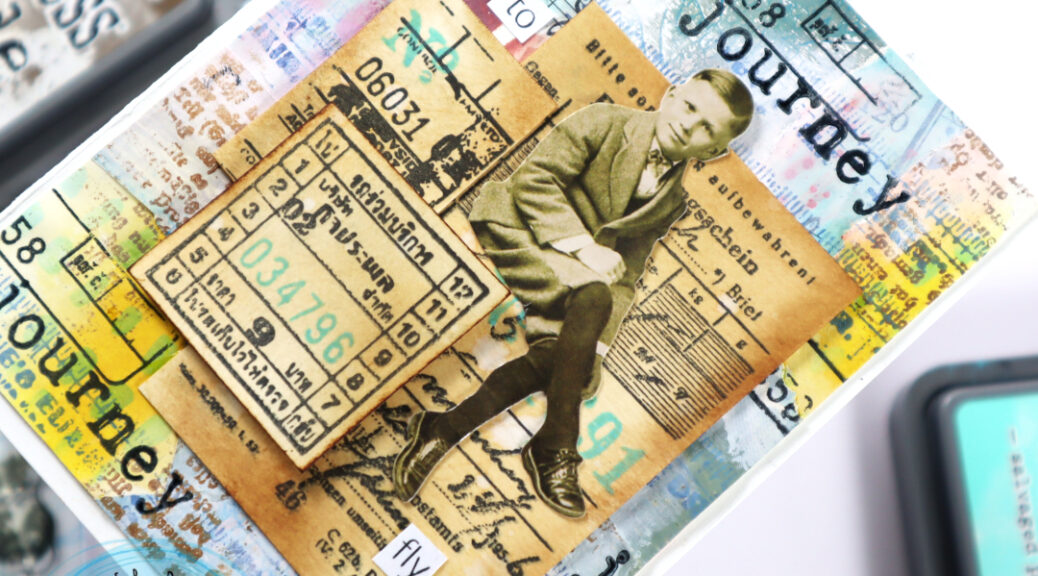
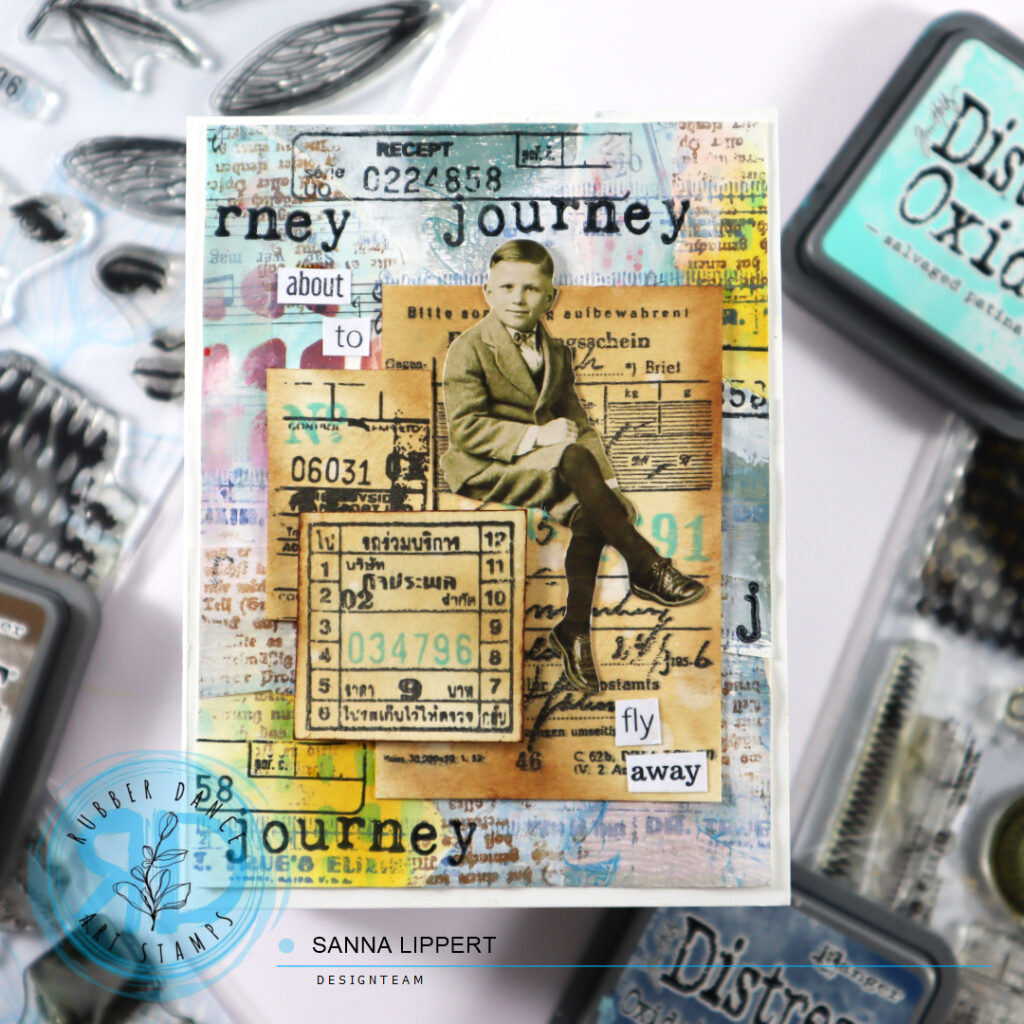
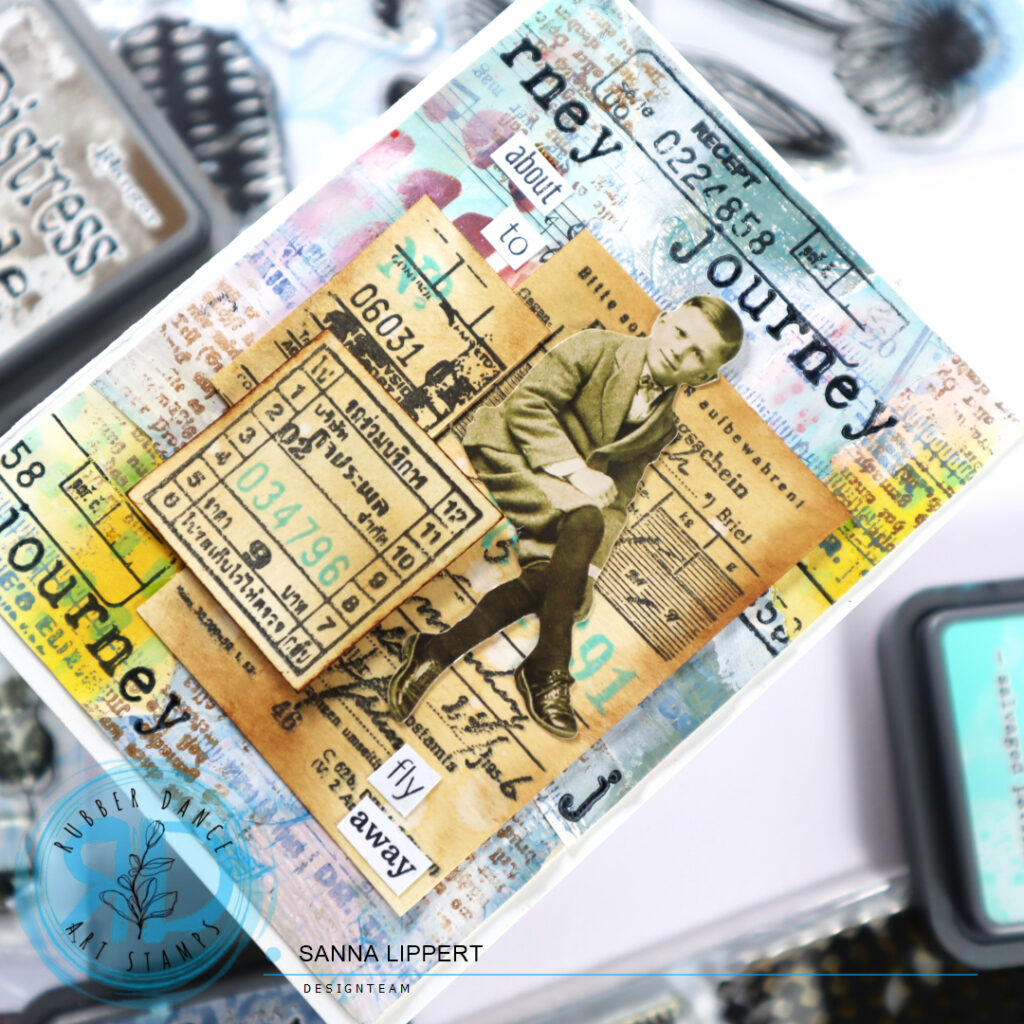
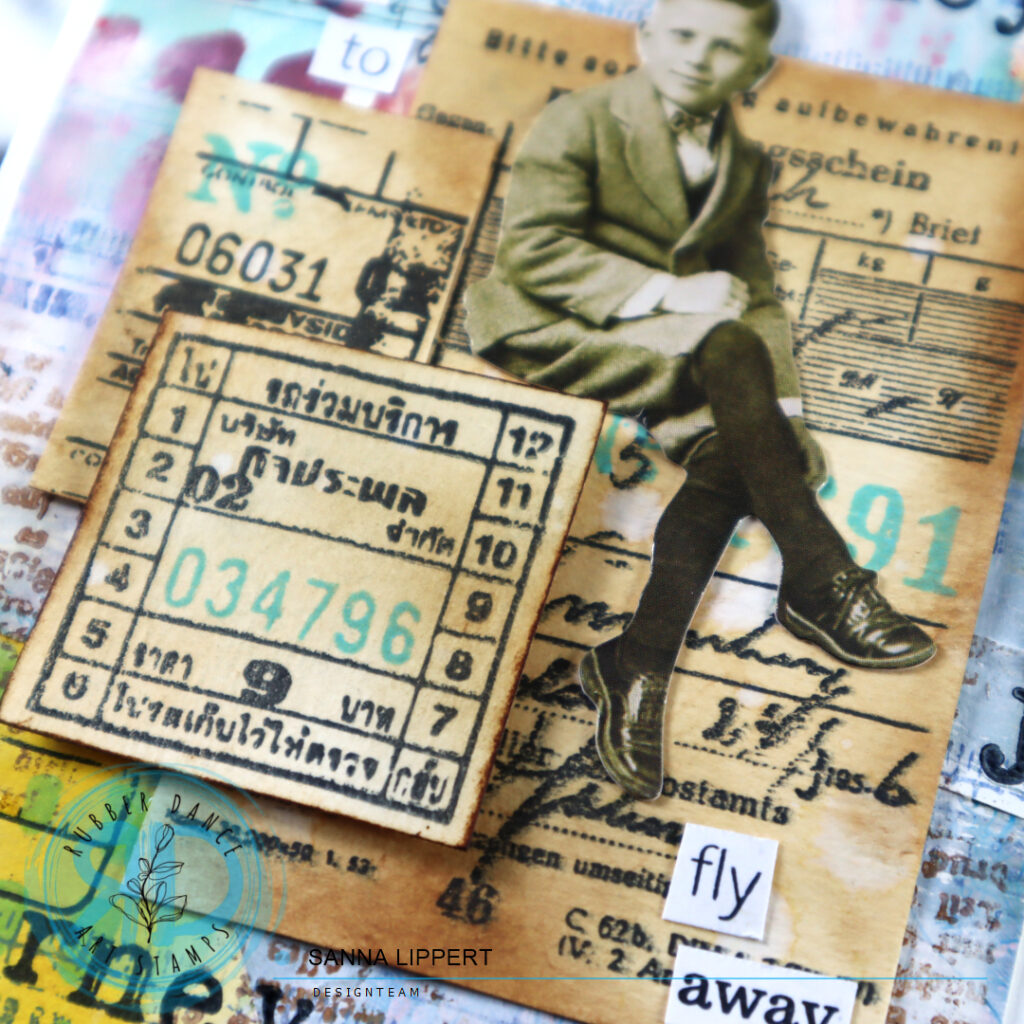
Hello everyone, it´s my turn to share a project over at Rubber Dance blog today. I am up with a vintage styled collage background card. For this card I´ve used the “DIY vintage tickets” I recently created, as my focal point. The stamps used on this project are: Mix It Up 7, Mix It Up 6 and Mix It Up 5. On the background I´ve used various gelli printed and stenciled collage papers using different stencils, like: Marks 2, Marks 3 and Xmas Trees 1.
For this card I first gathered gelli printed and stenciled collage paper bits together and wripped and adhered random bits onto a piece of cardstock. Next I applied some white heavy body paint with my fingers onto the surface to tie the different papers together.
After that I grabbed some dark brown Distress Oxide ink and stamped a script image with Mix It Up 5 stamp set randomly onto the surface. Using the same stamp set I swapped for black stamp ink and another stamp and continued adding images. Finally using a dark blue Distress Oxide ink and one more stamp image from the set I finished the background.
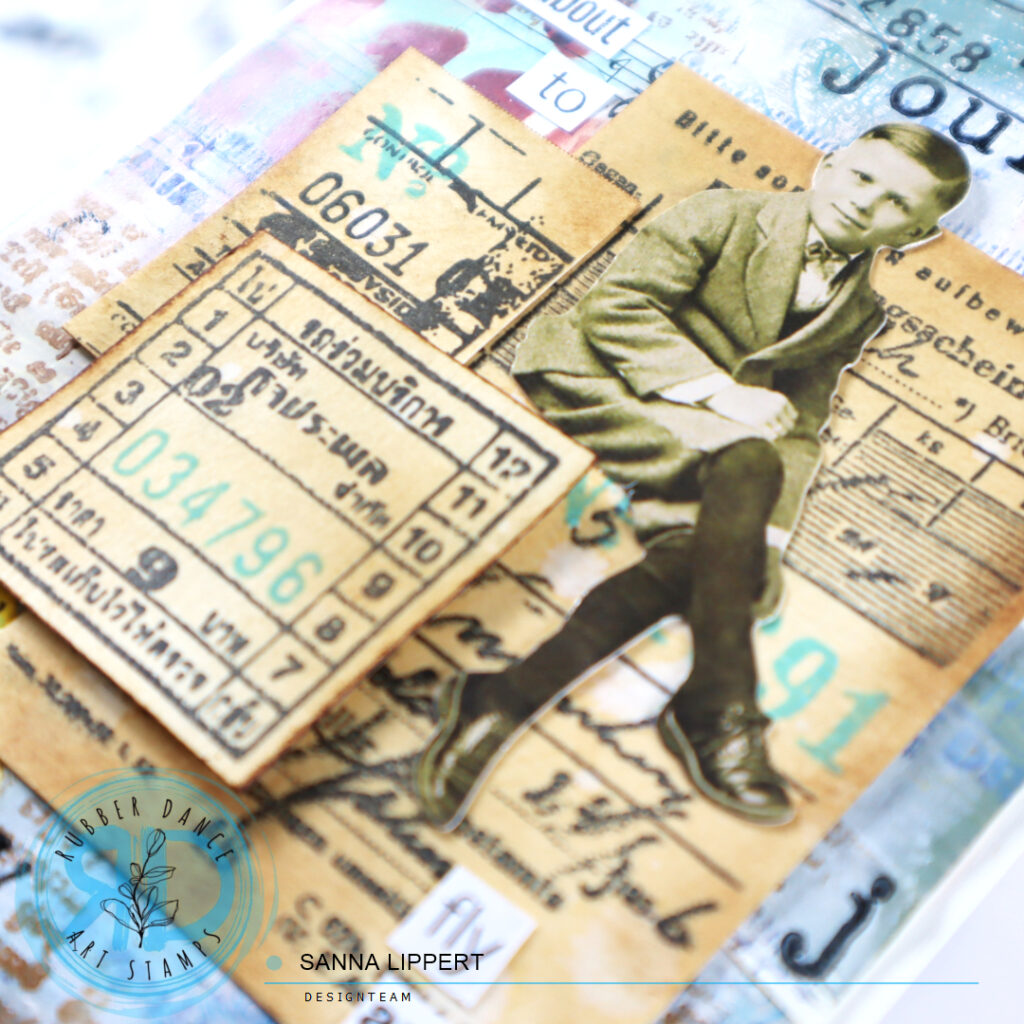
Next I created a cluster with my “DIY vintage tickets” on to the card (see the video here). I adhered one of the tickets with 3D foam to create more depth. I also stamped some additional details to the tickets with Mix It Up 7 stamp set and a turquoise Distress Oxide Ink tone.
Then I added a Tim Holtz paper doll to go with the tickets, added some Mixed Sentiments 1 words to create a sentiment to the card and finished the card by stamping the word “journey” with black ink onto the background (Mix It Up 6).
To give you a better idea of the steps, here is the process video of the card:
I hope you get inspired to try some of these ideas out. Have fun! xx, Sanna
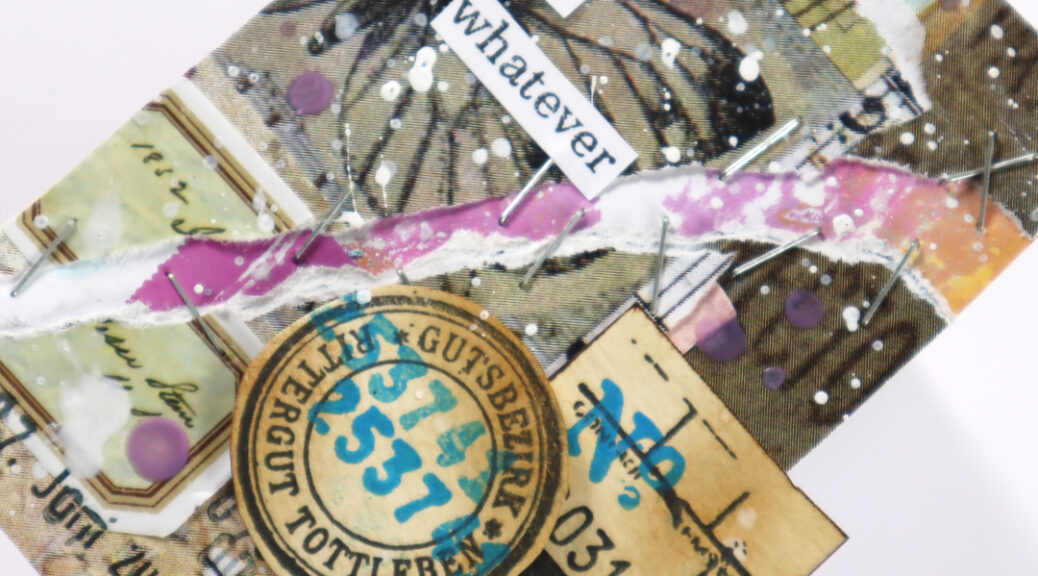
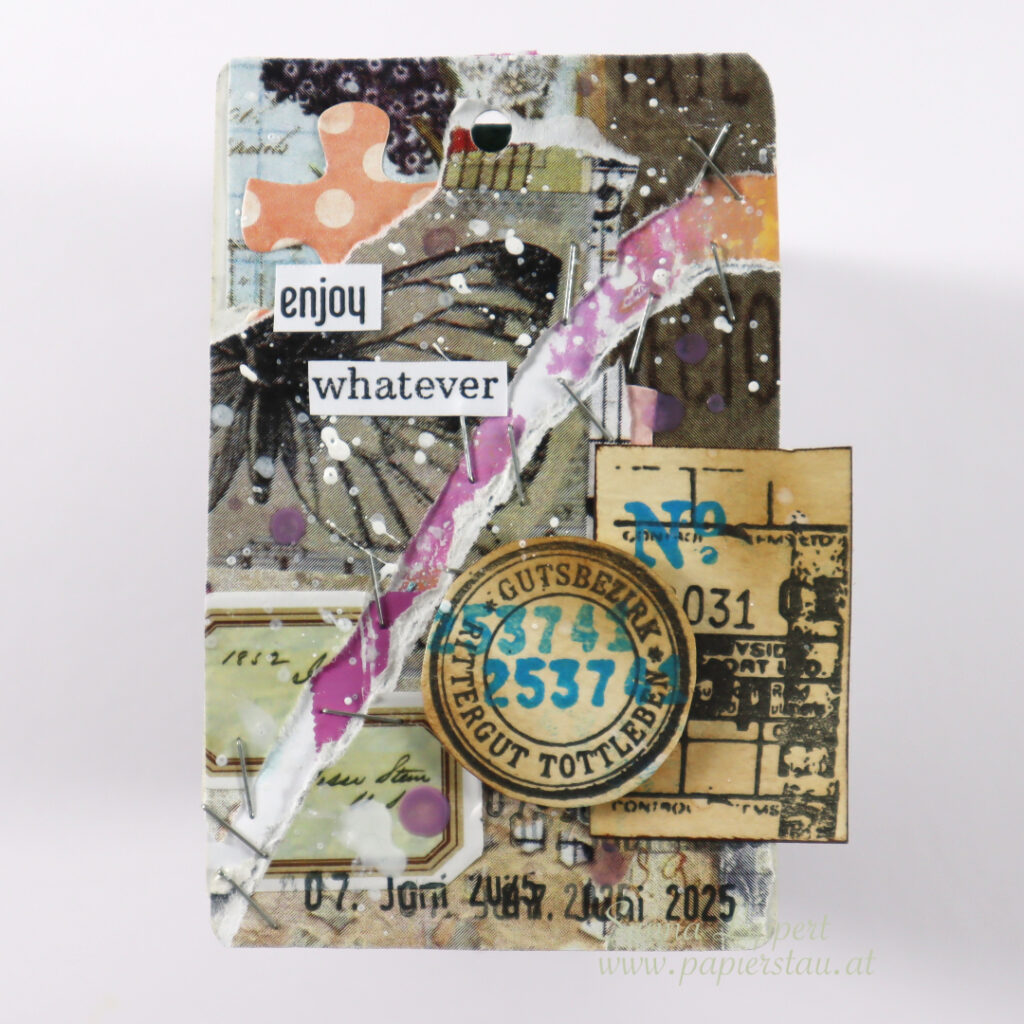
Hello everyone! This is my take on the ShanoukiArt Full Deck Challenge number 22: “cut up”. That meaning cutting up the actual deck card some way.
I started by adding collage papers (by Yuna) to the background, then incorporating some carry over items (puzzle pieces) from my last deck card. After that I used my constant; a date stamp. I also added a label sticker to the background.
Next I wripped the card in two and adhered and stampled the pieces onto a residue paint paper. For decoration/finishing touches I added white and purple Gloss Sprays, some of my “DIY vintage tickets” and a stamped sentiment. Here is the process video:
I hope you enjoyed this one – see you next week with FCD take number 23. Happy crafting, xxx, Sanna
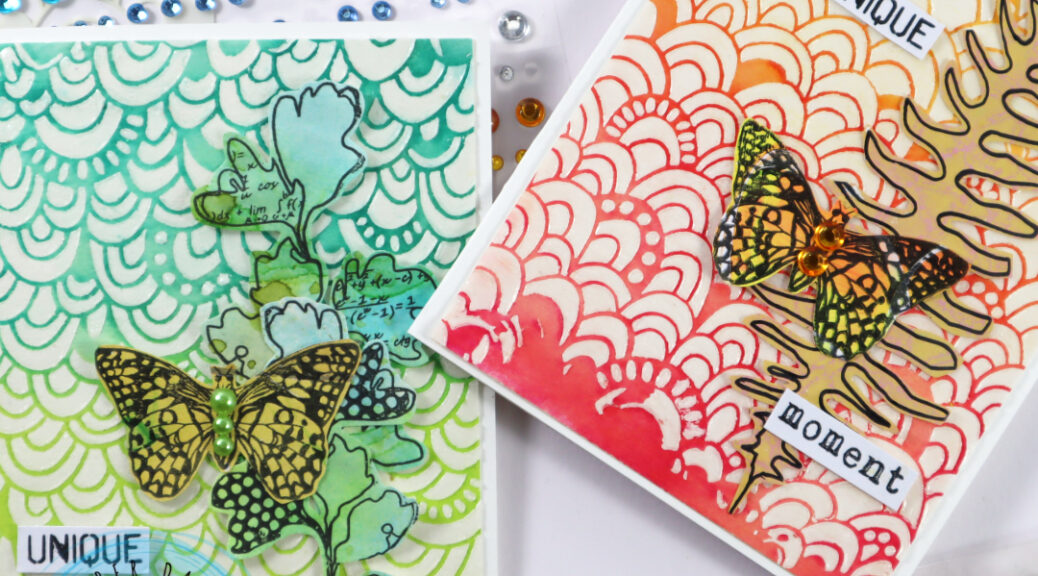
Hello everyone! It´s my turn to share an inspirational project over at Rubber Dance blog today. I am up with a monochromatic card set. I wanted to create a card background using the Rainbows #2 stencil and that is how this idea started. In addition I used the Mixed Sentiments #1 and added collage fodder elements I had previously created with Sketchy Leaves 5 stencil and Butterflies and Moths, as well as Doodle Flowers 2 stamp sets.
I started by taking a mixed media paper and cutting it into smaller sizes. Then I placed the Rainbows #2 stencil on top of the paper and applied Crystal Gel with a palette knife thru the stencil onto the surface. I did two surfaces and let them dry properly – make sure they are really dry – before moving to the next step.
Next I took a blue and green Distress Ink (twisted citron & peacock feathers) and applied those onto the stenciled surface. After that I took a baby wipe and wiped any residue ink off from the crystal gel-treated areas. After that I took double sided adhesive tape and adhered the inked and stenciled paper onto a white card base. I then decorated the card with collage fodder leaves and butterflies and stamped and fussy cut a sentiment from Mixed Sentiments #1 stamp set. For finishing touches I added some green adhesive half pearls to the butterfly.
I did the exact same steps on the pink and orange toned card, but I used spiced marmalade and picked raspberry Distress Inks on the background. The collage fodder is done using the Butterflies and Moths stamp set and the Sketchy Leaves 5 stencil. You can find tutorials to the collage fodder bits here, here and here.
And here is the full start-to-finish video for more details. Hope you like it!
I hope I could inspire you to try out Rubber Dance stencils with clear texture paste and inks. It´s a lot of fun!
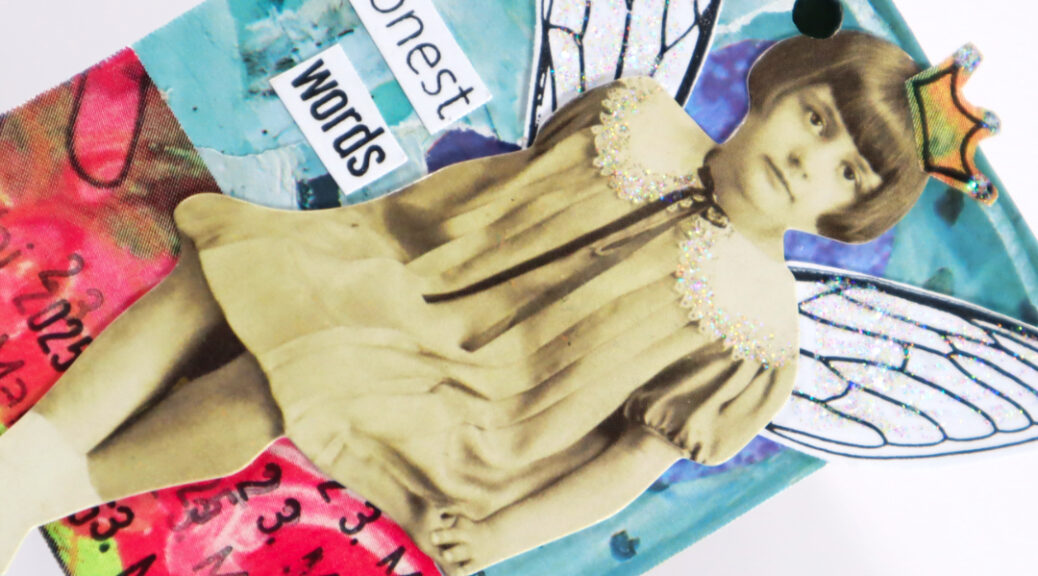
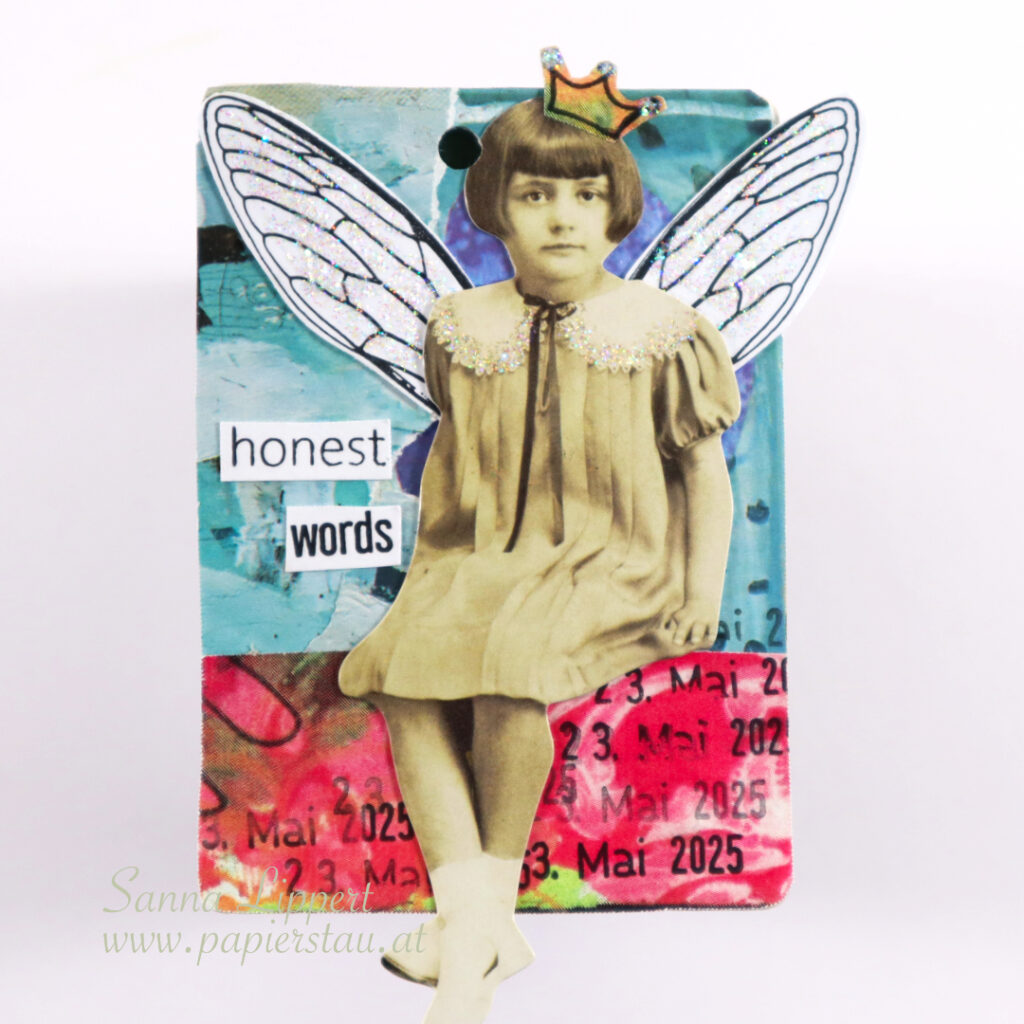
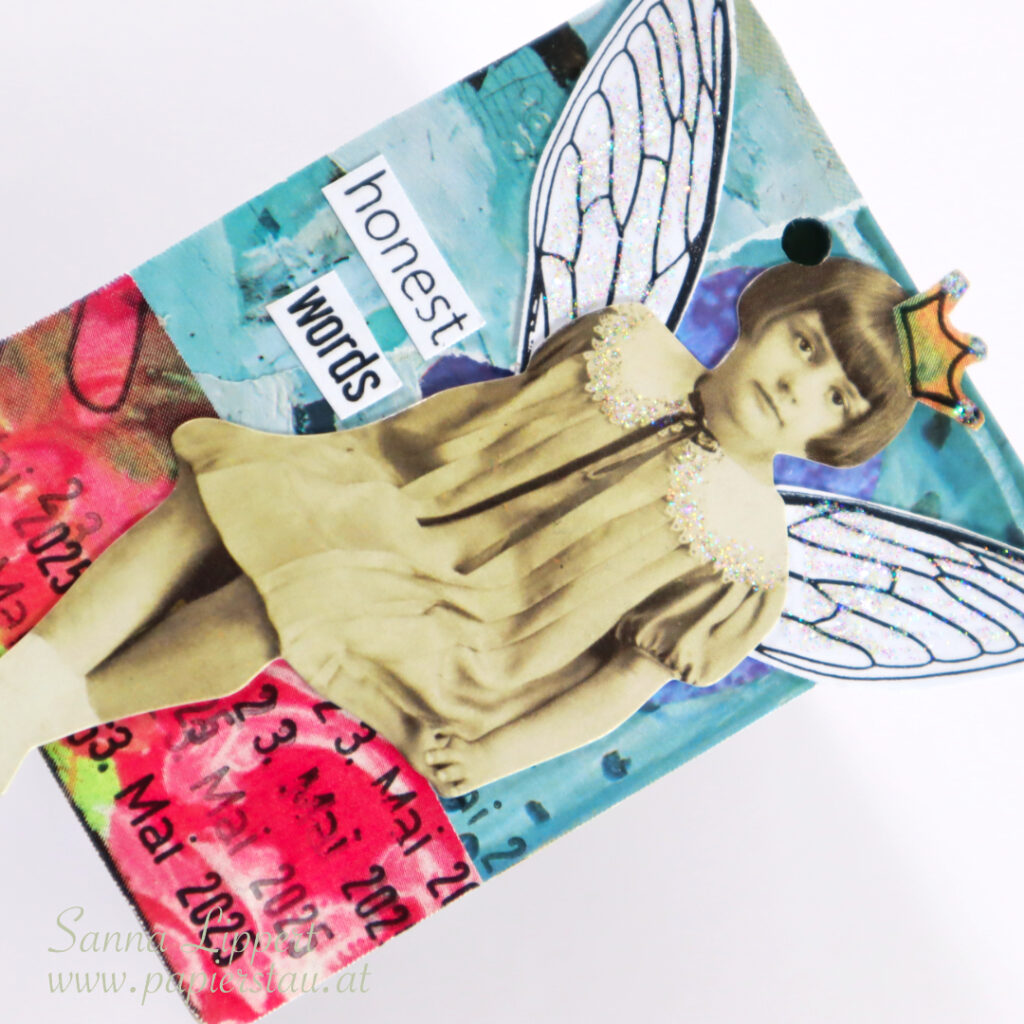
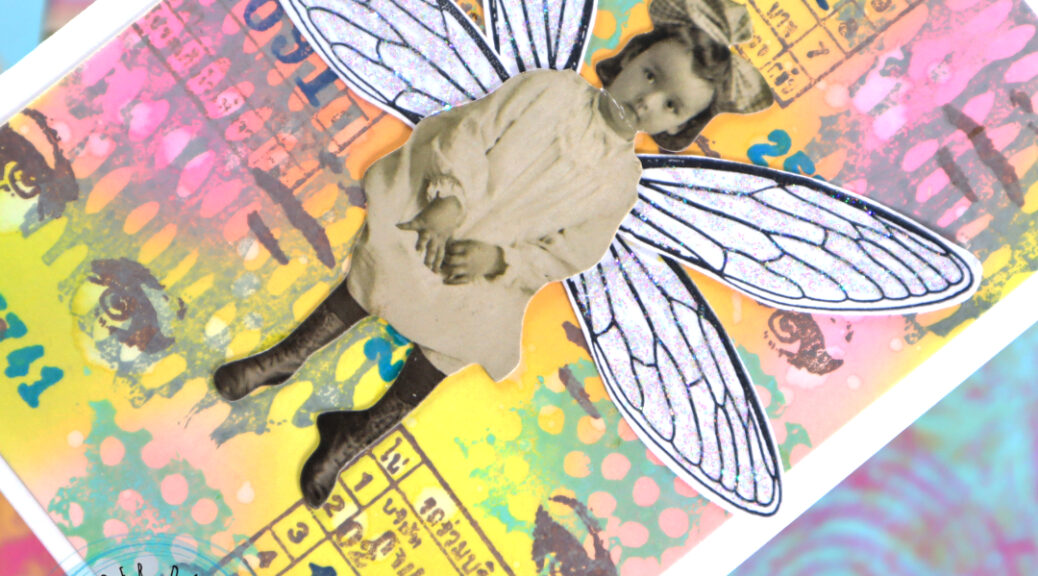
Hello! I am a bit late with sharing these, but here is my take on the 20th Full Deck Challenge; “paper doll”.
I used Tim Holtz paper dolls for this deck card challenge (by ShanoukiArt), added some collage paper gifted me by Yuna on the background. Some paper from the Artist Almanac 2023 got used too. My constant is a date stamp.
In addition I used Rubber Dance stamps (wings and words) to decorate my deck card and added some Stickles for sparckle.
And here is the video:
See you soon with another FDC take share! xxx, Sanna
Hello, I am up over at Rubber Dance with another project. I have a DIY ticket tutorial up for grabs this time. I used the “Mix It Up 4″, “Mix It Up 5” and “Mix It Up 7” stamp sets to create the tickets.
I started by applying 3 different Distress Ink brown tones (vintage photo, tea dye & gathered twigs) with a blending brush onto a white, smooth, mixed media paper. This blending result does not have to be meticulous. The more random and irregular it turns out, the better! You can even add lines and leave areas almost white during this step. This only adds to the vintage/used feel of the end result.
Next add water splatters onto the inked paper. Let sit for a while and dab any residue water off with a cloth or a paper towel. Then take all the ticket looking stamps from the stamp sets out and stamp onto paper repeatedly. After that cut into size with a paper trimmer / scissors. For finishing touches, go around the edges of each ticket with brown ink. Now you have yourself a pile of cool tickets you can use in future projects.
Here is a video of the ticket making process:
I hope you get inspired by this idea and make some tickets of your own with Rubber Dance stamps and Distress Inks! Have fun! xx, Sanna
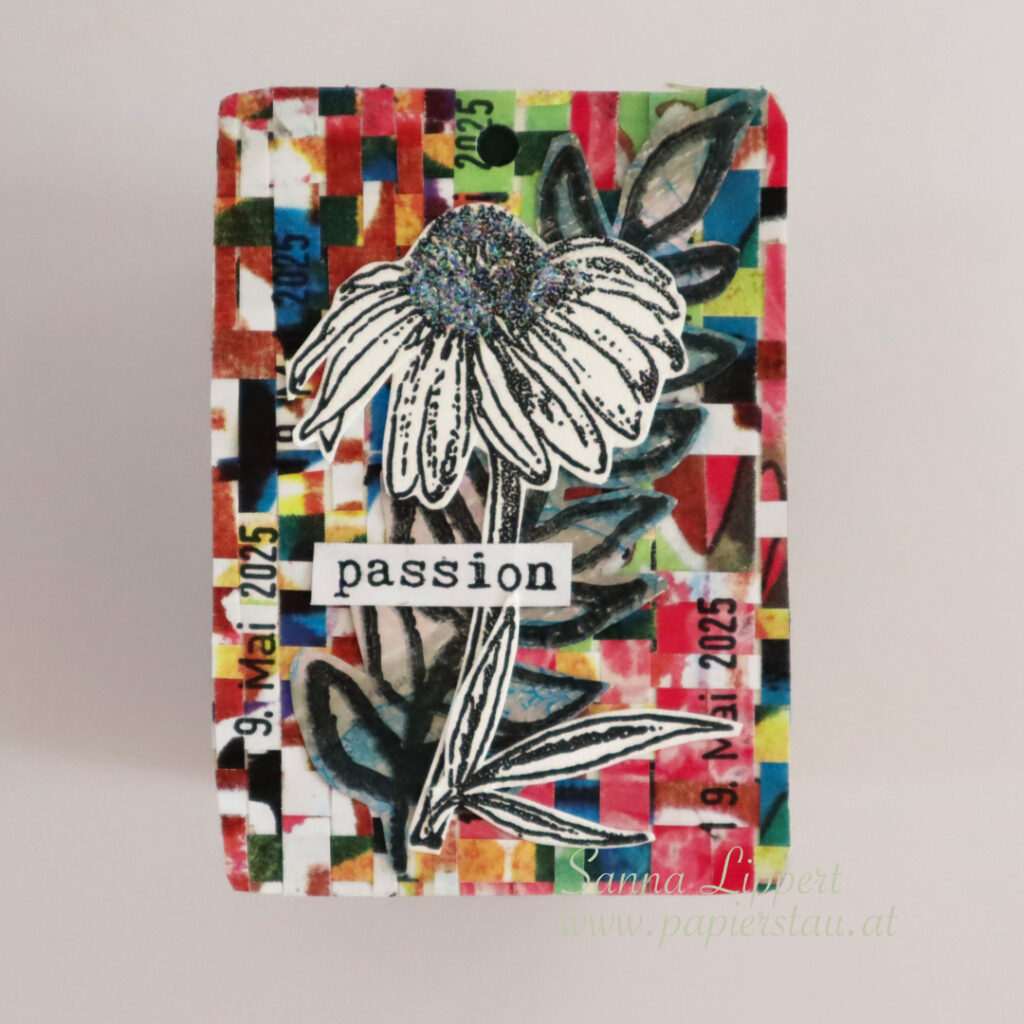
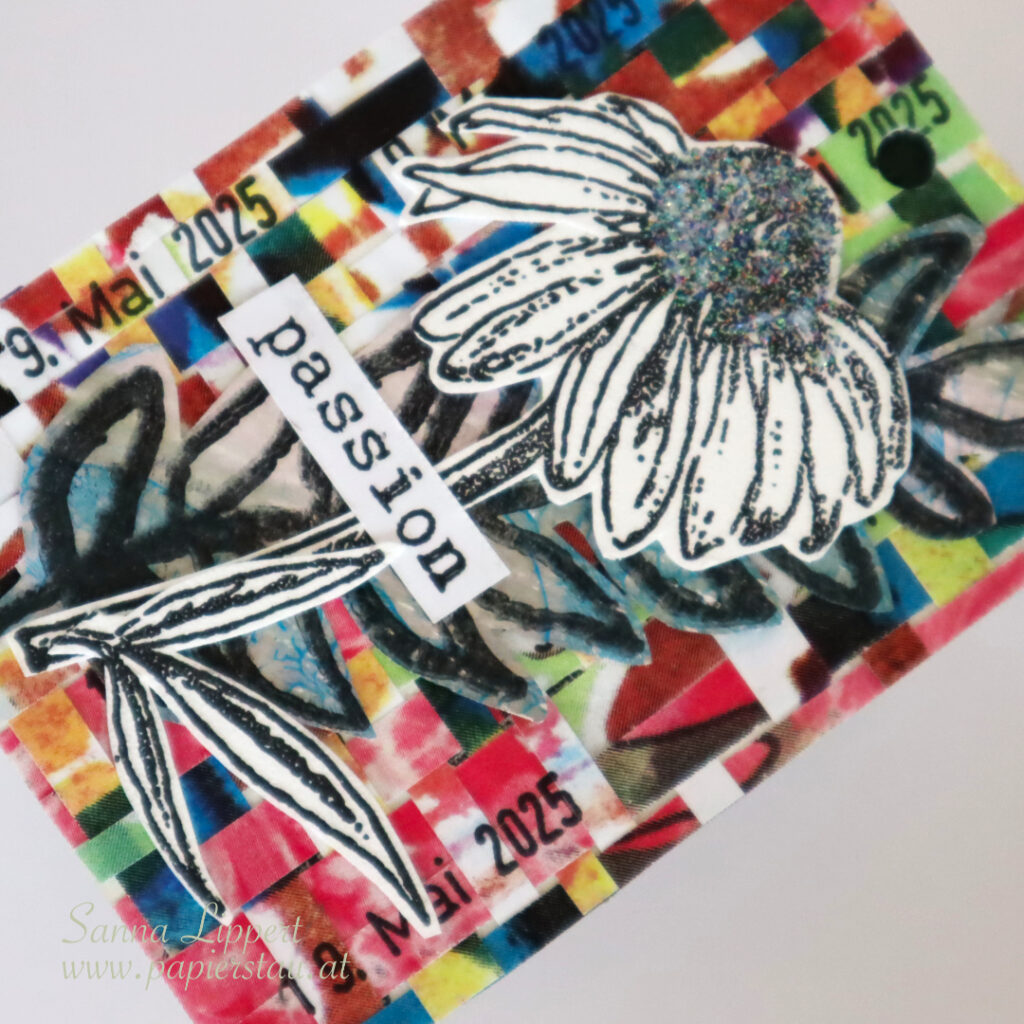
Hello and happy Friday! Here is my take on the ShanoukiArt 2025 Full Deck Challenge number 19: paper weaving.
I used Yuna´s collage papers on the background. Cut into very thin strips. After that I adhered the ends of the horizontal strips to a piece of cardstock (to hold them on place for easier weaving). Then added the vertical parts and when the piece was done, adhered it onto the deck card.
On top of that I added a collage fodder leaf (Rubber Dance). This is also a carry over item from my last deck card. My constant is a date stamp and I added those randomly onto the weaved areas. As a focal point, I decorated the deck card with a black and white stamped flower (Rubber Dance) and a stamped word. The flower has some Stickles on it for additional sparkle.
Hope you enjoy this deck card – I will be sharing the next one next week. See you then! xxx, Sanna
Hello, it´s my turn to hare some Rubber Dance inspiration today. I created another card set and tutorial share. For this card I used only one stamp set – the Mix It Up 7.
I started by applying Distress Oxide Inks in yellow, pink and light green tones with a blending brush onto a piece of white cardstock.
After that I chose stronger Distress Oxide Ink colors for my second layer (blues, greys, browns and greens). I randomly stamped with various images from the same stamp set onto the background. I also changed the ink color every time I changed to another stamp image.
Next I took the wings and flowers from the same stamp set and stamped with black stamp ink onto a piece of white cardstock. Then I fussy cut the images.
Finally I glued everything onto a white card base. The black and white images formed the focal point. For finishing touches I also added some Stickles to glimmer, like seen on this photo.
Here is a video on the full process for you to watch:
I had so much fun making these card backgrounds. I hope I could inspire you to grab a stamp set and make some fun backgrounds! Have fun! xx, Sanna
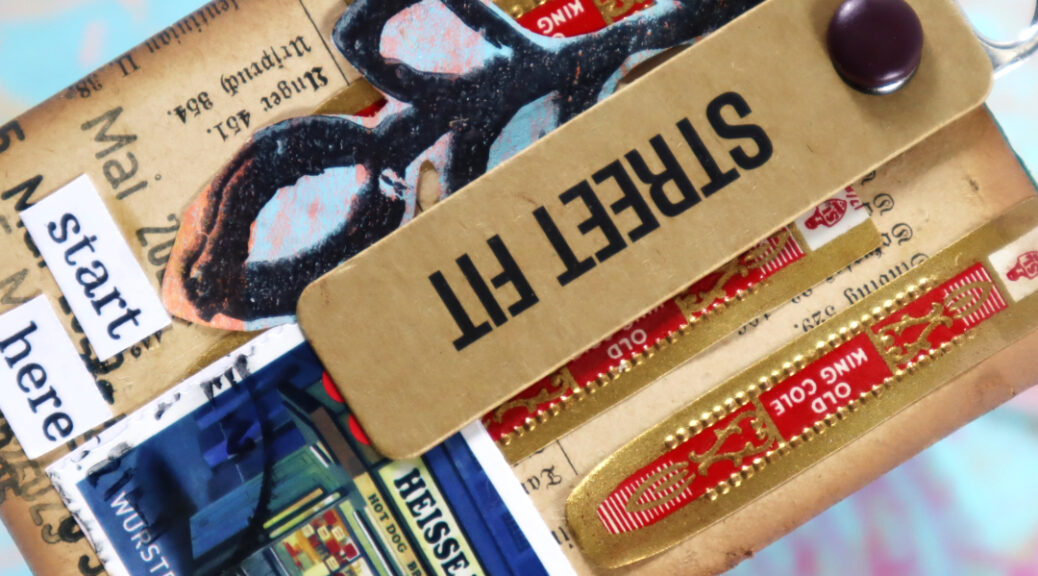
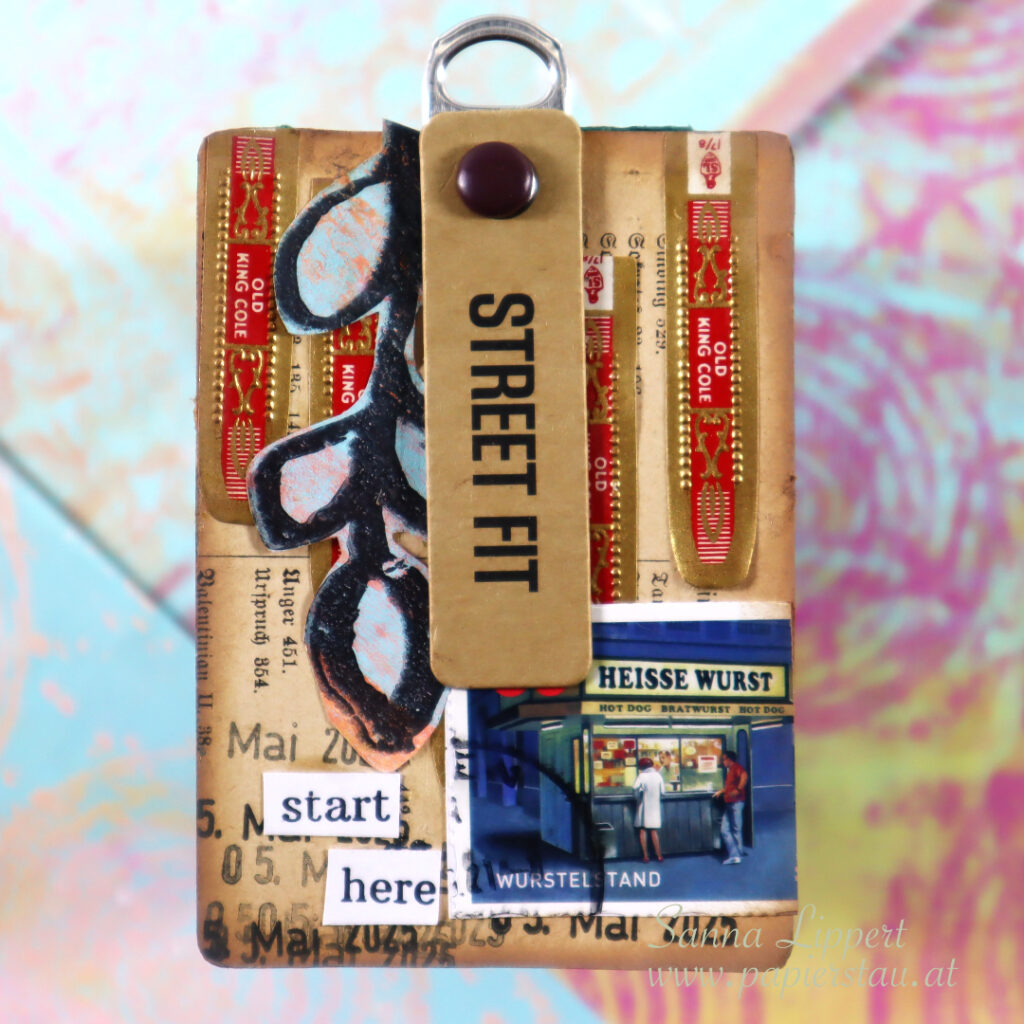
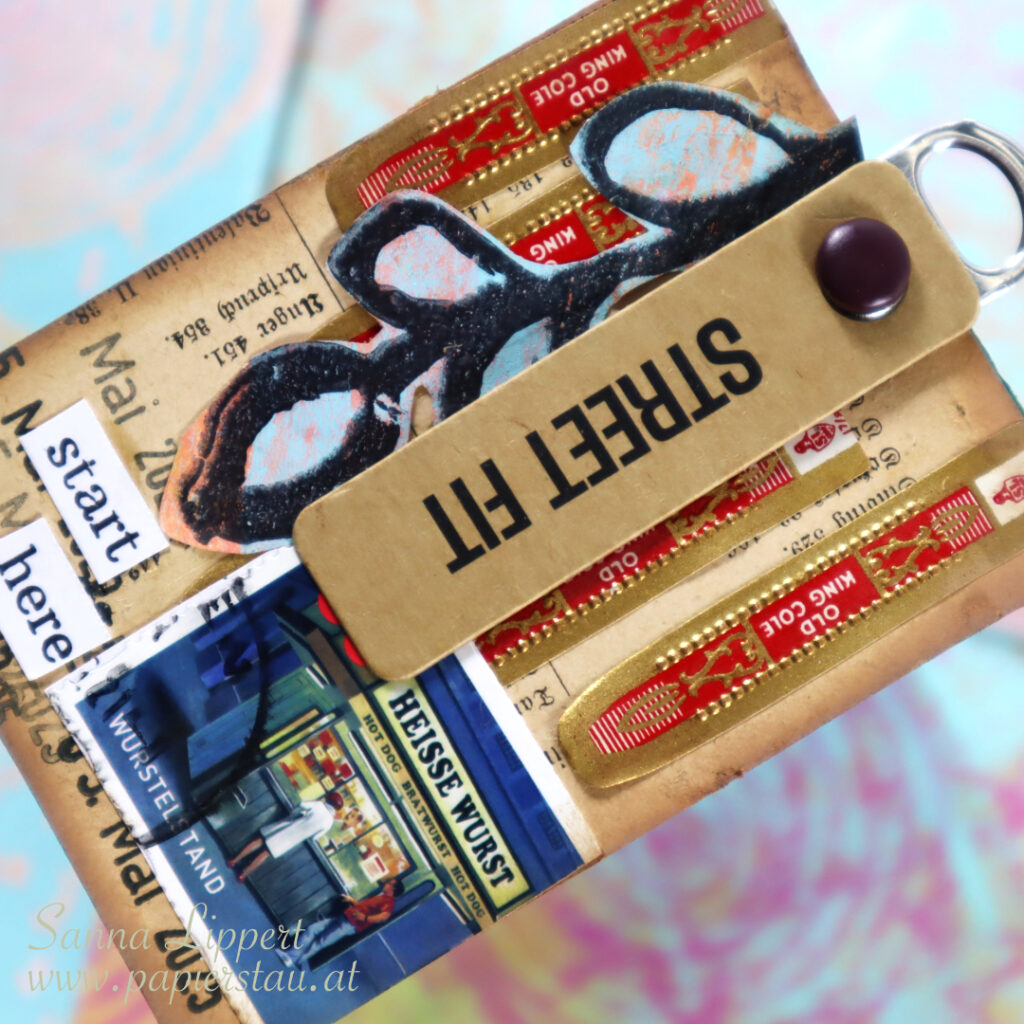
Hello and happy Tuesday! The ShanoukiArt “Full Deck Challenge” 18/2025 was about “junk”. This is my take.
I chose a piece of old book paper for the background with some cigar labels. On top of that I added my constant, the date stamping. After that I adhered a postage stamp to the background and then made a hole with a Crop-A-Dile big bite to attach my junk to the deck card (a clothing label and a cola can piece (both attached to the deck card with a brad).
A gelli printed Rubber Dance stamp image decorates the card and some stamped words got added for detail. Also by Rubber Dance. And here is the start-to-finish video:
See you next week with another deck card. Thanks for stopping by! xxx, Sanna
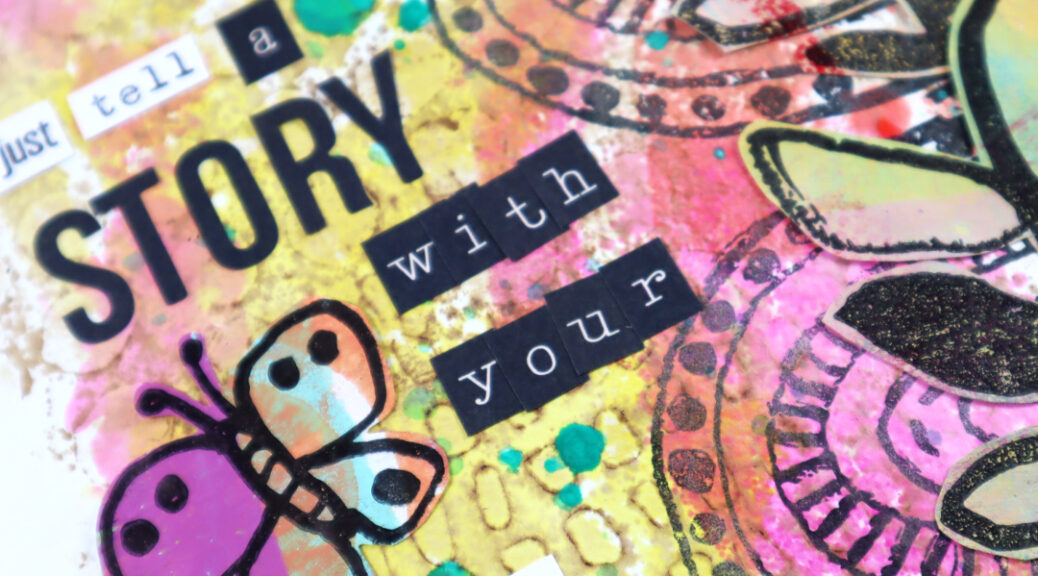
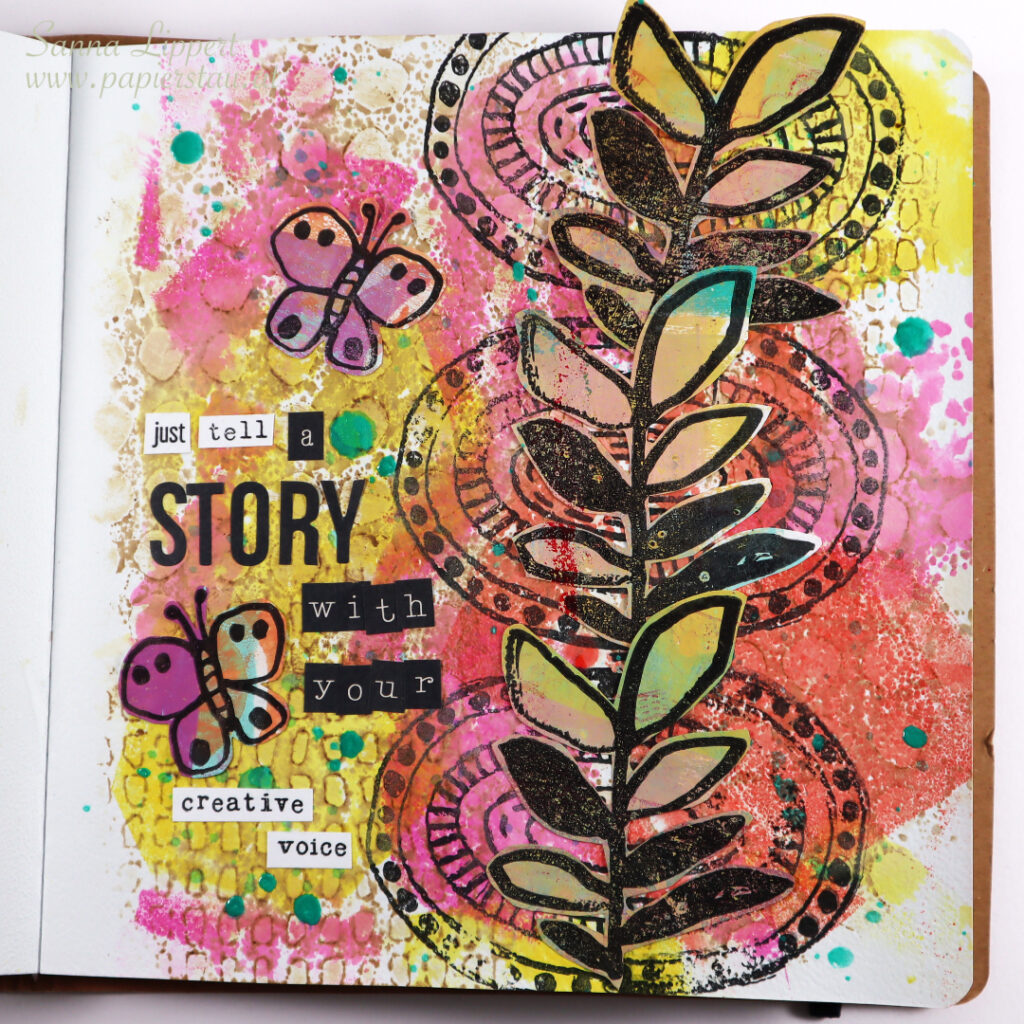
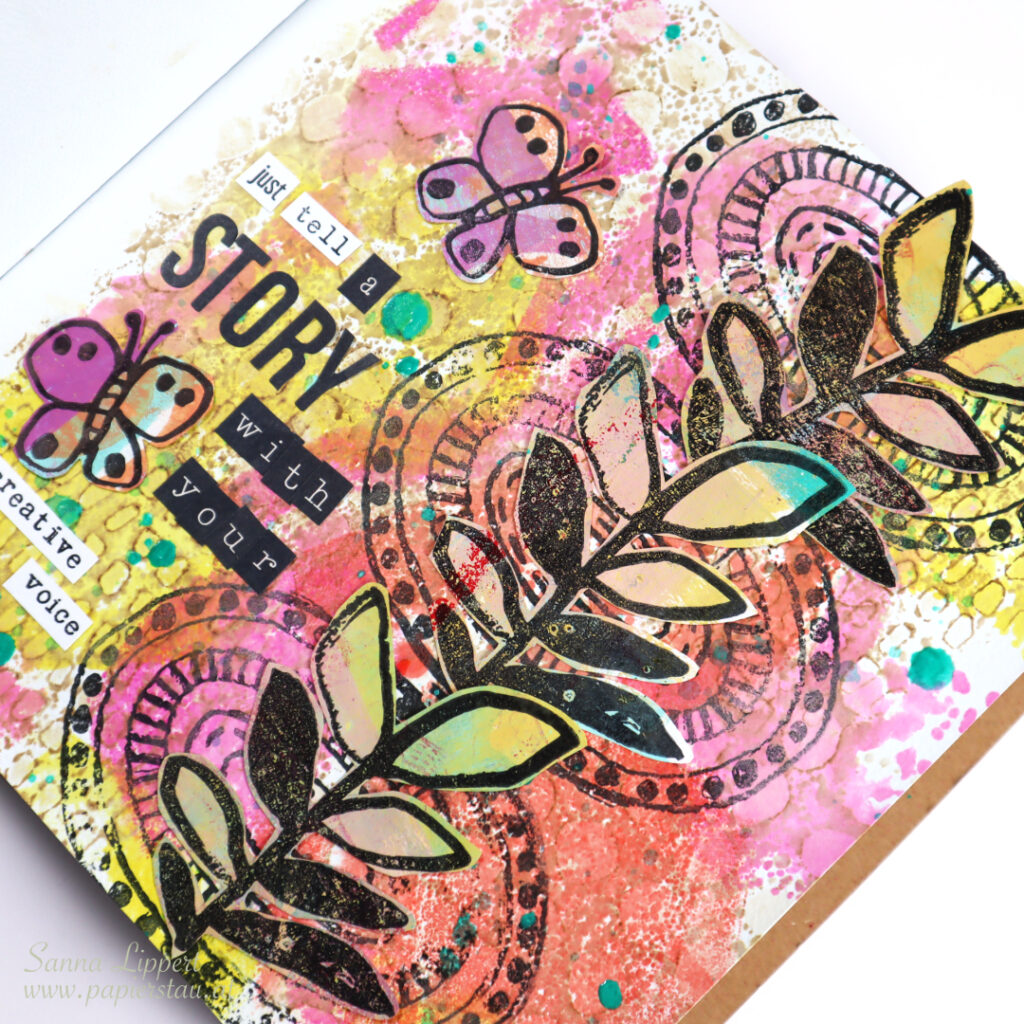
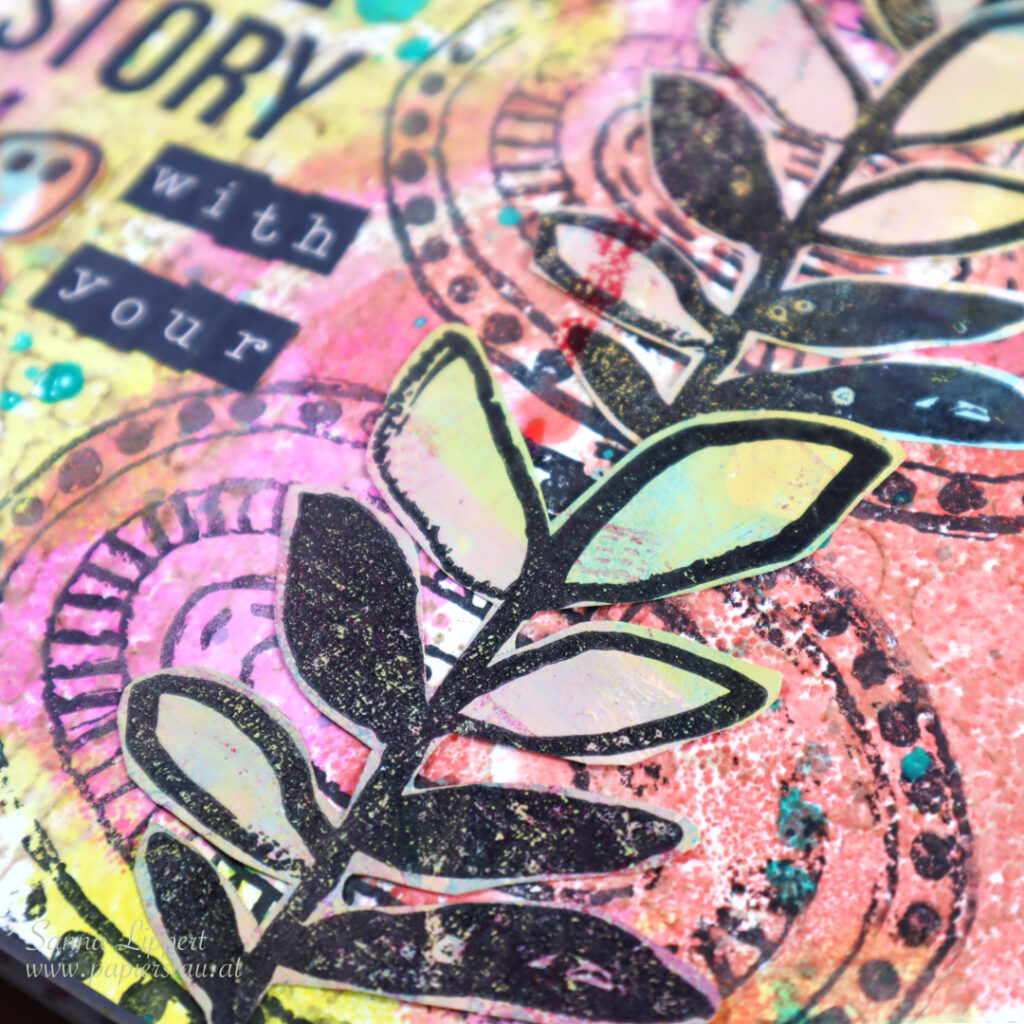
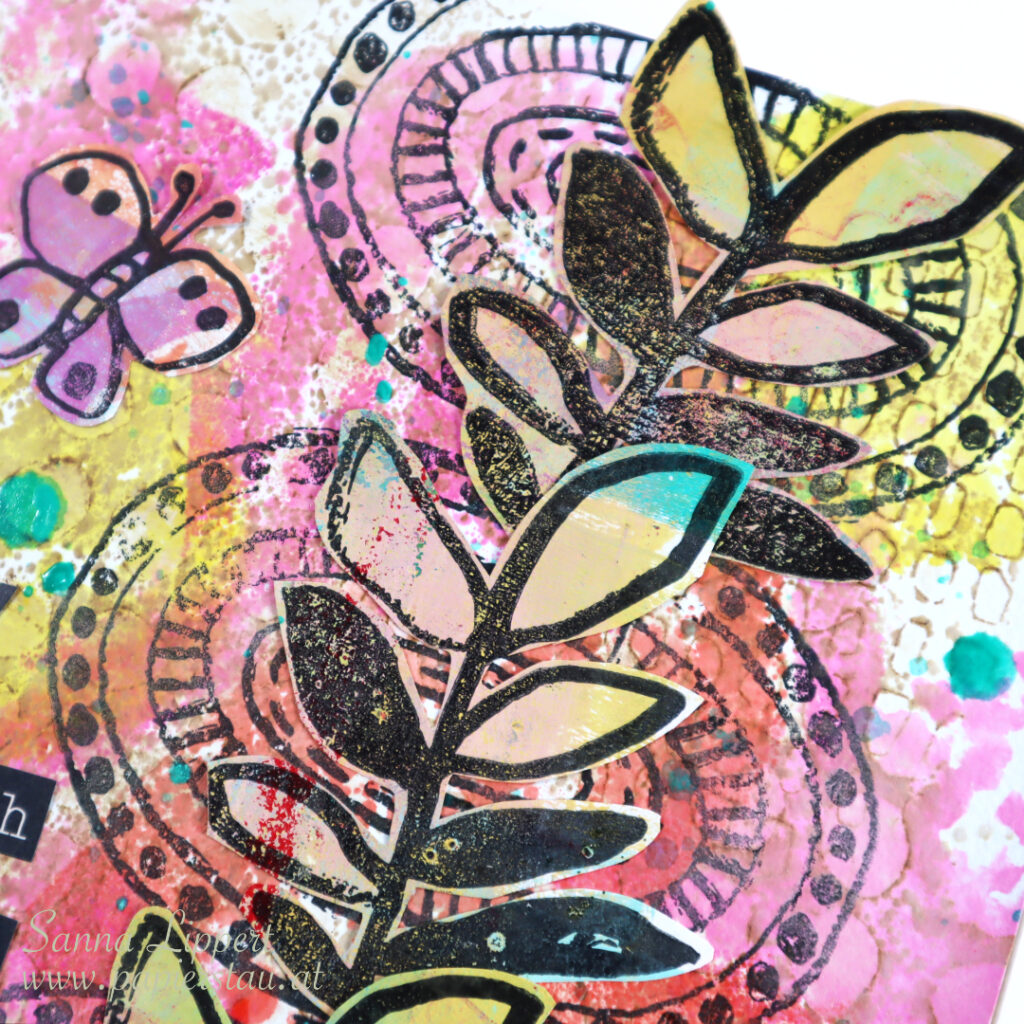
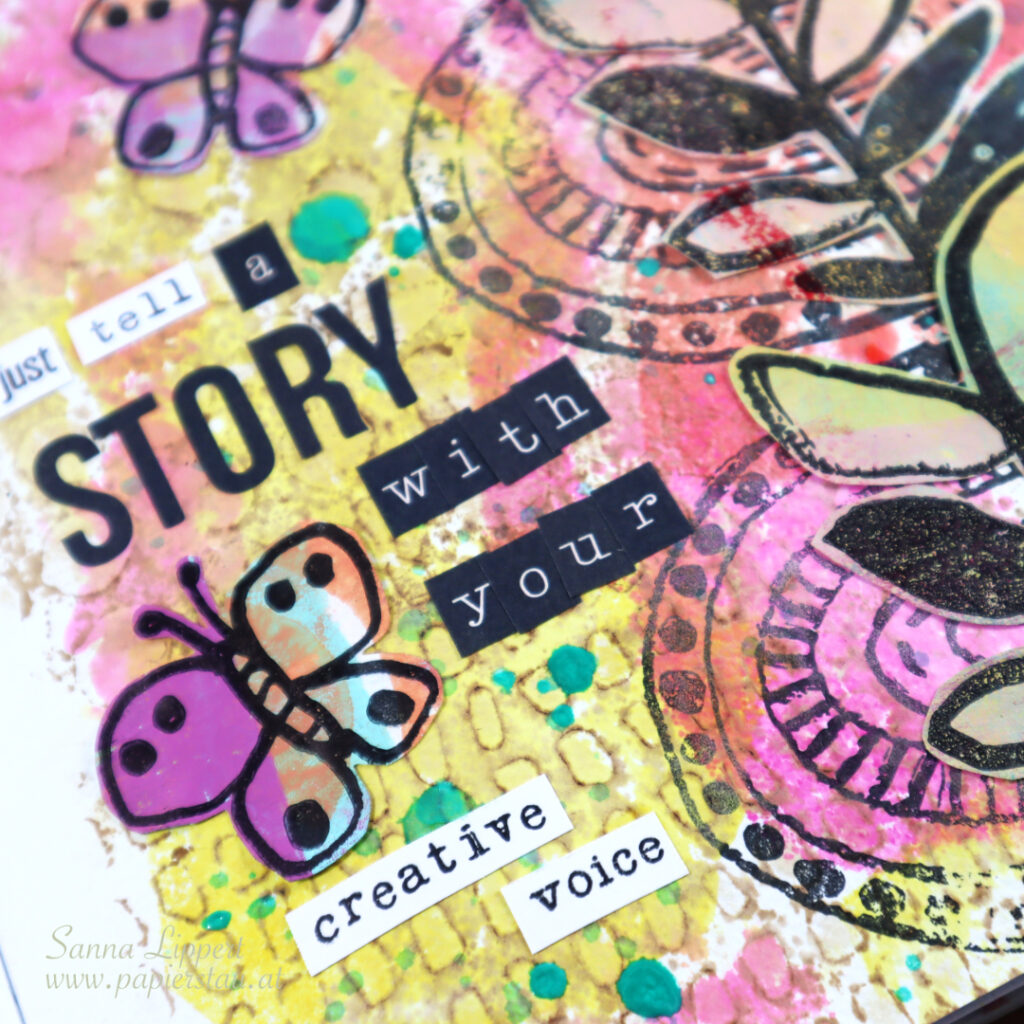
Hello everyone, here is a little share from when I was randomly playing in my art journal with recently made collage fodder pieces and Rubber Dance stamps and stencils.
I started with Distress Ink tones “ripe persimmon”, “picked raspberry”, “mustard seed” and “vintage photo”. I first applied the pink, yellow and orange tones with a misted gelli plate onto the background and created the random color areas. Next I pressed some “vintage photo” onto “Dotted 1” and “Marks 3” stencils, misted them and pressed the inked areas directly onto the paper. This created a hint of a pattern.
Next I used the “Pencil Marks 8” stamp set to create the oval shapes onto the page using black stamp ink. After that I grabbed some premade collage fodder pieces (leaves and butterflies) and adhered them to the page. After that I added some turquoise ink splatters (Dina Wakley Gloss Spray). For finishing touches I created a sentiment with stamped words (Mix a Sentiment 2023) and some stickers from my stash.
Here is the start-to-finish video:
I had a fun time playing in my art journal. Hope you enjoyed watching the process!