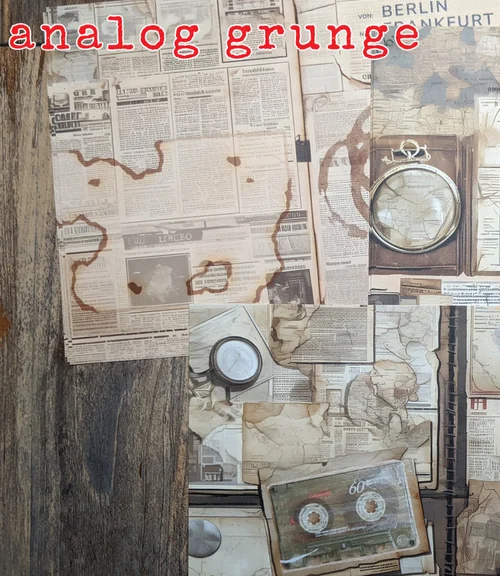
Hello everyone! Today I am stopping by to share with you another collage paper pack that is available at STAMPLorations, called “Analog Grunge”.
Here is a short flip-thru video of the papers:
There are 3 designs in the pack and 5 sheets of each design. I love the vintage look of these papers. They will be great for journals, tags, ATCs and cards. Cannot wait to put them into use!
If you are interested on purchasing the papers, feel free to use my discount code at the STAMPlorations store:
Hello and happy Monday! And just like that a full year has passed and with it, 52 deck cards got altered. Here is a flip-thru video of all the cards I altered during 2025:
It was a very good challenge to do – not too much time pressure. I even managed to make short videos of every process. And because it´s a small project, it is not overwhelming.
I haven´t yet decided, if I am going to play again this year. Still got some time to think it over :). Are you going to join in ? xxx, Sanna
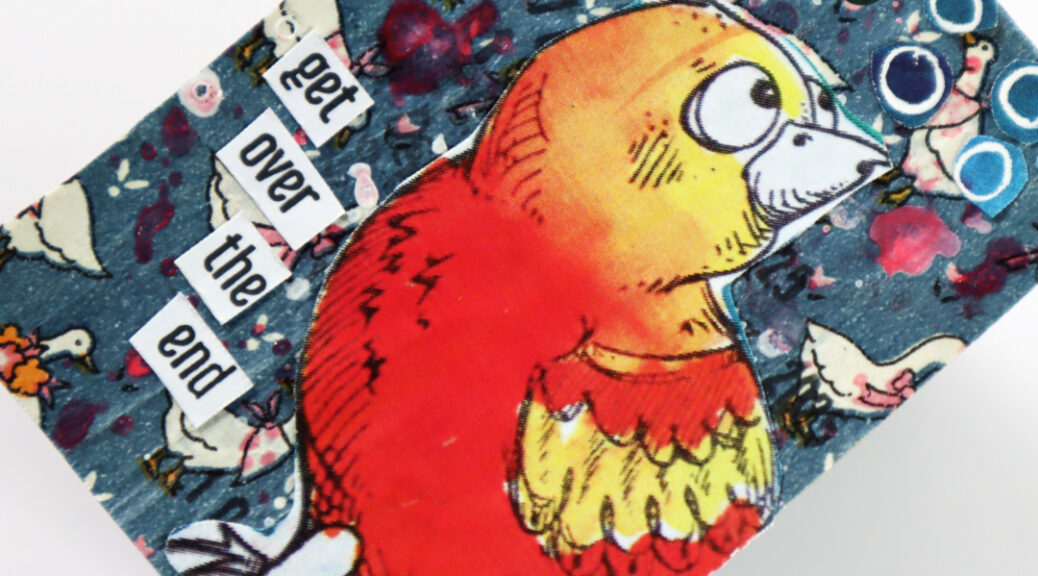
Hello! So this is it! I´ve finished the 2025 ShanoukiArt Full Deck Challenge with this deck card. The theme was “animal print”.
I interpreted the theme very loosely. See, the paper ribbon I used as a background paper, has animals on it and it is printed. Sooo…very loosely, it´s “animal print”. Ducks on paper, how cute is that?!
On top some Dina Wakley Gloss Sprays and my constant, a date stamp. My focal point is a big birdie, adding to the bird theme there. The stamped words are from a Rubber Dance stamp set. For finishing touches I added some hand drawn white circles. Drawn on the same blue paper I used on my previous deck card for the hearts. So also ticked off the carry over theme there, too.
Here is the final process video:
And this has been a fun year with the deck cards. I really enjoyed making them. The recording of the videos also did not get too stressfull, because it´s only one a week. There will, I think, be a new deck card challenge for 2026. Thinking if I should join again. Are you going to join?
Happy crafting and a fabulous end of 2025 and all the best for 2026!!! xxx, Sanna
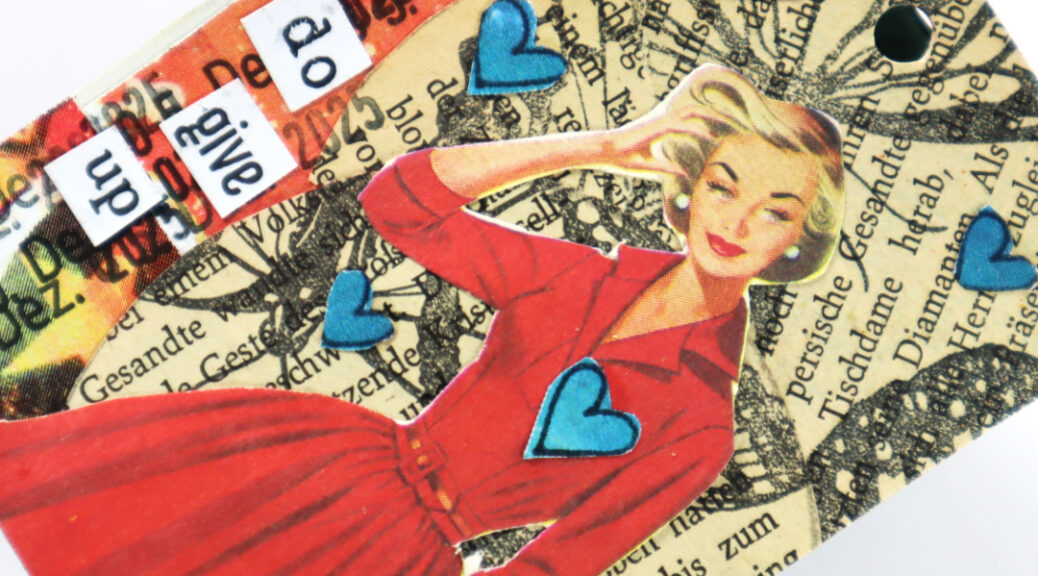
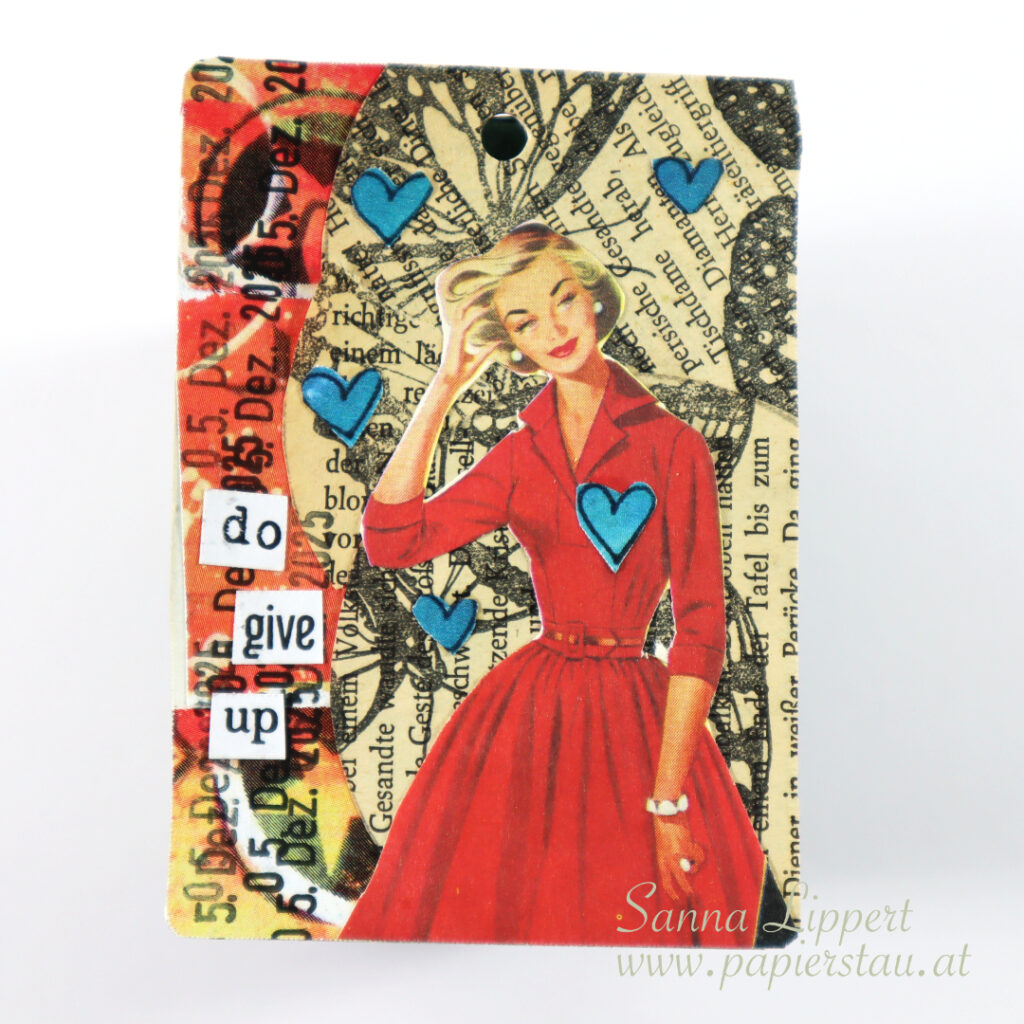
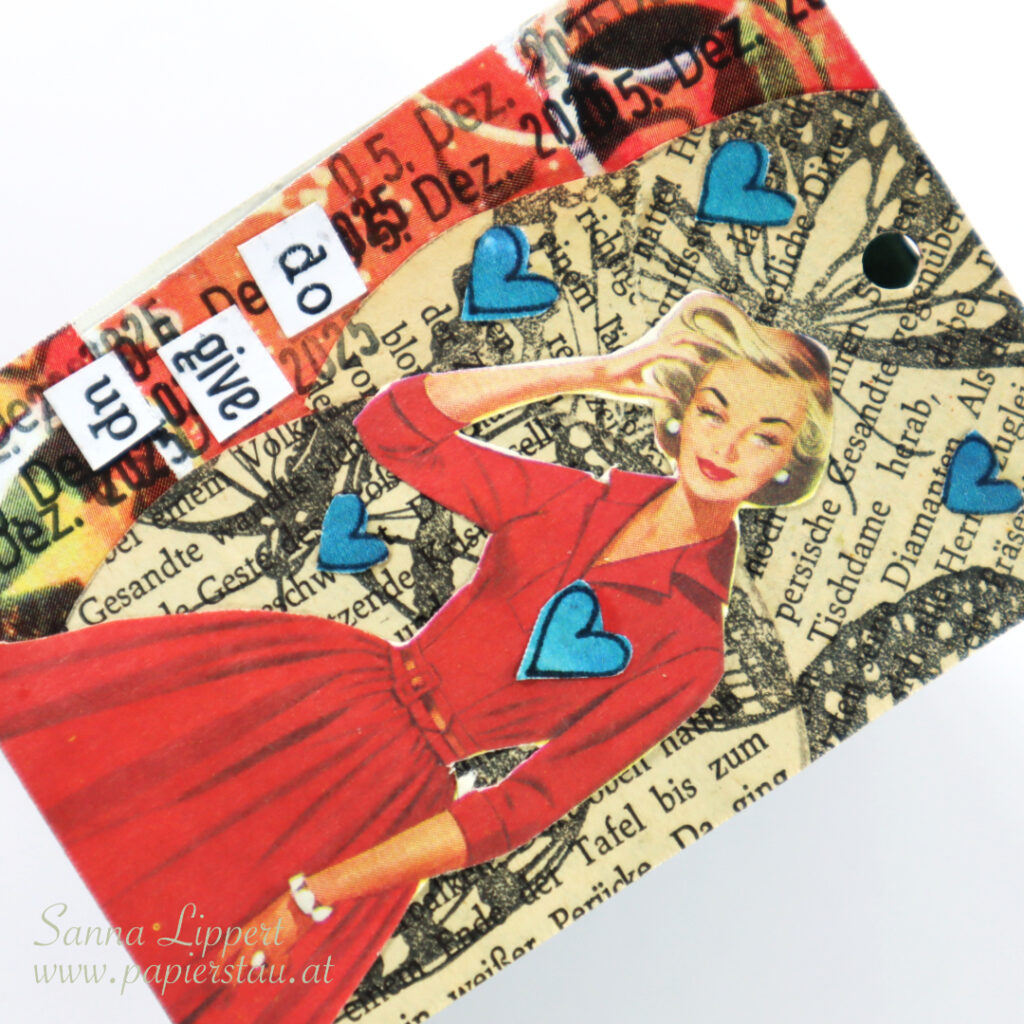
Hello! This is my take on the ShanoukiArt 2025 Full Deck Challenge number 51: queen of hearts.
On the background I again used the collage papers gifted to me by Yuna. Also my carry over item from the previous deck card. I combined them with old book papers I had stamped with Rubber Dance butterflies.
Next I added my constant – a date stamp. My queeon of hearts is a vintage image in a nice red dress. I added some hand drawn and fussy cut blue hearts around her -> queen of hearts.
Here is the process video:
Come back for the last deck card in a few days! Happy crafting! xx, Sanna
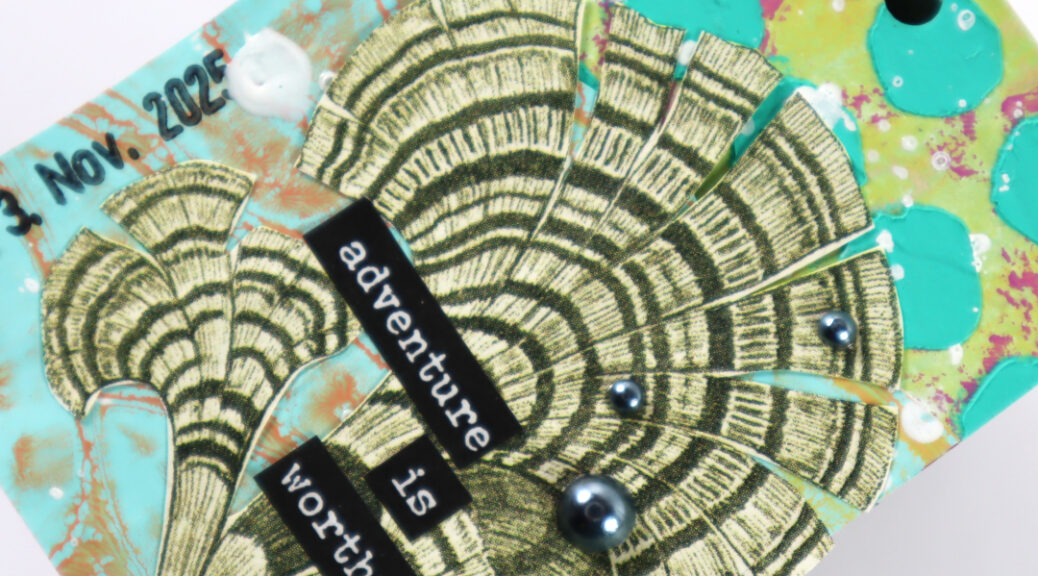
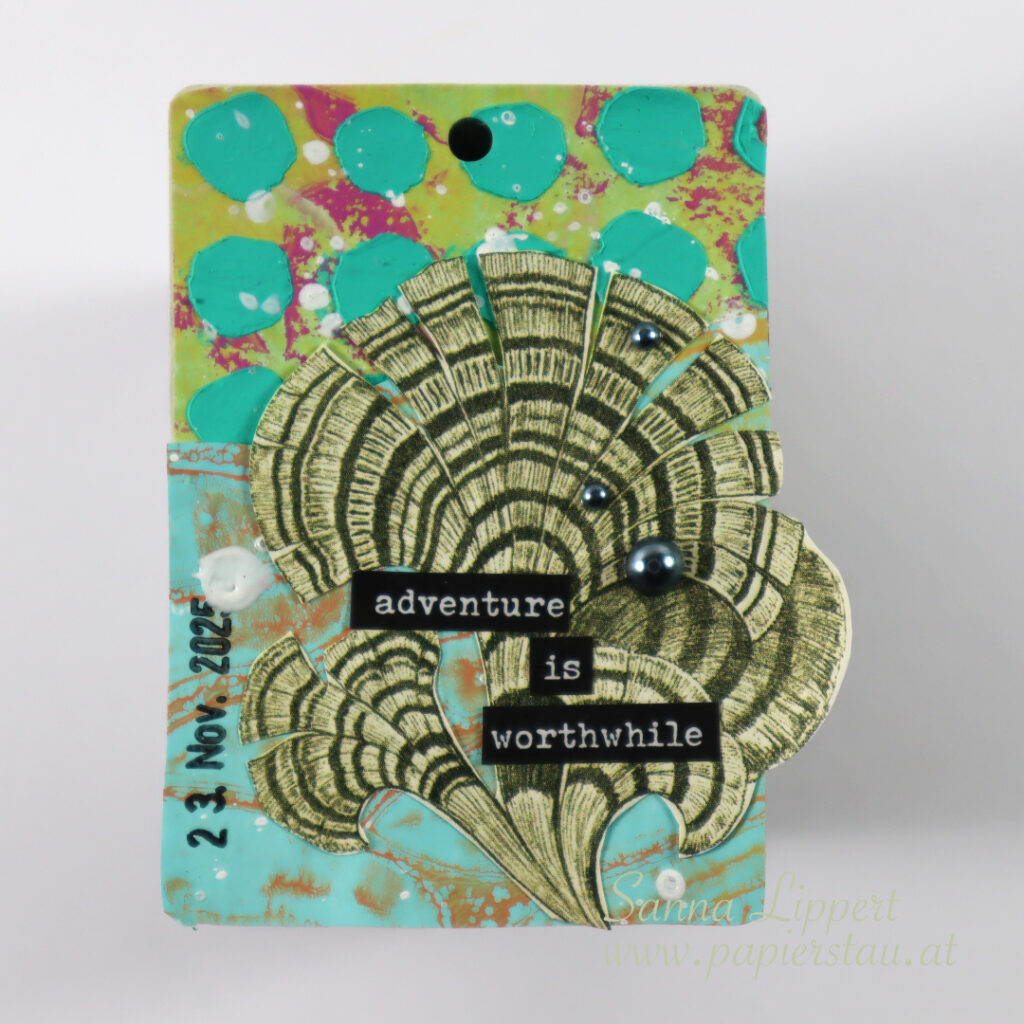
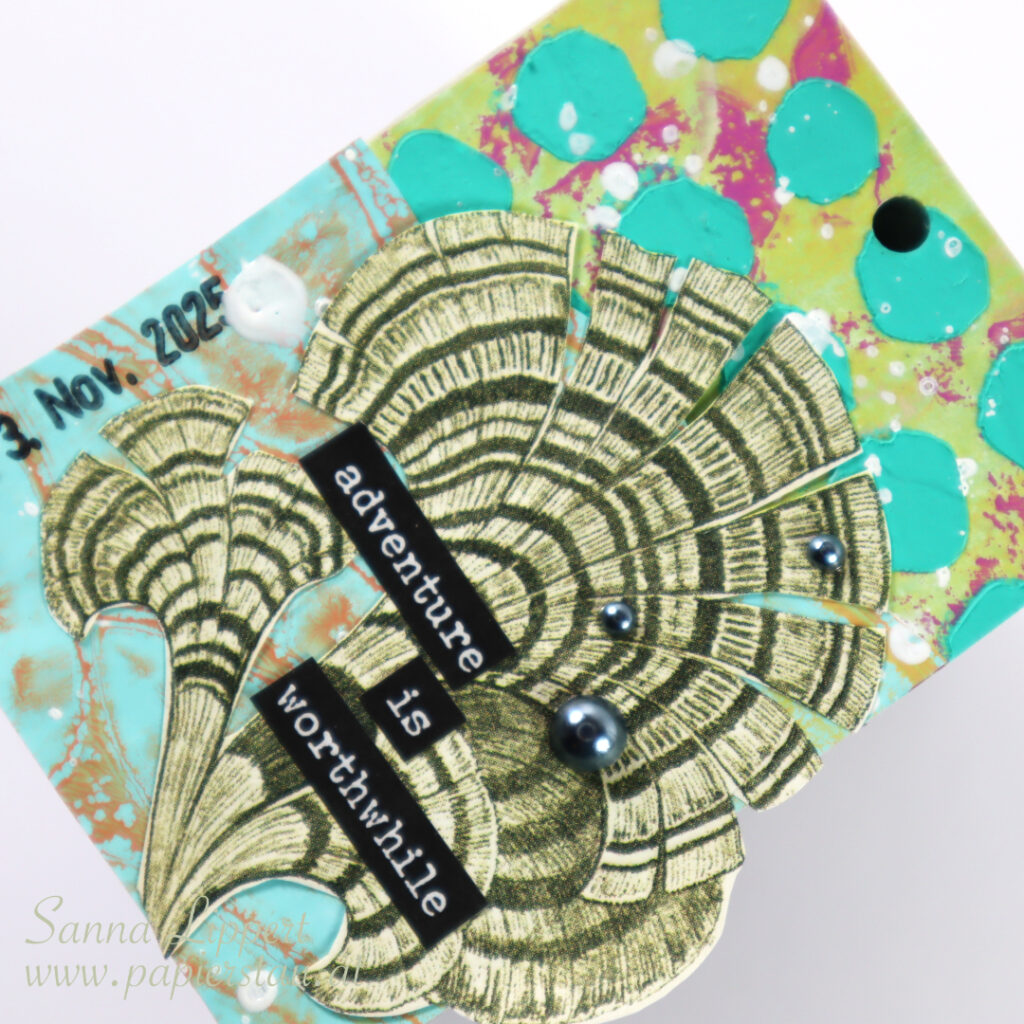
Hello! This is my take on the ShanoukiArt Full Deck Challenge 47/2025 – under the sea.
My carry over item is the turquoise, gelli printed collage paper. To that I added a stenciled, gell printed paper. On top is my constant, a date stamp.
Next I added some Dina Wakley Gloss Spray in white and a fussy cut, sea themed collage paper (coral). On top some half pearls and Tim Holtz sticker words.
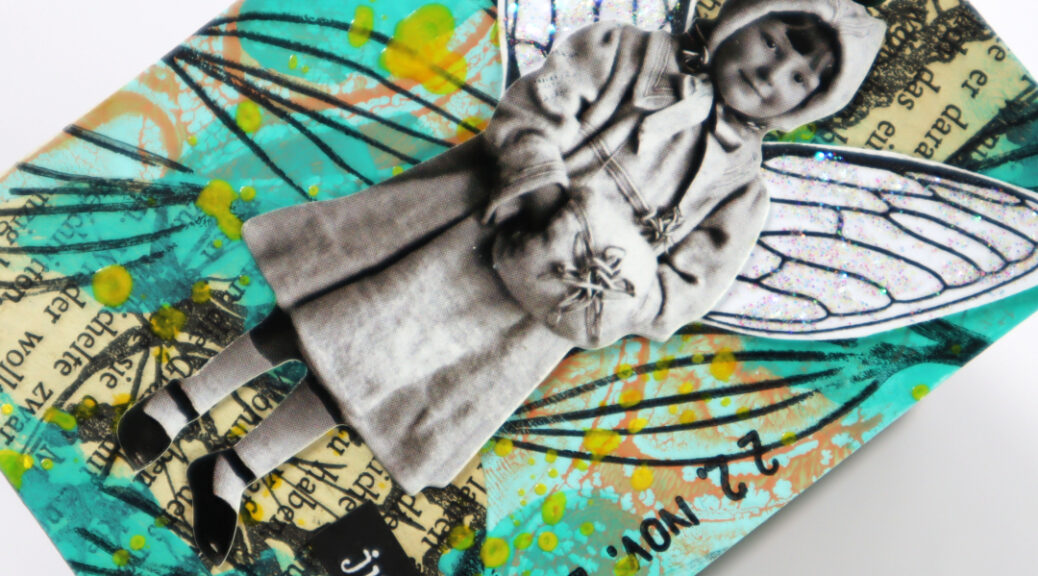
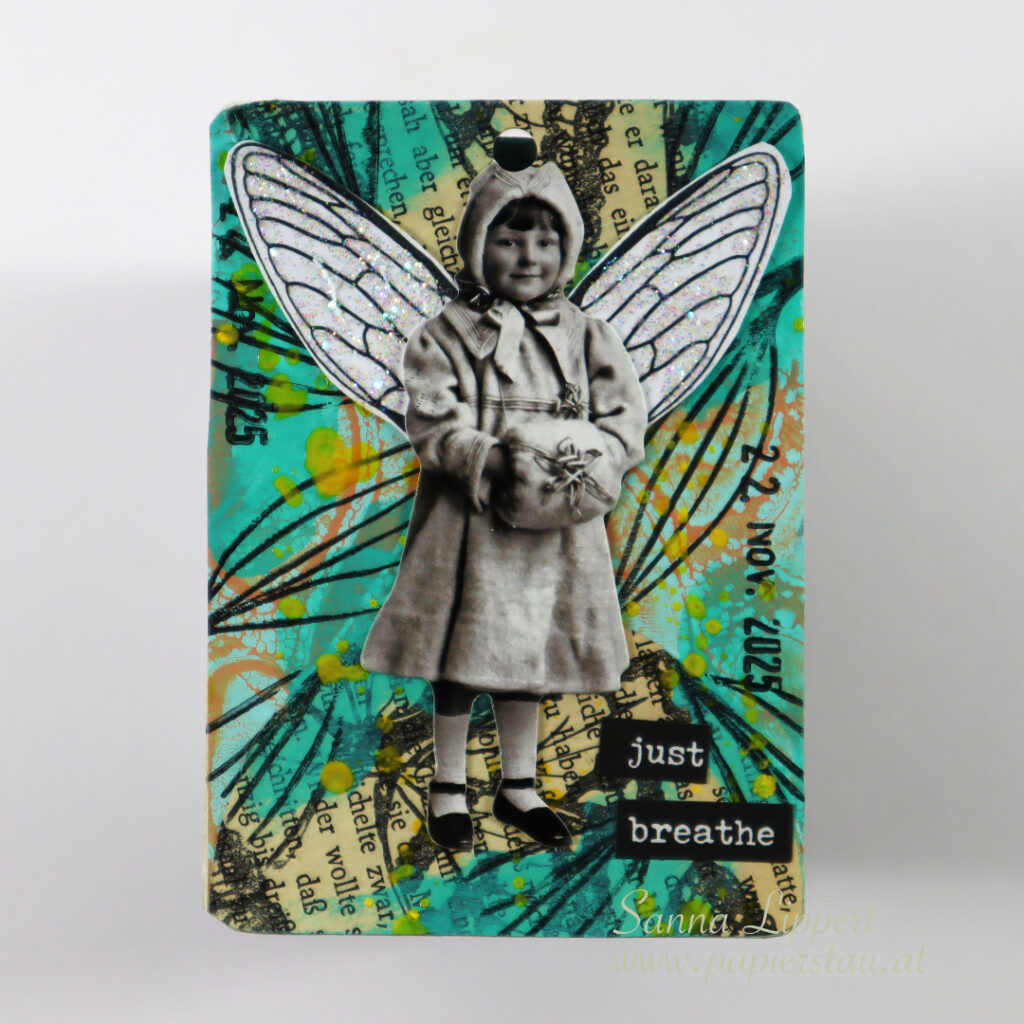
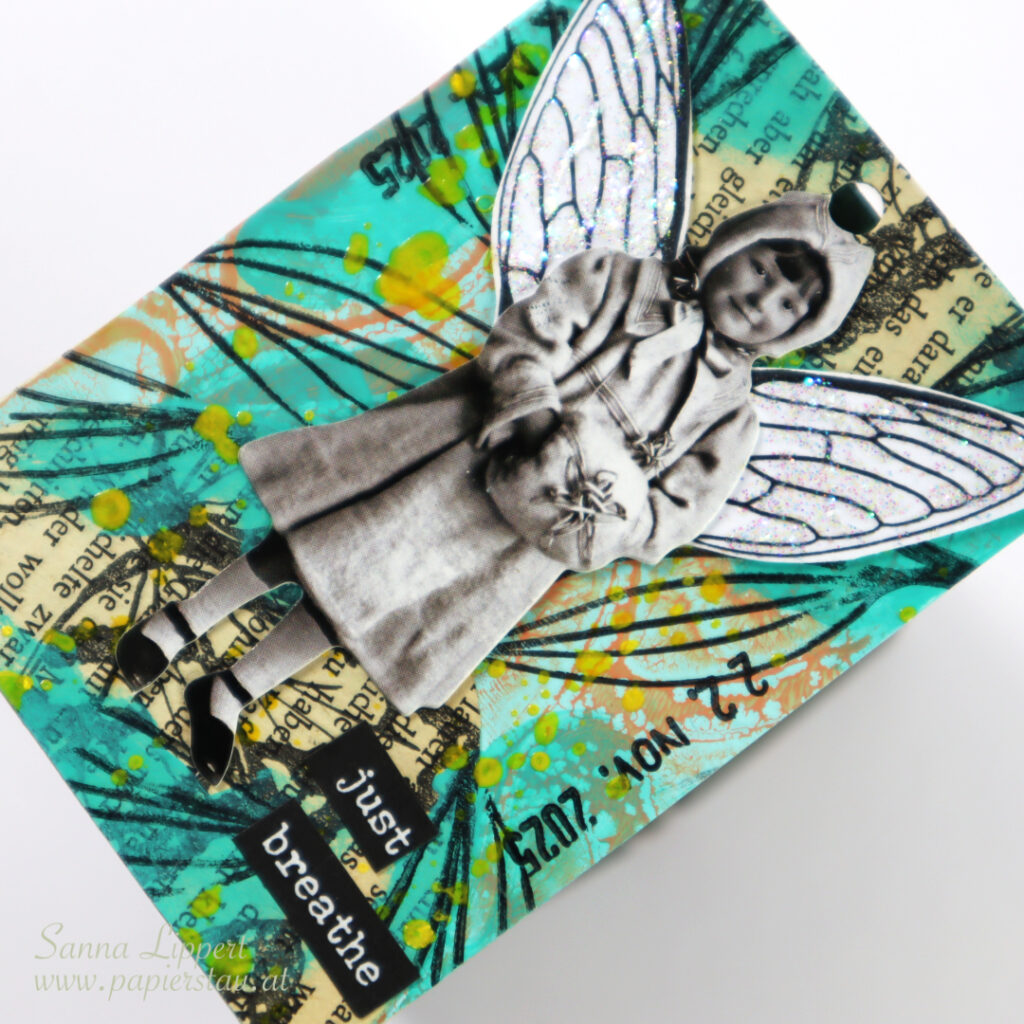
Hello! Here is my take on the ShanoukiArt Full Deck Challenge number 46: fairy.
For this one I used the butterfly stamped old book paper bits as a carry-over-item. To those I added some gelli printed collage papers in turquoise and some Dina Wakley heavy body paint in turquoise. After that I added my constant – the date stamp.
After that I added some yellow Dina Wakley Gloss Spray and stamped leaves with this Rubber Dance stamp to the background. As a focal point I added a Tim Holtz paper doll and fairy wings from a Rubber Dance stamp set. I added some Stickles for shine to them, too. The sticker words are by Tim Holtz.
Here is the step-by-step video:
See you again next week with another take! xx, Sanna
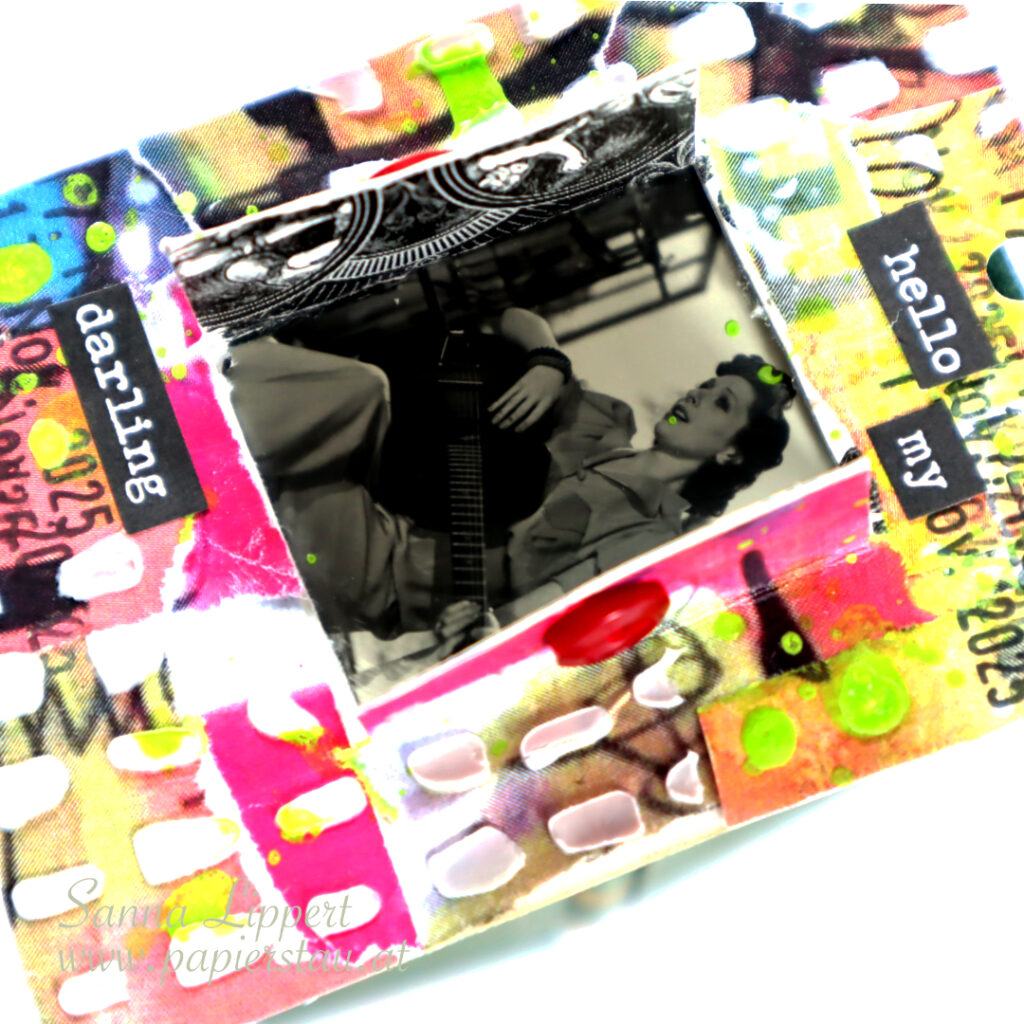
Hi there! This is my take on the ShanoukiArt Full Deck Challenge number 44: window.
I used an exacto knife to cut a window onto the deck card. I then placed a vintage photo behind the window. After that I added some of the collage papers that I also used on my previous deck card (carry-over-item) and added some additional ones. All gifted to me by Yuna from Australia.
After adhering the collage papers on place, I added my constant, a date stamp here and there. After that some white modeling paste thru a Rubber Dance stencil. After that some Dina Wakley Gloss Spray as detail.
For finishing touches I added Tim Holtz word stickers and two red buttons for the window.
Here is the start-to-finish-video:
See you again next week with another FDC take! xxx, Sanna
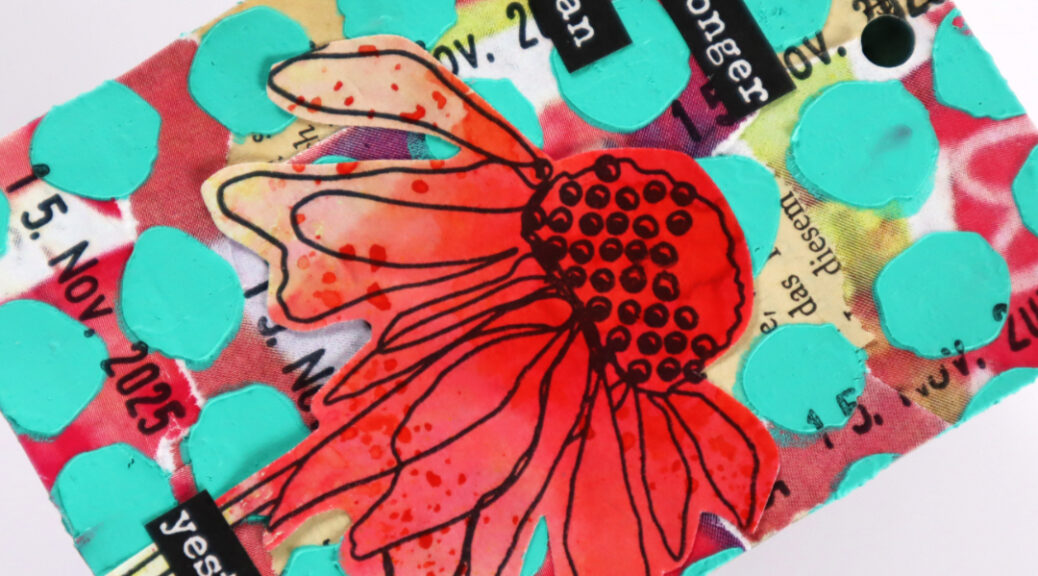
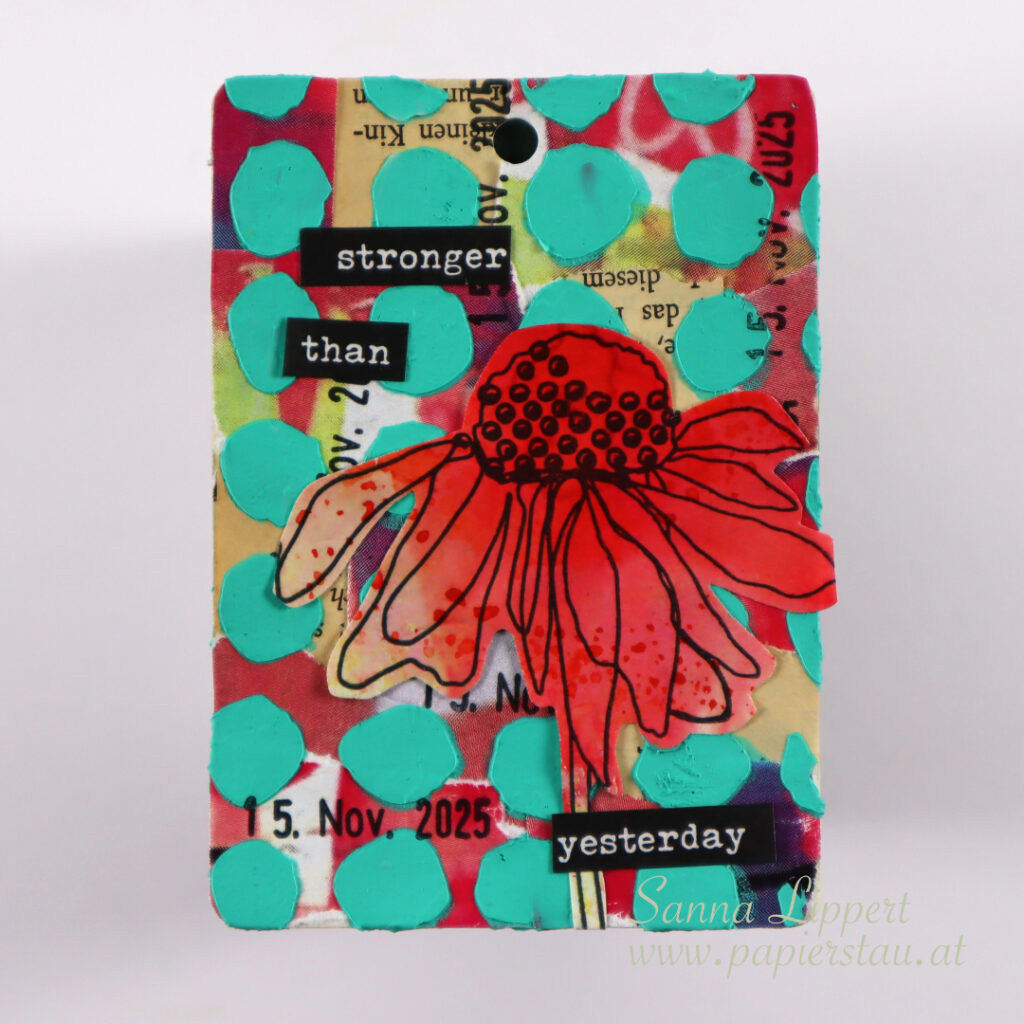
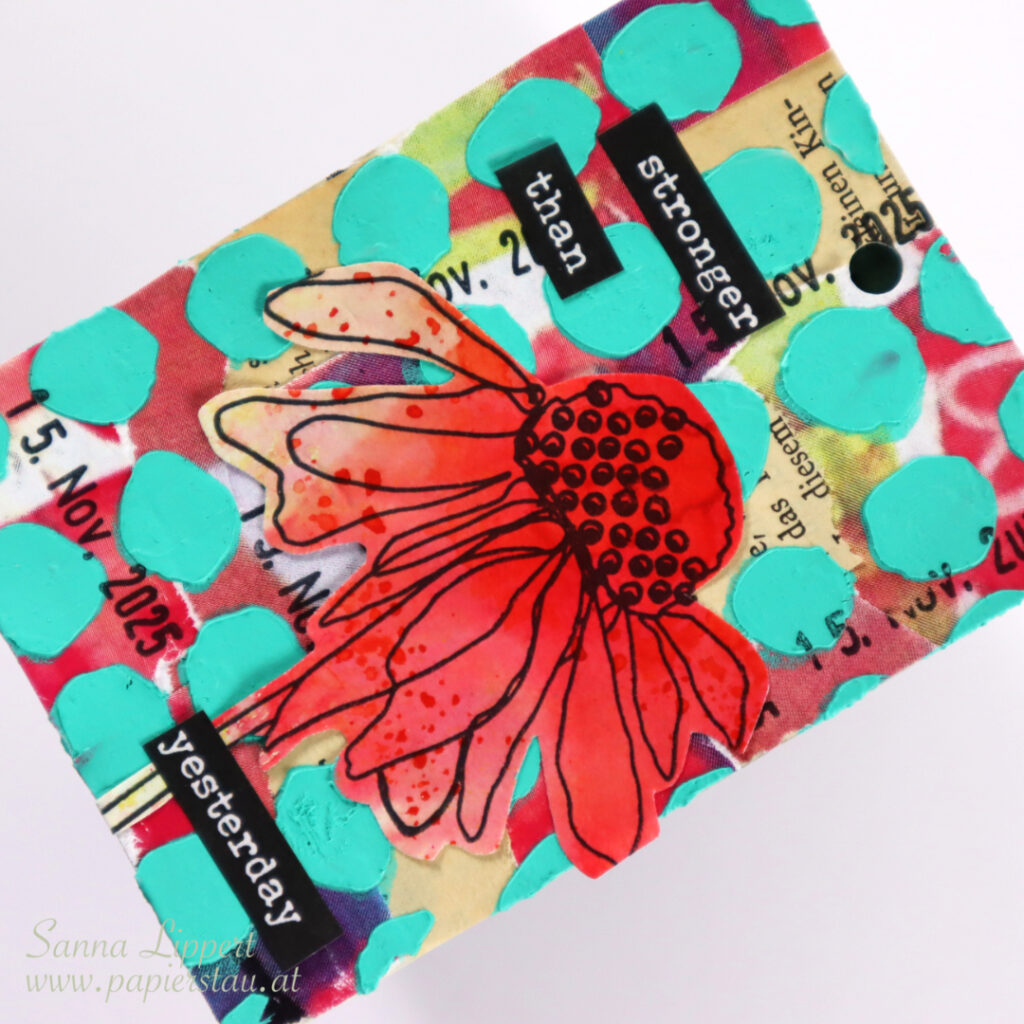
Hello, this is my take on the ShanoukiArt Full Deck Challenge 2025, number 43: circles.
I again used Yuna´s collage papers and my carry over item – bits of old book paper – on the background. On top I mixed white modeling paste with Dina Wakley heavy body paint in turquoise and stenciled it thru a Rubber Dance circle stencil onto the deck card.
In between the stenciled pattern, I stamped my constant, the date stamp images. For decor I added a premade collage flower (stamp by Rubber Dance) and some word stickers (Tim Holtz).
Here is the start-to-finish-video:
See you again next week for another FDC take! xx, Sanna
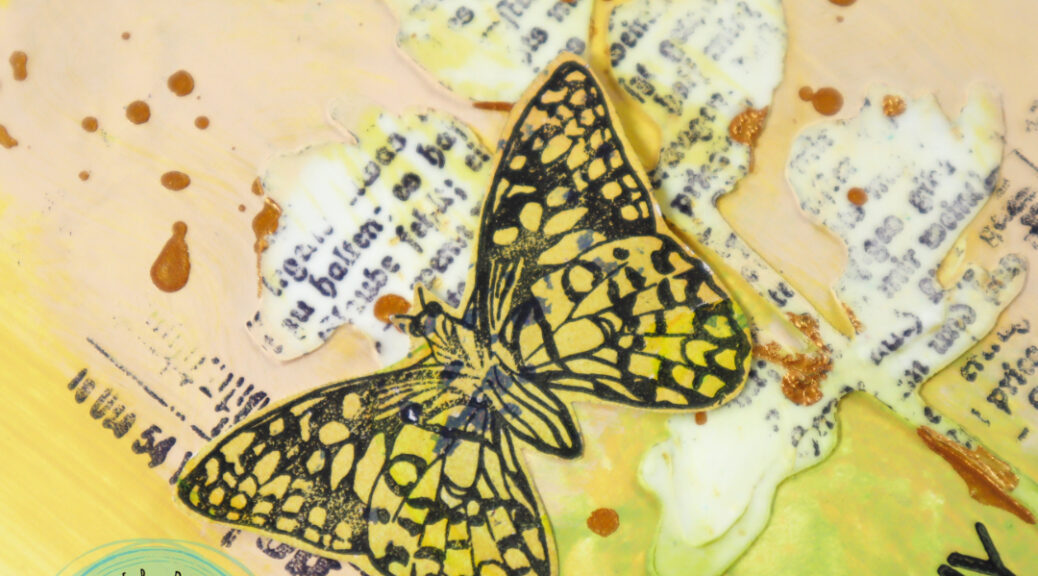
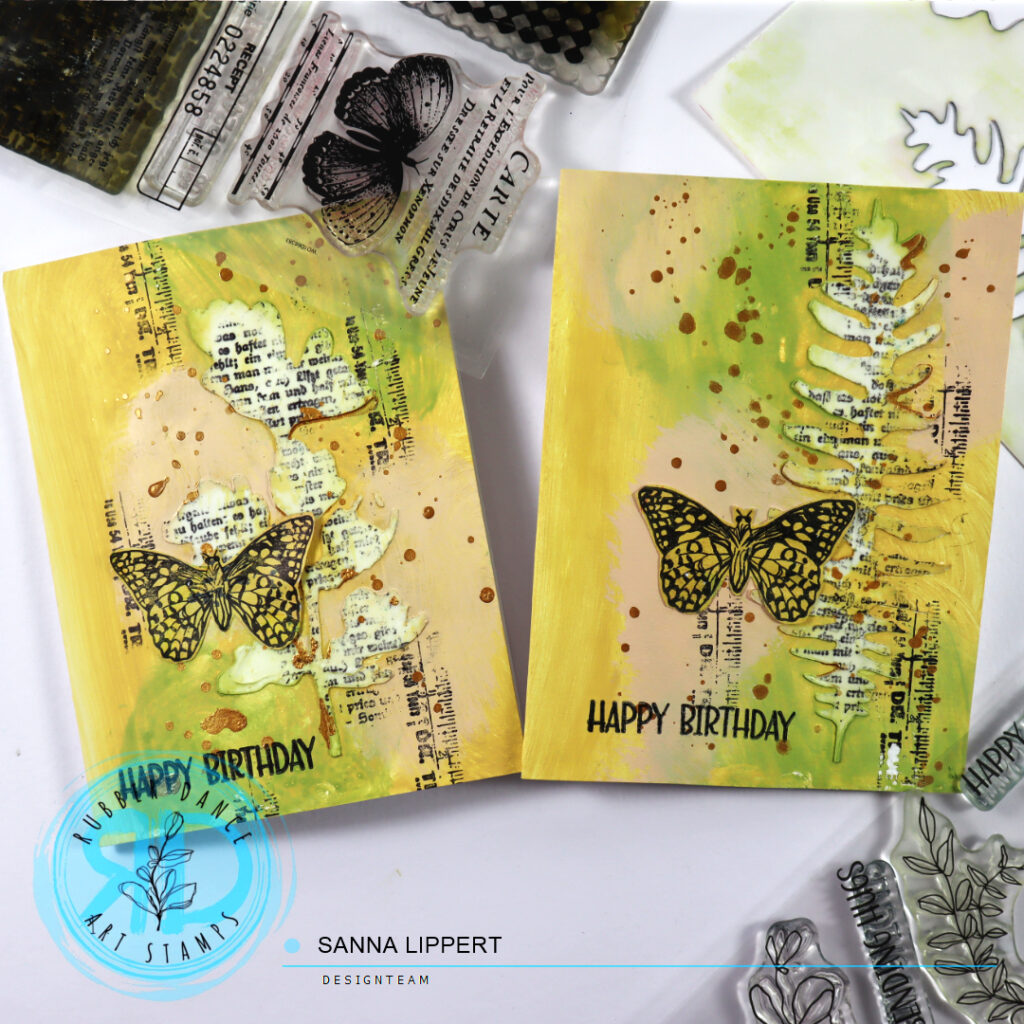
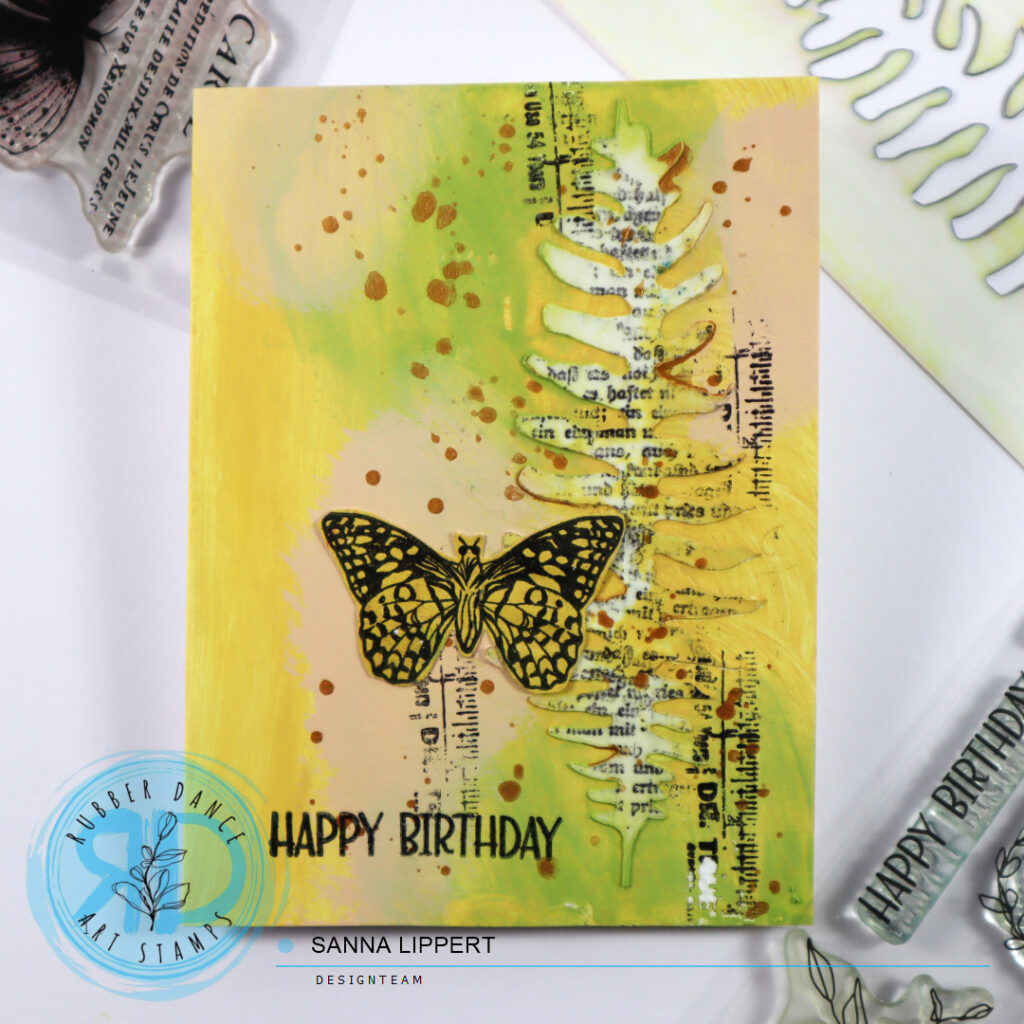
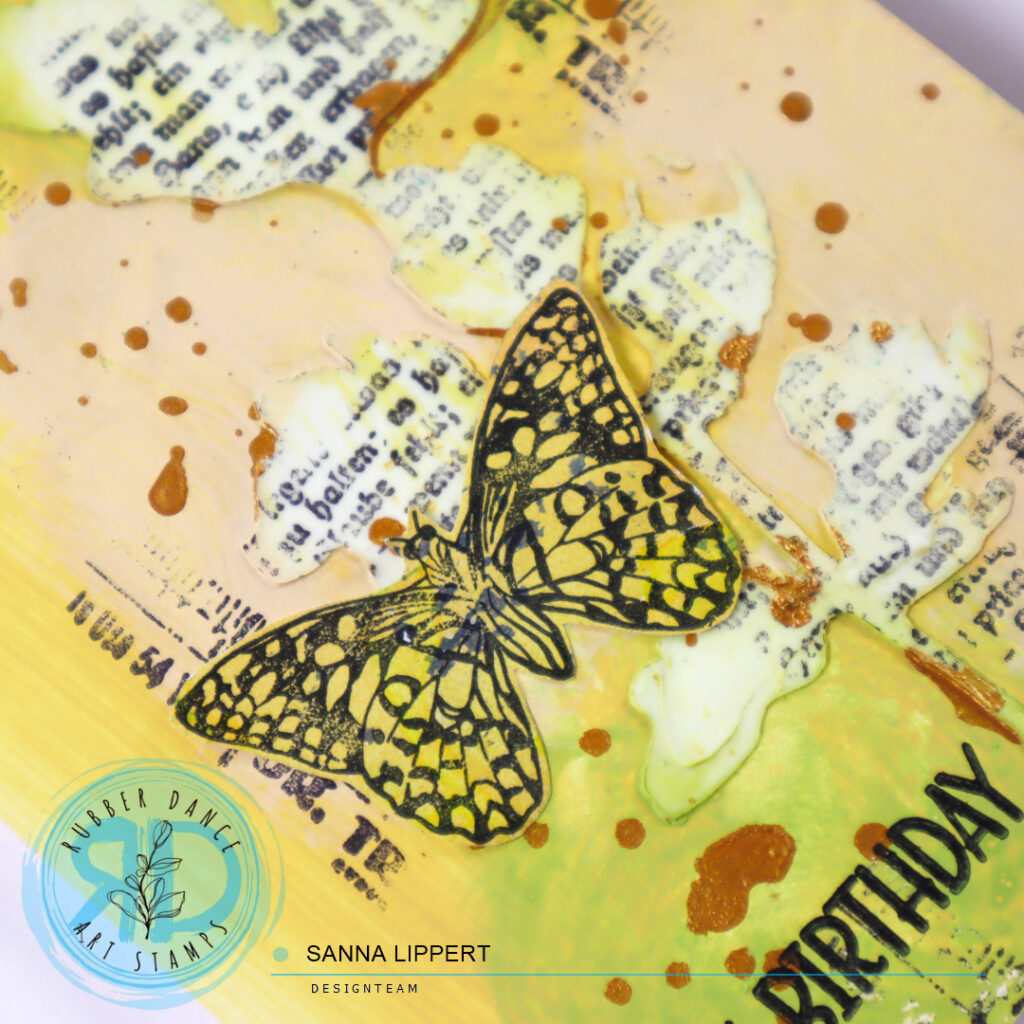
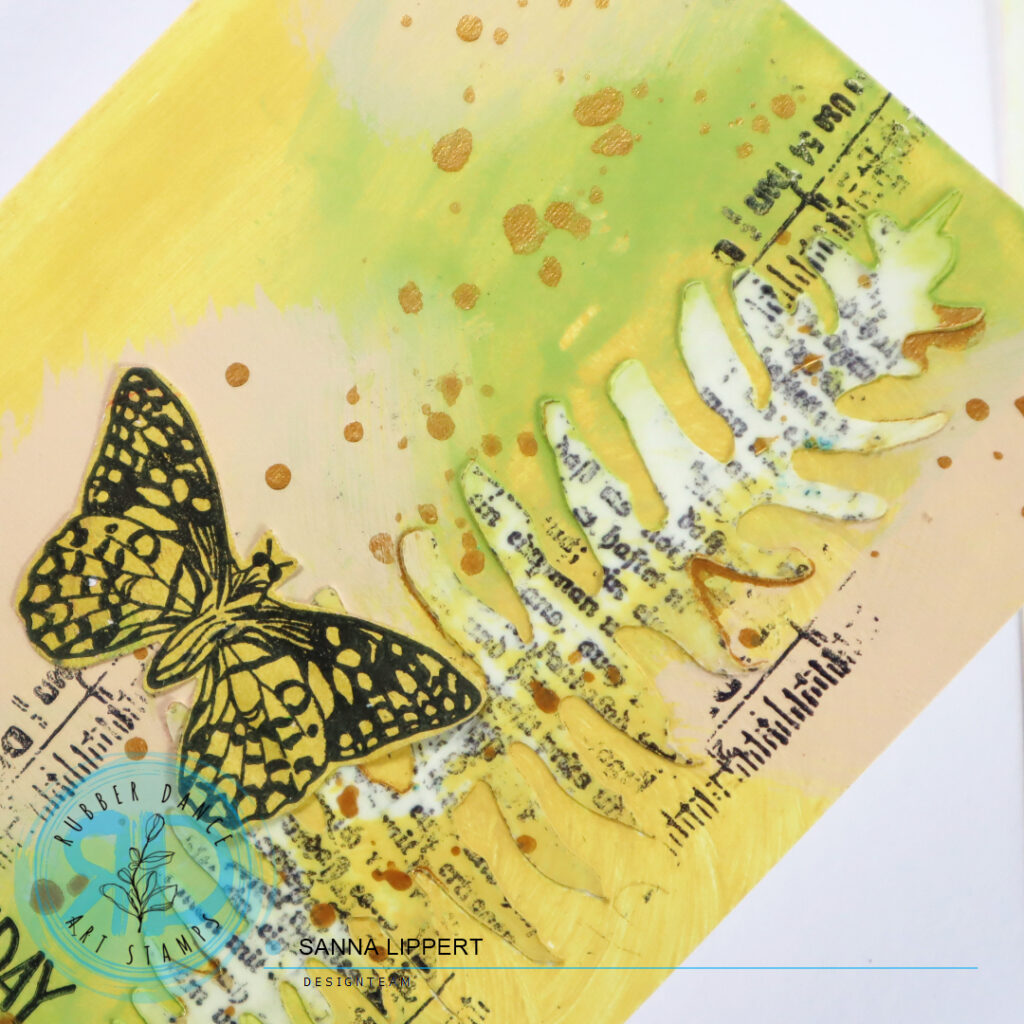
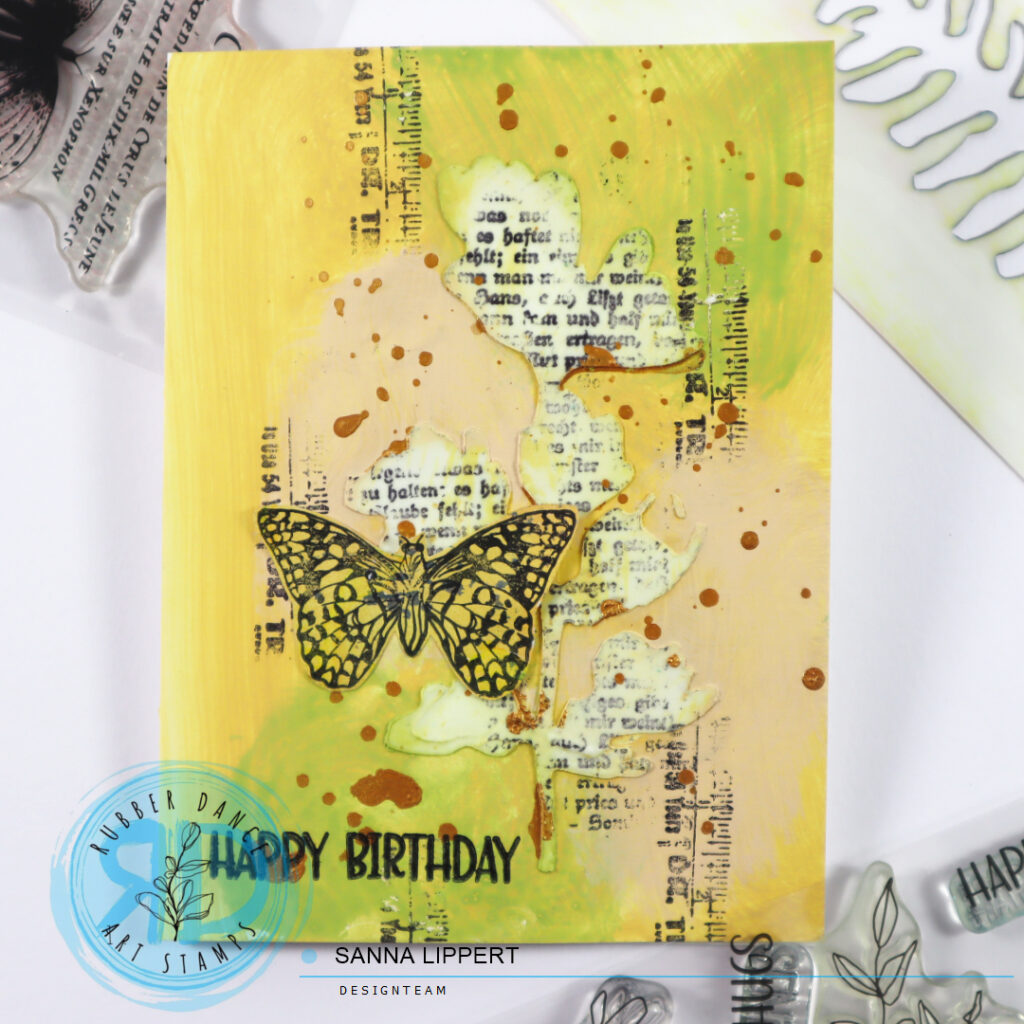
I started off by applying modeling paste thru the Sketchy Leaves 5 stencil directly onto the card base. After that I used ocker and light green paints to add the first layer of paint to the card. I then wiped some of the paint off the stenciled areas with a baby wipe.
Next I added black stamping with the Mix It Up 5 stamp set. First onto the stenciled leaves, then slightly next to it. After that I added golden pigment splatters to the background. For finishing touches I added a stamped butterfly and sentiment.
Here is a process video for you to watch:
I hope to have inspired you with this card set tutorial! Have fun creating! Hop over to Rubber Dance store and purchase a stamp set of a stencil. It will support a small business to survive these crazy tax times! xxx, Sanna
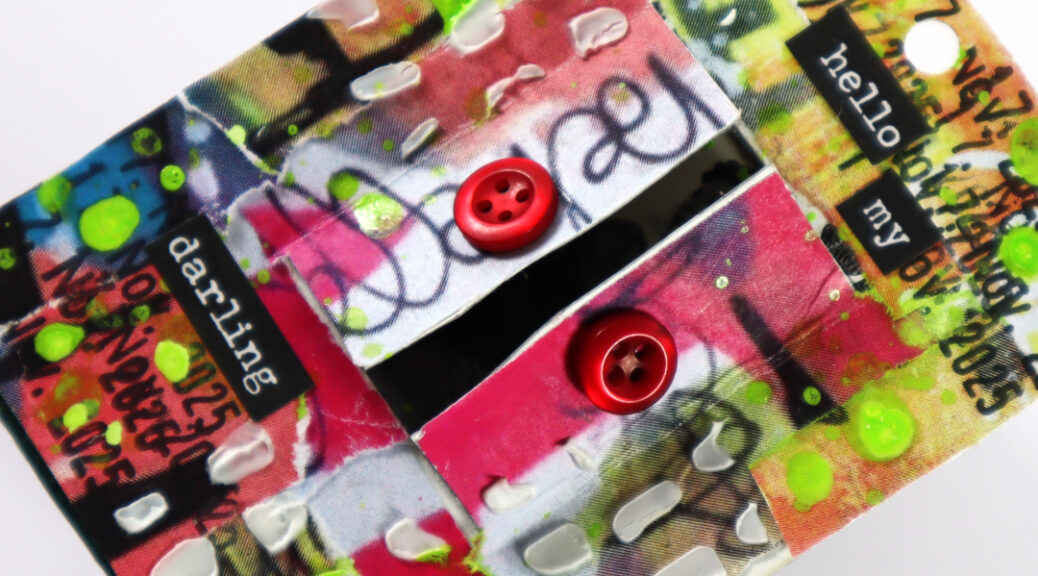
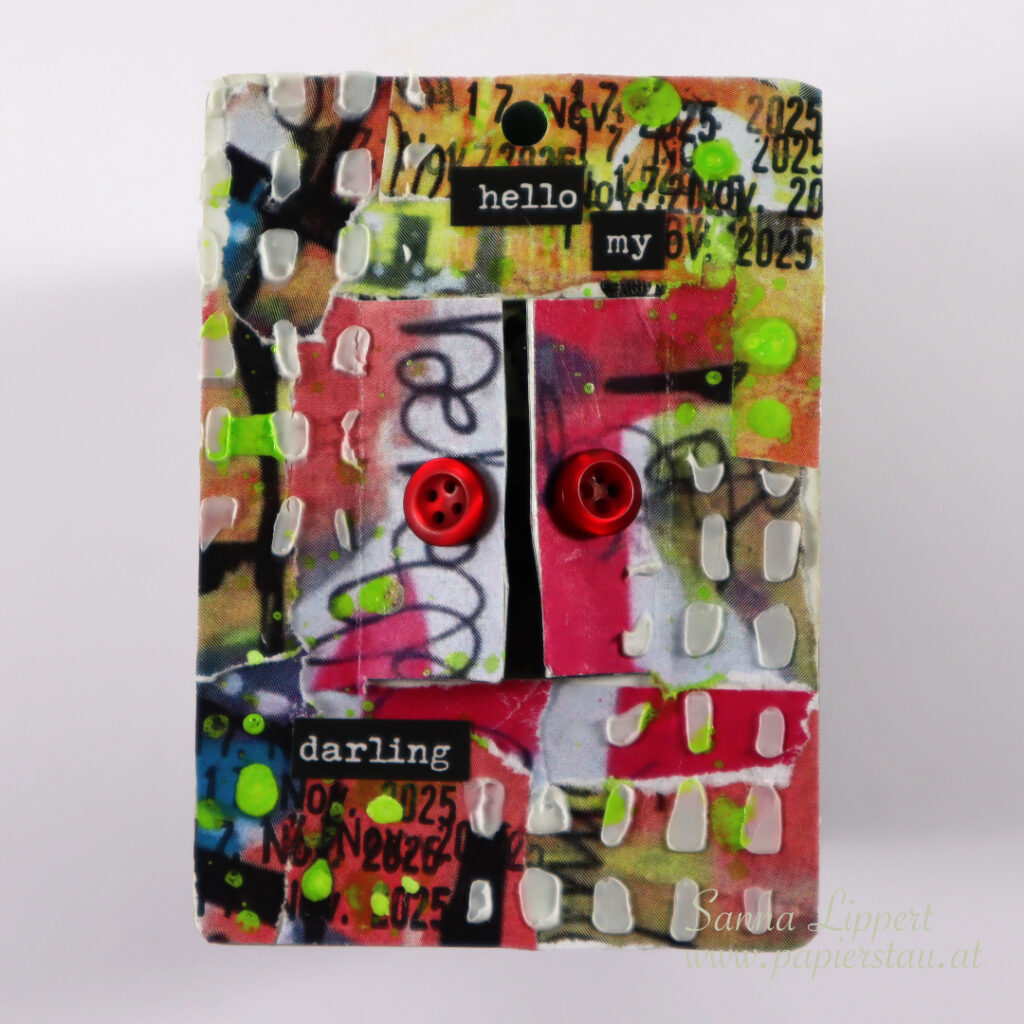
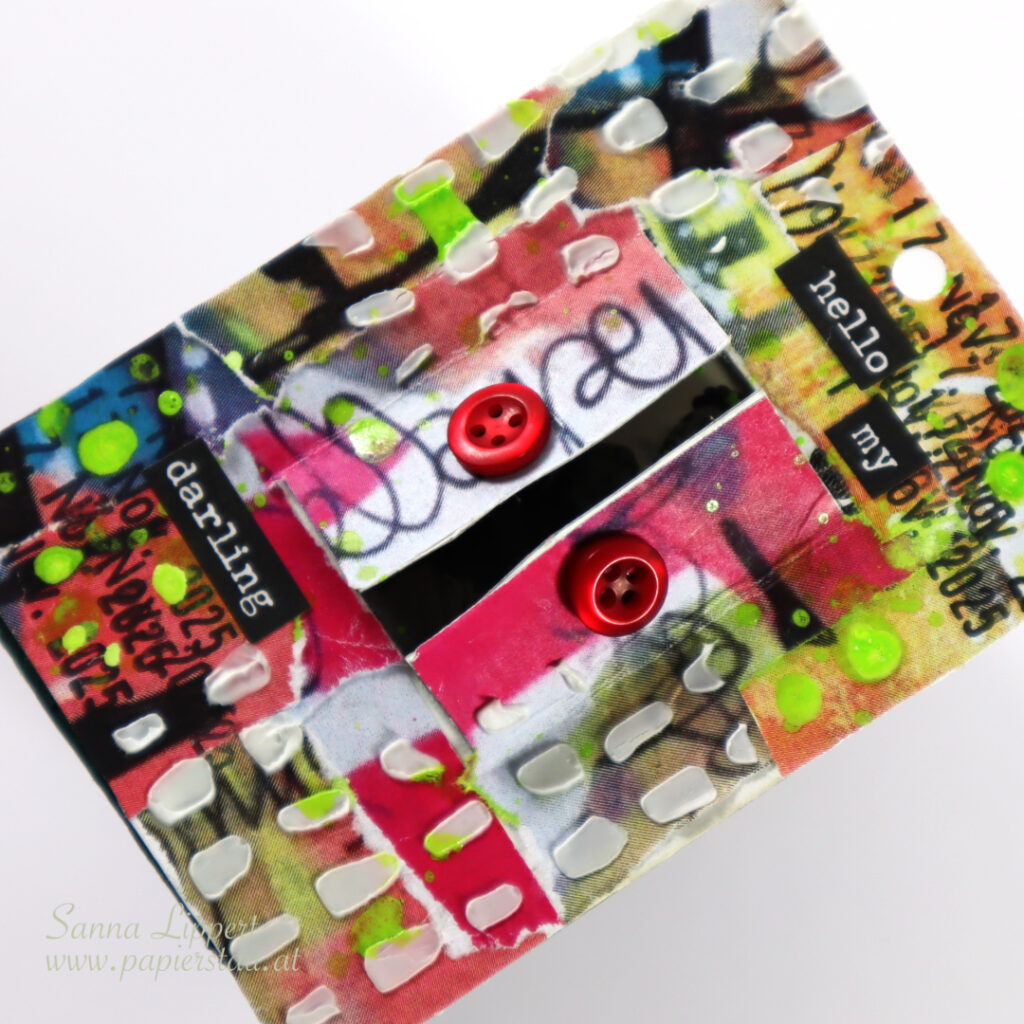
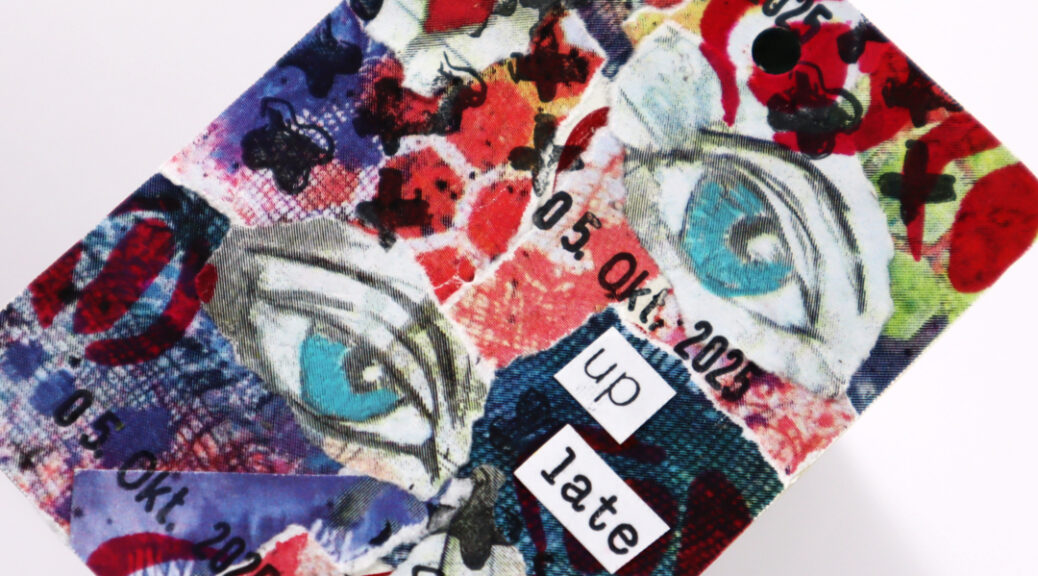
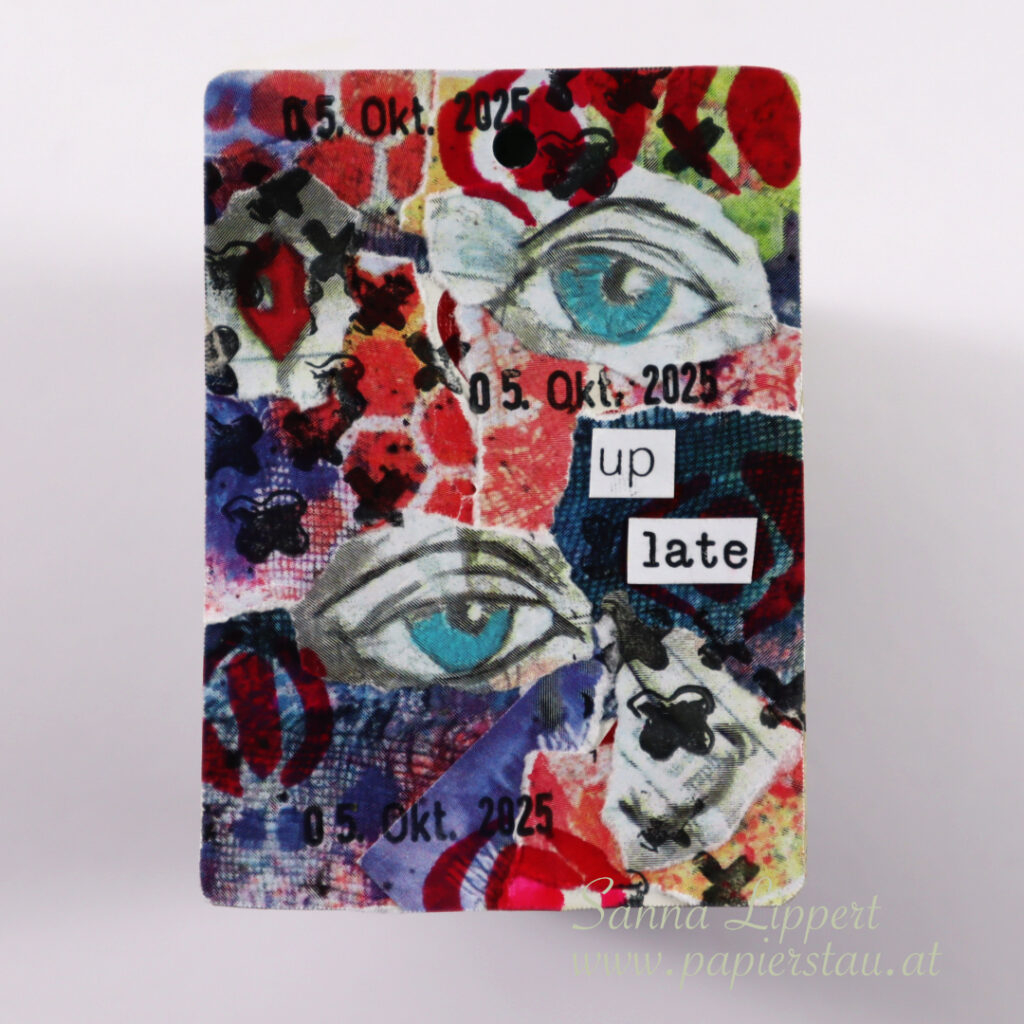
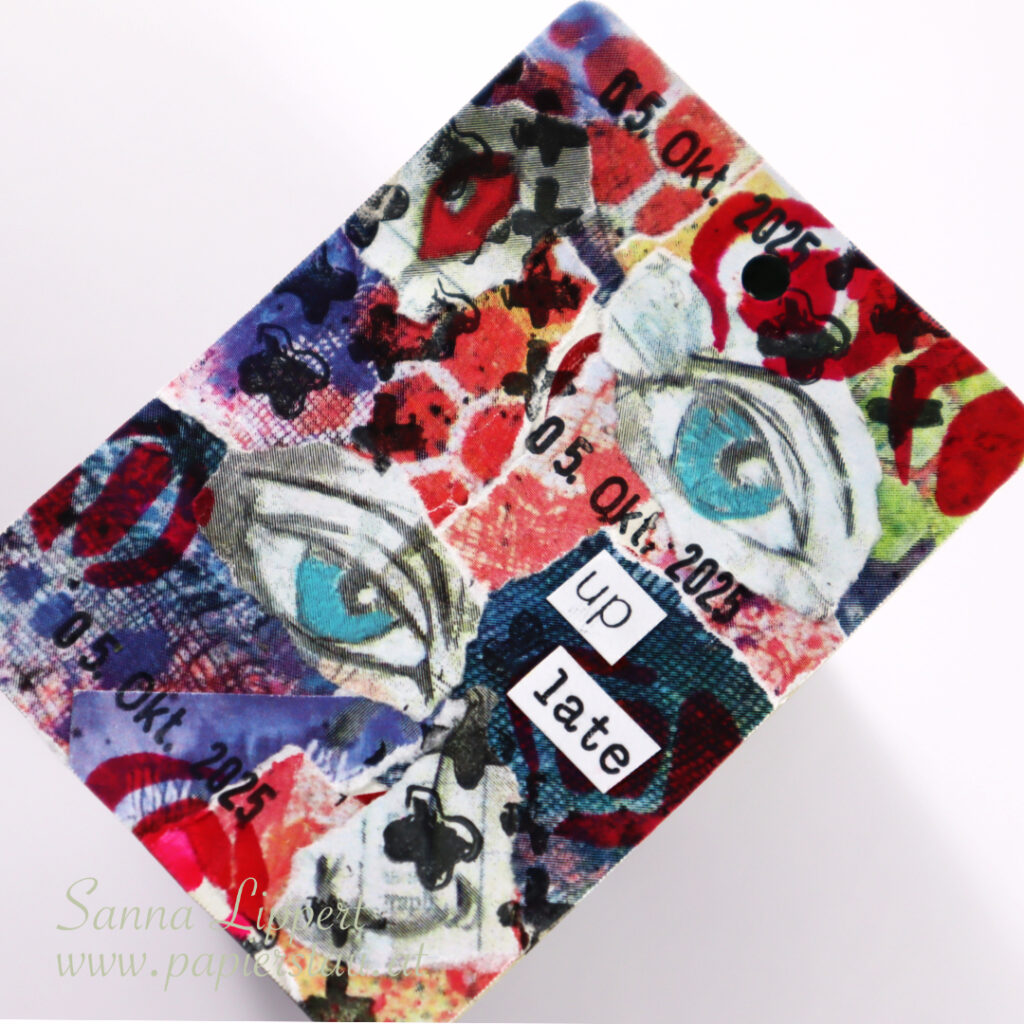
Hello and happy Thursday! Here is my take on the ShanoukiArt “Full Deck Challenge 2025”, number 38/2025: chaos.
For this one I again used Yuna´s collage papers that she gifted to me. This time I chose bold and colorful/wild ones). And as a carry-over-item another collage paper with a face on it. I only wripped off the eyes, mouth and nose and adhered them onto the deck card very randomly.
On top I added some stenciling with a marker using this Rubber Dance stencil. After that I stamped with black ink and this Rubber Dance stamp on top. I tried to keep everything very chaotic (lots going on here and there). I colored the eyes with Neocolor II crayon to make them stand out better. My constant is on the background (a date stamp). And I finished the deck card off with this Rubber Dance sentiment stamp set words.
Here is the process video:
See you again next week with another take! Happy crafting, xx, Sanna