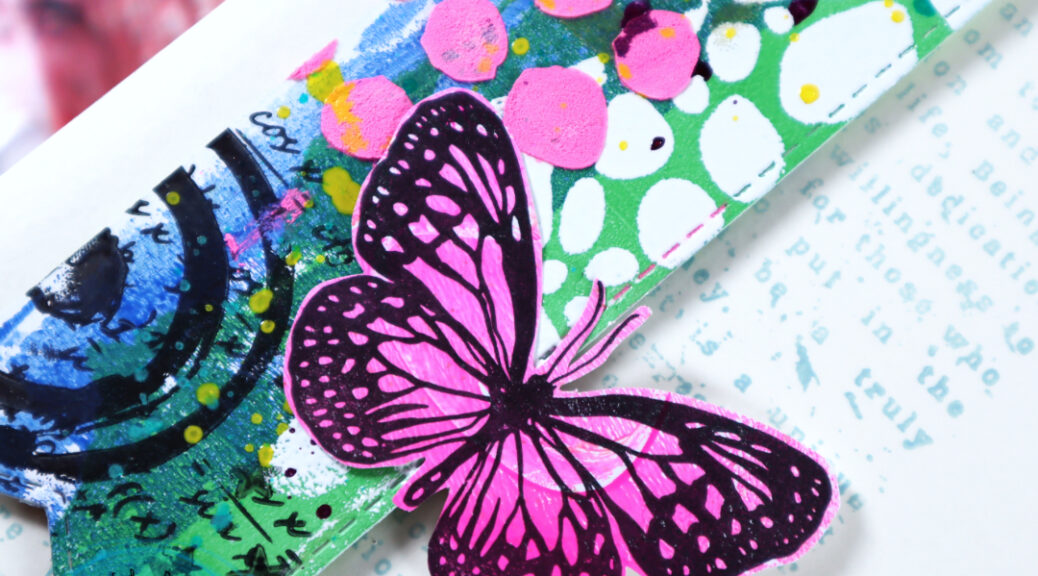
Pastel toned cards – Elizabeth Craft Designs

Hello and happy Sunday! Today I´m sharing another guest design team project over at Elizabeth Craft Designs. My project for this month is inspired by the lovely sunshine weather we have had the past days here in Austria. I wanted to create lovely, candy coloured cards, because of the sunshiny weather.

These are the two cards I share at ECD blog today. Both are very simple and easy to do, but still look detailed. The good thing is, they are done in no time!

Here are the steps for the first card:

Step 1: Take a piece of each (yellow, light blue, grey, pink and light green) Soft Finish Cardstock and die cut one piece of the Junk Journal Extras dies in each colour.

Step 2: Now take the smaller flower dies from the Tropical Florals die set and die cut the flower with pink, yellow and grey Soft Finish Cardstock.
Step 3: Next adhere the die cut pieces onto a white card base overlappingly and arrange the flower to the upper left corner for decoration.

Step 4: Finally, take a piece of kraft carstock and heat emboss a sentiment with white embossing powder using one of the sentiment in the Build Your Own Sentiments 1 set. For additional decor, add a few craft drops next to the sentiment.

Here are the steps for the second card:

Step 1: Die cut a strip of paper with the Adventure Edges die and create a cloud background to a white card base with it by applying yellow and light pink ink using the die cut border as a stencil.

Step 2: After that apply some ink droplets with the light pink tone onto the background for a fun additional detail. Use a paint brush or a water tank brush for this purpose.

Step 3: Die cut two leaves and one flower with the Tropical Flowers die set from the same Soft Finish Cardstock tones used on the first card.

Step 4: Arrange the leaves and the flower onto the right lower corner of the card and adhere on place. Then add a stamped sentiment with black stamp ink and the Build Your Own Sentiments 1 stamp set.

Step 5: For finishing touches add a few Craft Drops to the background.

Also if you are not into pastel tones, feel free to try out this set in primary colours or in more neutral tones. Changing the cardstock colours will give you a totally different look!

Hoping I could inspire you with my card projects today and get you crafting fun candy coloured cards yourself! See you again next month with another ECD project!! Have a great Sunday!
xxx, Sanna

Supplies:

All the best – Tonic Studios

Hello lovelies, today I`m again sharing another Tonic Studios product based card. I am totally in love with the very delicate German sentiment dies which will be available in April. Here I´ve again used the “All the best”-one, this time with blue paper. I love how it really jumps off the card against the pink and gold toned background.

I´ve created the background by first stamping the rose images onto white cardstock, then pouring white embossing powder on top and heat setting with a heat gun. Next I took a blending brush out and applied pink, green and golden Nuvo Embellishment Mousse tones on top of the embossed roses fairly randomly. The mousse blends really nicely with a blending brush and the embossing powder resists it really well.

That resulted in this resist technique background. After that I added the die cut sentiment which I adhered with the Nuvo Glue Pen again. Works really well!! For additional interest I cut the paper into strips leaving open areas in between the stripes, that way the white card base peeks thru those areas and creates a nice contrast to the card. For finishing touches I adhered some silver Nuvo sequins here and there.

That´s all from me for today. I hope you get inspired to try some of the techniques out yourself!!! See you soon with more projects, so hope you´ll drop by for more :).

Happy crafting,
xxx, Sanna

Supplies:


Misted Mixed Media Tag – STAMPlorations

Hello everyone and Happy Saturday! I´m up with another Mixed Media project share and tutorial over at the STAMPlorations blog today. For today´s post, I wanted to create a colorful mixed media tag.

Here is what I created:

And here is how I went upon creating this tag:  I have a book af cheap watercolor papers that have a coloring image on them. I went and die cut the Stitched Nesting Tag with my die cutting machine from that paper pad. The image just adds to the layers of my tag, I don´t mind it being there at all.Next I took the Heartfelt Hibiscus stamp image and using an embossing ink pad, stamped the image onto the background quite randomly. I only left some space at the very top for the Trendy Birds 2 clear stamp images. Those are also embossed with white embossing ink, like the flower images. I heat set the embossing powder with my heat tool.After that I took a set of spray inks and applied them onto the background. In between colours I used my heat tool to dry the particular spray ink layer abit, before adding the next one. I love the gorgeous shine the spray inks add to the background. Now you can also see the random flower pattern and the birds thru the misting. I repeated the same steps like above on the single bird image, this time using black spray ink. After the spray ink was dry, I fussy cut the image.Then I took a residue piece of white cardstock (I always save small pieces of paper for purposes like this) and stamped words from the Trendy Birds 2 stamp set onto the paper. I also applied a rub-on onto the paper and then inked the background green with spray ink. Next I fussy cut every piece.I then adhered all the fussy cut pieces on place and decorated the background with Nuvo Confetti (this adds an additional sparckle).For additonal detail I added some Nuvo Mousse thru the “Rag Rug” stencil with a palette knife here and there on the tag background. This adds an additional layer of texture and interest.For finishing touches I added some Nuvo Drops here and there and some ribbons.Here are some detail photos of the tag.

I hope you get inspired to play with stencils yourself and create a mixed media project of your own! When you do, remember to submit your project to the Mixed Media Challenge!

Also I am again adding my discount code for you to use. When you add “STAMPGIRLSANNA” upon checkout at the STAMPlorations store, you will get 20% off your order! Happy shopping &

Happy crafting,
xxx, Sanna

Supplies:

Noel tag – Tonic Studios

Helllo and happy Friday! Christmas eve is just around the corner and today I am sharing my last Christmas themed tag for this year with you:

For this tag I again used the Magnificent Magnolia stamp set to create the background for my tag. I simply took the leaf pattern stamp from the set and repeatedly stamped the image with embossing ink onto the background. Next I poured some golden embossing powder over the stamped areas and heat set the powder with a heat gun.

After that I inked the white tag with Bundled Sage Distress ink and added a frame sticker as a focal point. I decorated the frame with Harvest Moon Glitter Accents and adhere the bird sticker into the middle using a 3D foam underneath it. This way it is more dimensional. I then added Nuvo Glaze drops onto the wings and poured some Ice White Pure Sheen Nuvo Glitter onto the glazed areas. I let that dry properly and then wiped any loose glitter off and added some Harvest Moon glitter details there too. For finishing touches I added a word Noel, created with stickers from Basic Grey and bound a matching ribbon to the tag. I really like the combination of the stamped image with the bundled sage colour on the background. It makes it very elegant and festive looking.

That´s iit for this years Christmas themed tags. In January I´ll start sharing tags again, but this time with another theme :).

Happy crafting and happy holidays,
xxx, Sanna

Supplies: