Tag Archives: Tim Holtz

Mixed media tag set – Rubber Dance

Hello everyone, I am up over at Rubber Dance blog today with a tag set featuring gelli printed fodder elements. For these tags I used the Butterflies and Moths, Mix A Sentiment 2023 and Loose Florals 2024 stamp sets.

Here is how I created the tags:

I first started by stamping brown Distress Oxide Ink with the Mix A Sentiment 2023 stamp set onto the kraft tags. Next I took black stamp ink and the leaves from the Loose Florals 2024 stamp set and stamped black leaf images onto the tags.

Then I colored the leaf images with glitter brush pens and added some gelli printed strips to the bottom of the tags with some old book page pieces. For the gelli print piece I used the same Loose Florals 2024 stamp set.

After that I added some white gel pen circles to the background for interest and adhered some butterfly fodder and ribbon to the tags.

For finishing touches I added some liquid pearls to the butterflies and attached sticker sentiments to each tag.

Here is also a quick step-by-step to how the butterfly fodder was done:

First create a colorful gelli print. I used three tones of paint and “drew” random scribbles to the paint. Next I stamped “Butterflies and Moths 2024” with black stamp ink onto the gelli print. After that I fussy cut all the images. This way I have plenty of fodder ready for my next projects.

Creating the fodder and tags was so much fun. I hope you give it a try! While at it, make sure to try out different color combinations and patterns. This way you have plenty of material to work with for future projects.

Happy crafting,
Sanna

Supplies:

Inspirational cards for the New Year with positive and negative stencil images

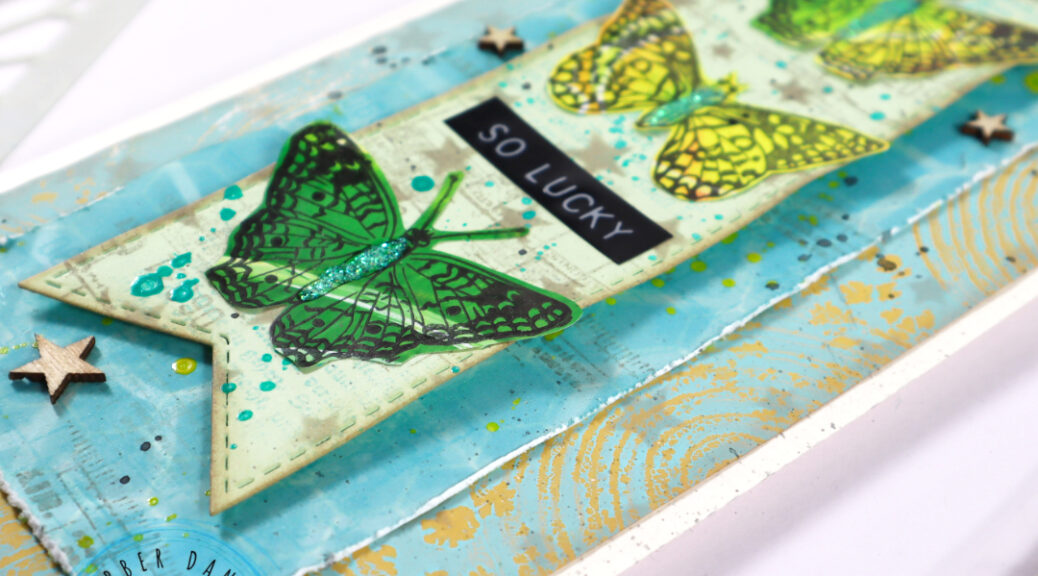
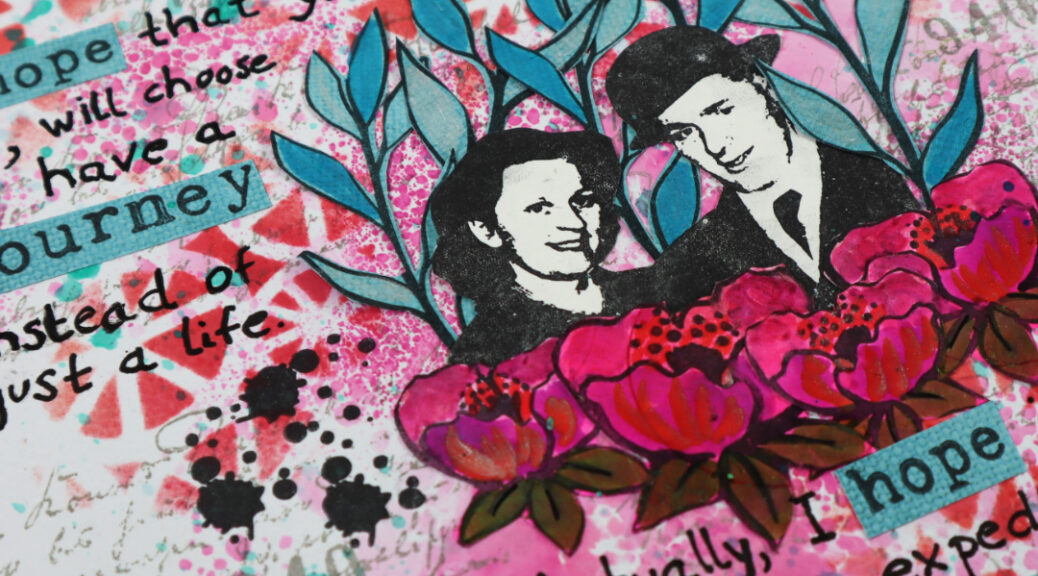
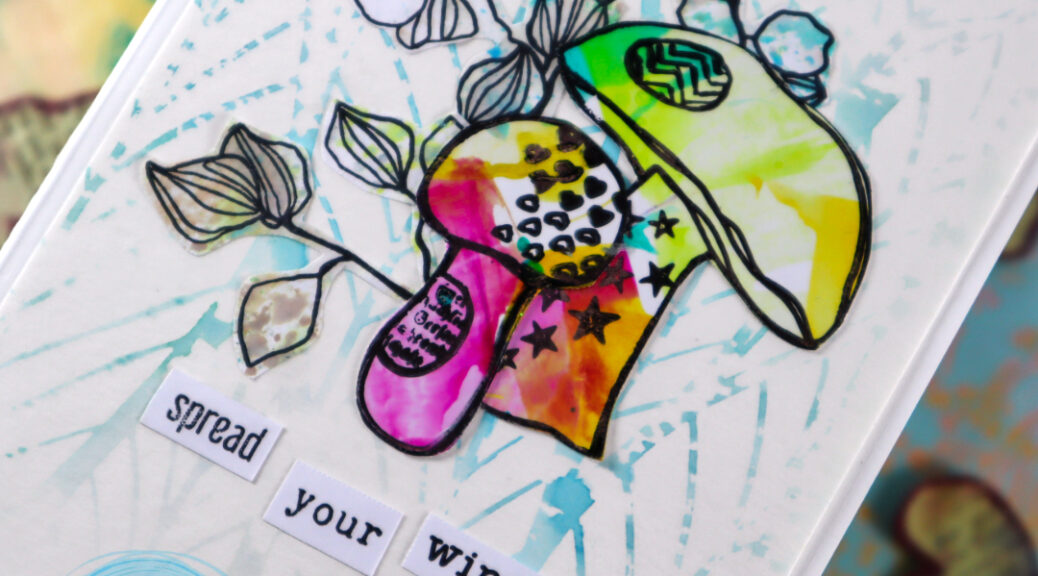
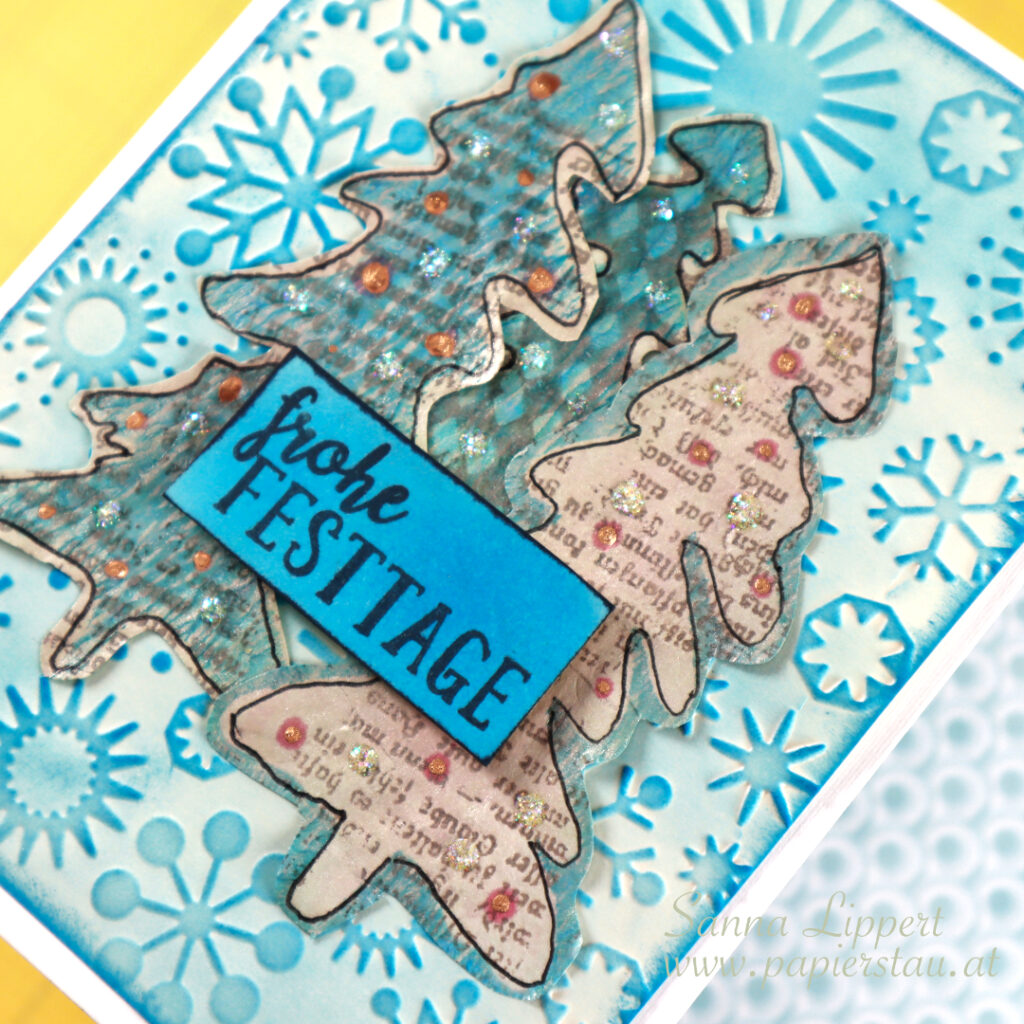
Hello, it´s my turn again today over at Rubber Dance blog and I am up with a set of motivational/inspirational cards for the new year, created using positive and negative stencil images. For the cards I used the Textured Mushrooms 2 stamp set with the Wheels and the Leaves 2 stencil.

Here is how I created these cards:

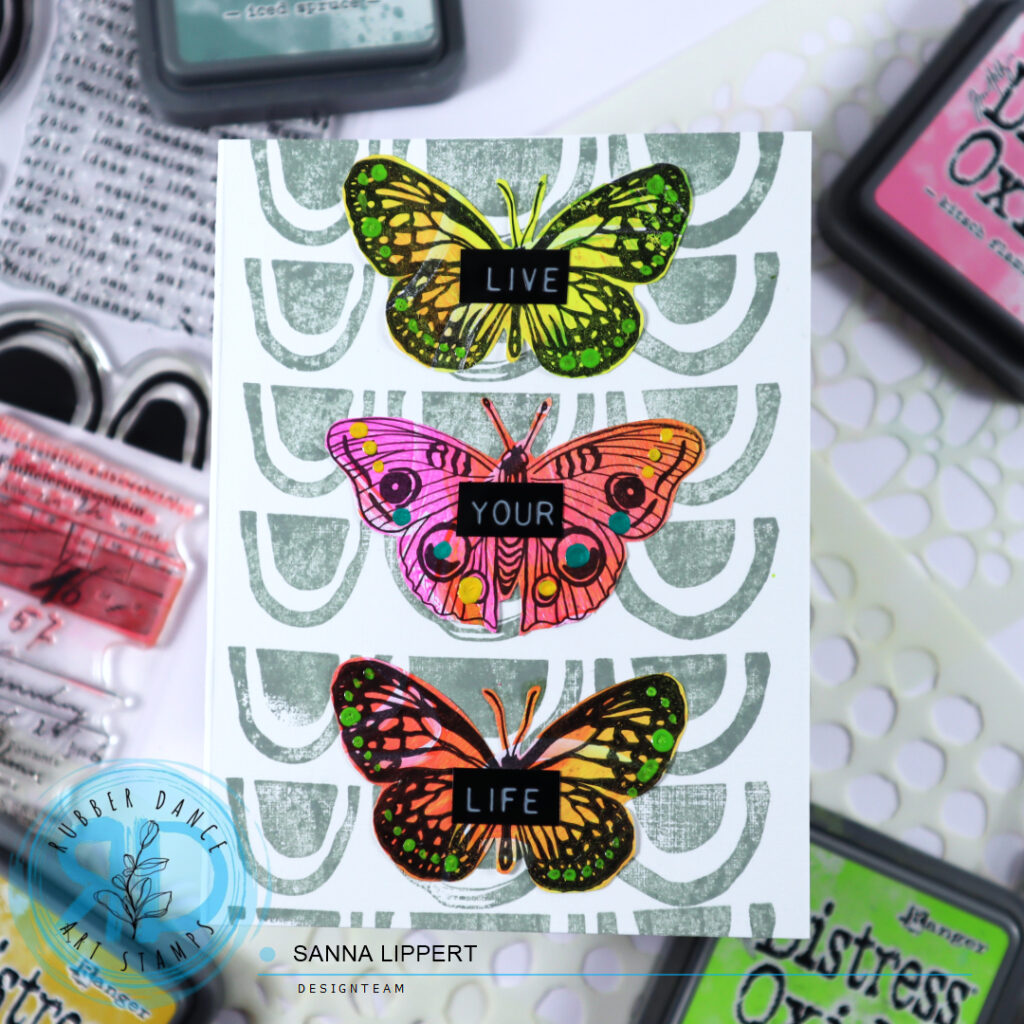
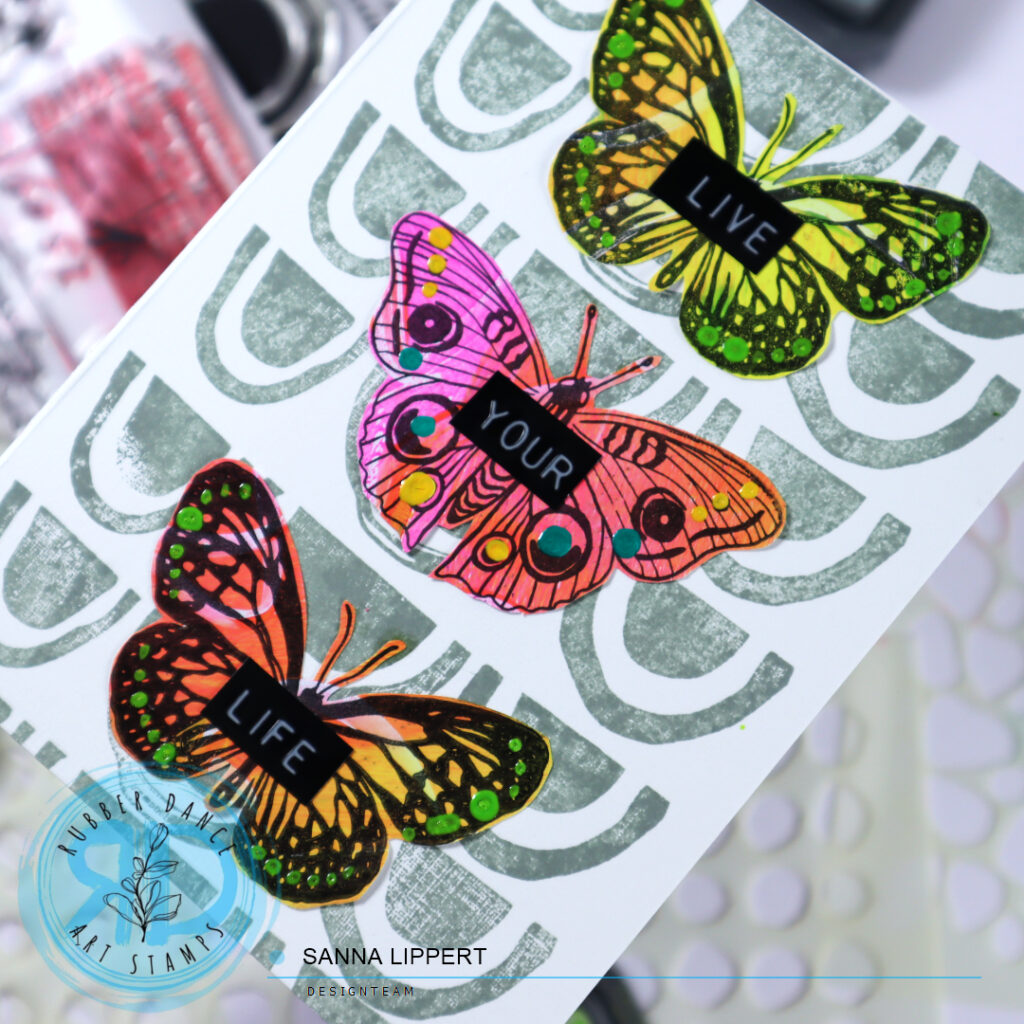
I first took a white card base and added Distress Oxide Ink in blue tones thru the Leaves 2 stencil onto it. For my second background I then took the already inked stencil, spritzed it with water and pressed the wet image onto another piece of white paper and let that dry.

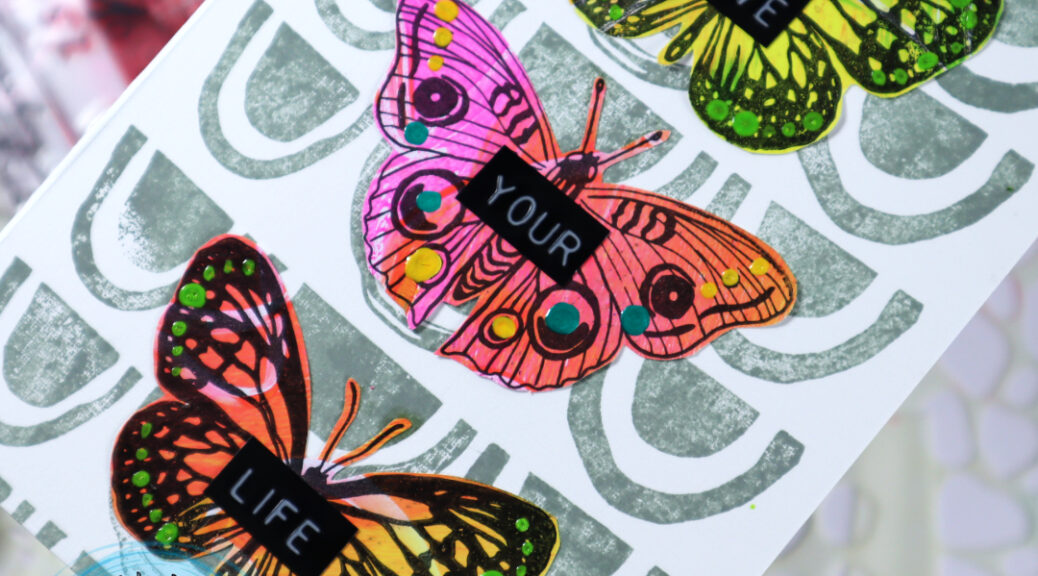
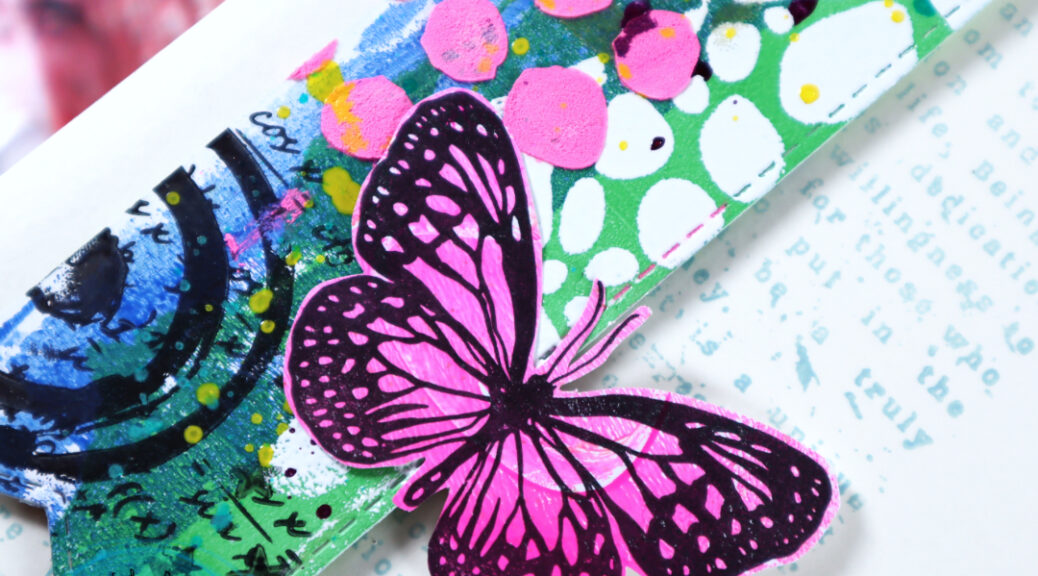
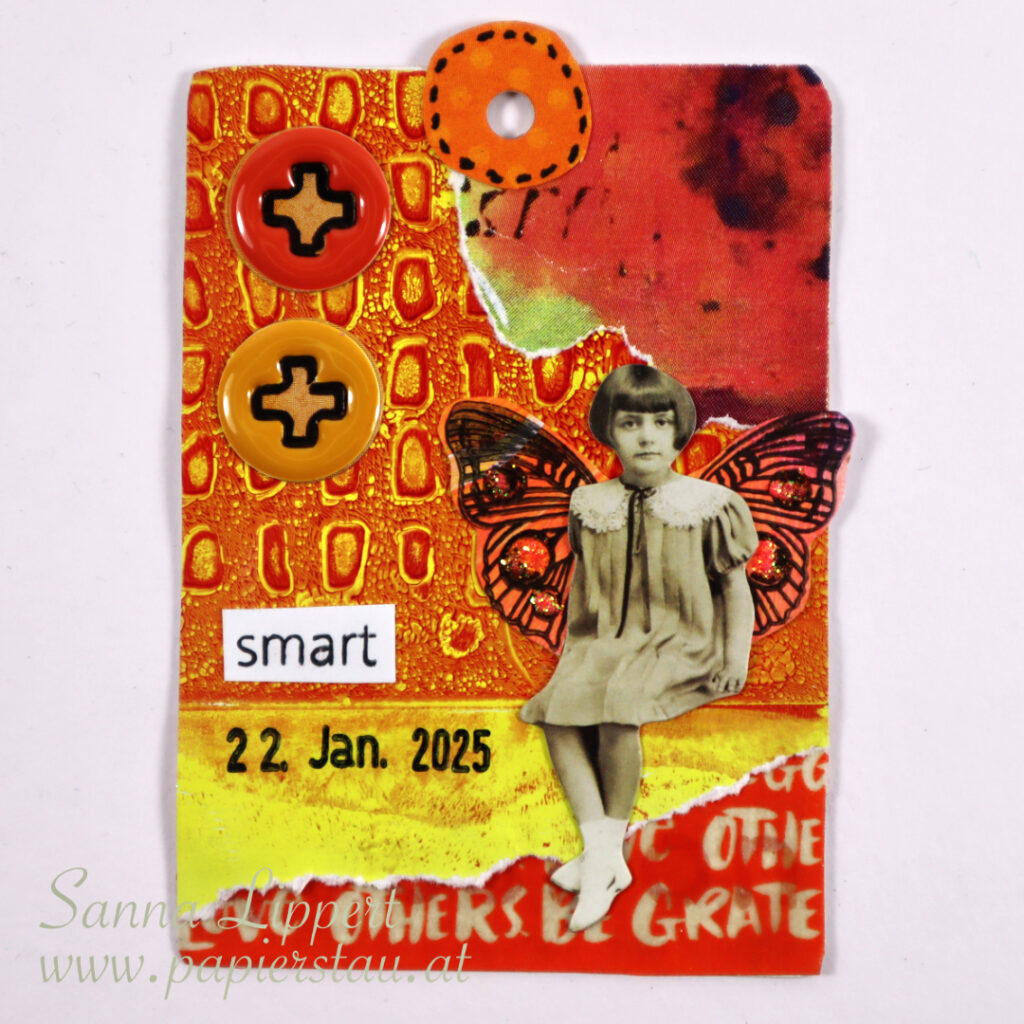
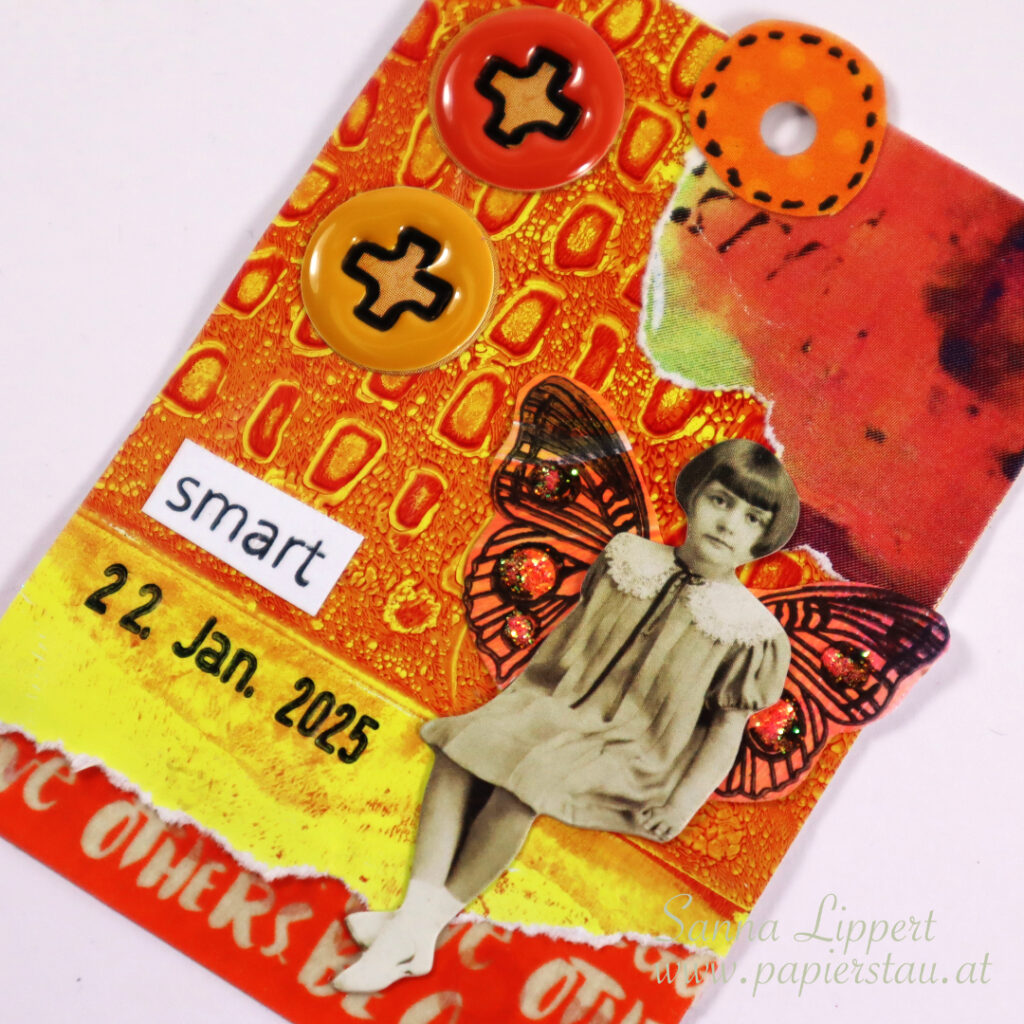
You can see both backgrounds here on the above cards. For centerpiece I used leftover pieces from my previous projects, like the leaf images, the Gloss Spray mushrooms and the circle image. The sentiment are created with the Mix A Sentiment 2023 stamp set. I stamped the images on white paper, then fussy cut every word and arranged different sentiments with the words.

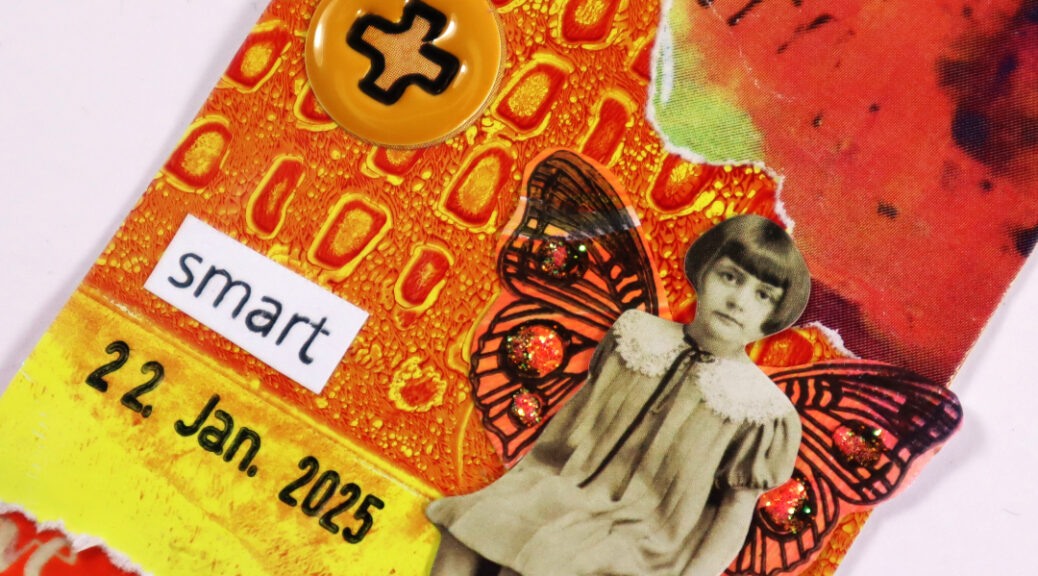
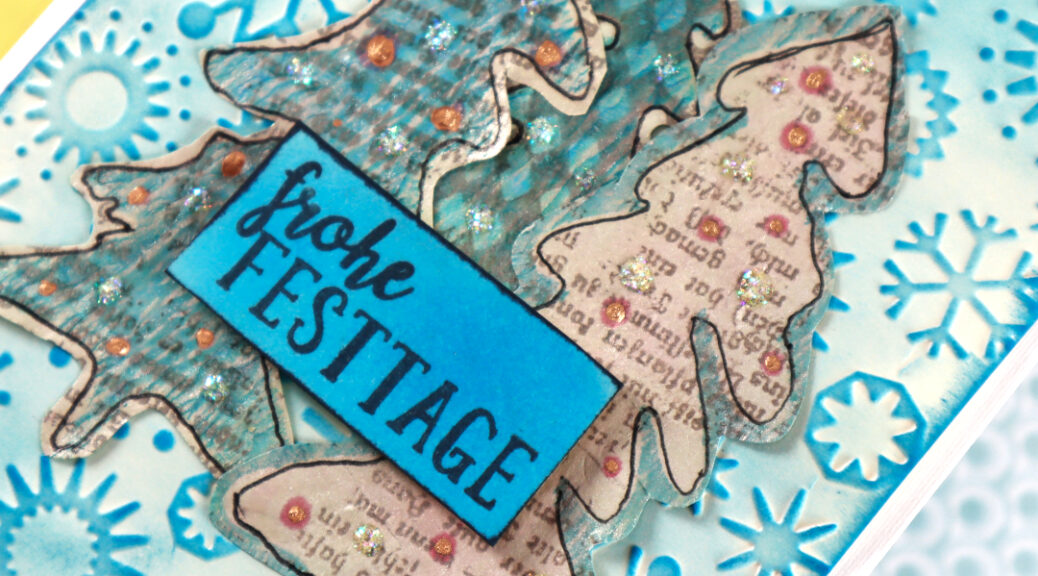
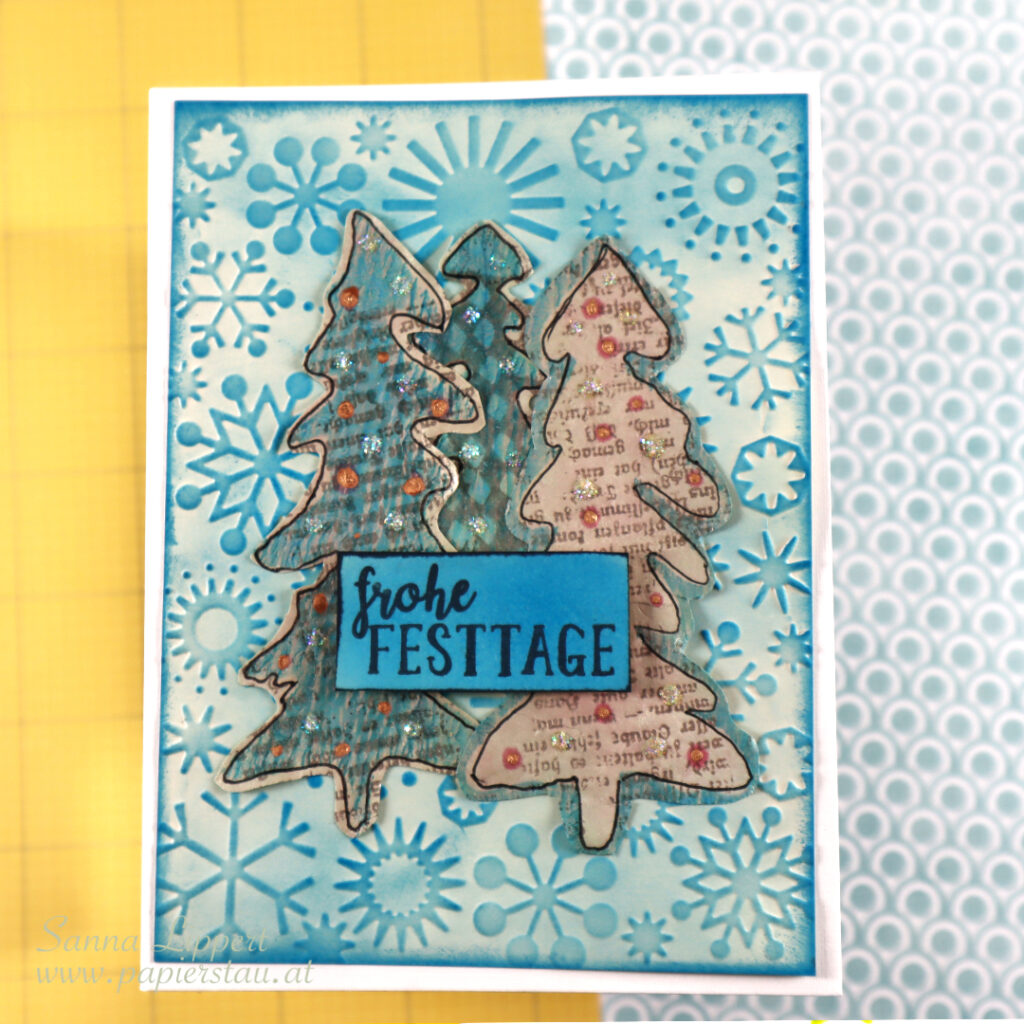
For the second set of cards with orange and red toned backgrounds, I did the same, except I inked a piece of white mixed media paper, then spritzed the Wheels stencil again with water and made a negative image with the leftover ink. In fact, the inked stencil image can be used several times, until the stencil has no ink/color left.

For these cards I used the basic idea, like on the blue cards. If the card recipient loves strong color combinations, then you can give them the positive image card and if not, go for the lighter, negative stencil image background.

Since the Sketchy Leaves stamp is sold out due to popular demand, I will link an alternative product for you. Basically any leftover images can be used as centerpieces here. Just cluster them and add an interesting sentiment and your inspirational mixed media cards are done.

Hope you get inspired!
xxx, Sanna

Supplies:

Xmas trees on dry embossed background

Hello and hapy Monday! Here is yet another Xmas card I created.

I used my old dry embossing folder by Cuttlebug to create this background, then inked over the embossed paper with Distress Oxide ink (Faded Jeans) very lightly. I then added some stenciled and stamped Xmas trees as a centerpiece and stamped a sentiment on an inked piece of paper with 3D foam. The dots are made with golden paint and glitter glue.

The stamps used on the stenciled and outlined trees are by Rubber Dance, as is the stencil used here. For more details see the supply list at the end.

Have a good start into the week!
xxx, Sanna

Supplies:

Christmas card with Rubber Dance stencils and stamps and recycled material

Hello everyone, it´s again my turn to share a project over at the Rubber Dance blog today and I am up with a stenciled Christmas card idea share this time. For this card I used the Xmas Trees 1 stencil and the Mix It Up 5 stamp set with some Distress Oxide ink. I also added some recycled material a a focal point for this card.

Here is how I created this card:

First I took an old map page and placed the Xmas Trees 1 stencil on it. Then I outlined the tree images with a waterproof black pencil onto the map page. Next I took a premade card base and applied some “speckled egg” Distress Oxide Ink onto a stamping block, misted that with water and pressed the ink very randomly onto the card base.

After that I took the Mix It Up 5 stamp set and stamped random text images with the same stamp ink onto the background. After that I fussy cut the “map trees” and adhered them slightly overlappingly onto the card base.

For finishing touches I added a stamped sentiment with “walnut stain” Distress Oxide ink and a sentiment from the Textured Xmas Trees 2 stamp set. I really like how the card turned out with the “map trees” as a focal point.

I hope this stenciling idea inspires you to create fun, stenciled Christmas cards yourself too!

Have fun creating!!
Sanna

Supplies:

Artist Trading card set with Textured Mushrooms 2 – Rubber Dance

Hello, it´s my turn over at the Rubber Dance blog again today and I am sharing a fall themed Artist Trading Card set, created with Textured Mushrooms 2, Mix It Up 6 and Mix a Sentiment 2023 stamp sets as well as the Lattice stencil. As my starting point I again used the Gloss Spray mushrooms from my post back on the 20th of October. I made plenty of them at once and now have fun material to play with.

For this set I started with a red patterned paper piece that I fussy cut into right size. Next I took Dina Wakley paints in tones Mineral and Sage and applied those thru the Lattice stencil onto the papers very randomly. After the paint was dry, I added stamping with the Mit It Up 6 stamp set stamps and brown stamp ink.

For additional interest I added some Gloss Spray splatters in Cheddar and Fuchsia and let the layer dry before attaching some screen prints to the cards with a stapler. Now all I needed to do, was to arrange the Gloss Spray mushrooms onto the cards and adhere them on place. For finishing touches I added some Mix a Sentiment 2023 words to the ATC´s as well as added details to the mushrooms with Posca pens. Finally, to add more depth to the cards, I inked the edges with a brown Distress Oxide ink.

And here is the video start-to-finish for further details and steps – hope you like it and get inspired!

Happy creating!
xx, Sanna

Supplies:

Art Journal page with stencils, Distress Oxide Inks and Textured Mushrooms 2

Hello everyone, it´s my turn to share another inspiration project over at Rubber Dance blog today again. This time I have a fun art journal page share with tutorial prepared for inspiration. I used Big Ovals, Textured Mushrooms 2 and Round in Circles on this page and I have a video tutorial up for steps and details.

For this art journal page I used the Gloss Spray painted mushrooms I had created for my previous post and hand plenty left over from. But first I started by creating a fun background with the Big Ovals stencil and Distress Oxide inks in orange and yellow tones. On top of that I have added Gloss Spray splatters in aloe, fuchsia and sand.

Next I´ve arranged the mushrooms in two circles into the middle of the page and added a Distress Oxide ink stamped circle image (from the Round In Circles set) into the very center of the page. Then I stamped some additional circles with brown stamp ink here and there to the background and finished the page off with some medieval Gloss Spray splatters and a fall themed quote.

Here is a video tutorial to give you a better idea of every step of the process – hope you like it!

I really like this stamp set so much – it was so much fun to create something in bright and happy fall colours into my art journal. I hope you get inspired to create too!
xxx, Sanna

Supplies:

Slimline fall card with Textured Mushrooms 2 – Rubber Dance

Hello, I am up over at Rubber Dance blog with a fall themed card tutorial today. I absolutely adore the new Textured Mushrooms 2 stamp set and wanted to create a fun mixed media card featuring them.

Here is how I created the card:

I started off with a premade gelli printed background I had used the Organic 3 stencil on (see the video here). After that I applied Distress Oxide Inks thru Big Ovals (walnut stain ink), Lattice (speckled egg ink) and Scribbles 1 (hickory smoke ink) stencils to create even more layers to the background.

Next I took a premade paper I had inked with blue toned Distress Oxide Inks and Marks 3 stencil and added some abandoned coral, mustard seed and hickory smoke Distress Oxide Inks on top to then stamp some Textured Mushrooms 2 images onto the inked areas. I fussy cut the mushrooms, added details with a white gel pen and used them on the card.

Before adhering the background onto my slimline card base, I added some staping with black ink onto it with the Mix It Up 6 stamp set and on top of all the layers I then added some Gloss Spray droplets in turquoise and Magenta.

For finishing touches I adhered the fussy cut mushrooms to the card and chose two fun sentiments to go with them.

Have you tried adding plenty of little layers on top of each other with stencils? I hope this card inspires you to play with stencils and then grab the gorgeous Textured Mushrooms 2 set and add fabulous mushrooms to your projects! Have fun!!!
xxx, Sanna

Supplies:

Ink blended and stamped clean & simple style cards – Rubber Dance

Hello, I am up over at the Rubber Dance blog with a card set tutorial. For these cards I used plenty of Distress Oxide Inks and two various rubber stamp sets (Weed Love & Round in Circles) from the store.

And this is how I created these cards:

First I added some washi tape to create borders for the area I was about to add ink blending onto. I used Distress Oxide Ink tones: saltwater taffy, spiced marmelade and abandoned coral for the first card. After adding the ink onto the card base I used one of the Weed Love stamp set stamps to add some stamping onto the area using black stamp ink.

Next I added another layer of washi tape on top of the ink blended and stamped area to create a border with black ink and one of the Round in Circles stamps. After that I only had to decorate the card with a sentiment (Tim Holtz Quote Chips) and a few enamel stars and the first card was done.

For the second card I used the same steps, but changed the colors to: hickory smoke, salvaged patina and fossilized amber. After that I added a border with the same stamp as on the previous card, except this time I stamped slightly overlappingly to create a different border. Then to decorate the card with Quote Chips and some green enamel dots.

I hope I could inspire you to play with the stamps featured on today´s post and give ink blending and creating clean and simple styled cards a try. Have fun!!!
xxx, Sanna

Supplies:

Layered, mixed media flower card with gelli background and stamps

Hello, this time I am up with a slimline mixed media flower card share over at the Rubber Dance blog. For this card I used a stenciled and gelli printed background paper that I created & used also on my previous projects (for example here). For the card I used the Loose Florals stamp set, as well as the Mix It Up 6 stamp set and the Round In Circles stamp set.

For the background gelli paper I used acrylic paints with Marks 2 stencil. You can find the video to that in the post linked above.

First I cut the gelli printed paper into right size to match my card base. Then I stamped with the Round In Circles stamp set stamp some circles on top of the gelli image with salvaged patina and spiced marmalade Distress Oxide Inks. After that I grabbed the Mix It Up 6 stamp set and black stamp ink and added some random stamping on top for additional interest and contrast.

After that I stamped some Loose Florals with black stamp ink onto white paper and colored them very loosely with watercolors and fussy cut them.

Finally I added some golden and silver ink droplets onto the fussy cut flowers as well as onto the background. Then I arrenged the flowers onto the card, added a chipboard sentiment and some half pearls for decor.

I had so much fun creating this card. It has quite a few layers again and happy, bold colors. I hope it makes it´s recipient happy and also inspired you to grab your stamp and stencil stash a play a little!!
Have fun! xxx, Sanna

Supplies:

Art journal page with Distress Crayons, stencils and stamps – Rubber Dance

Hello, it´s again my turn to share a create project over at Rubber Dance blog today and I´m up with another art journal page share. I made this one inspired by the beautiful watercolor pages Susanne makes, only I used Distress Crayons and stencils on the circles instead of watercolors. The products I used here are Weed Love stamps and Cross It, Marks 2, Marks 3 stencils, Grungy Butterflies and Mix a Sentiment 2023 stamps.

I started by applying various tones of Distress Crayons onto the page in circular motion. After that I misted the areas with a little water spray and then, when still wet, place a stencil over them and using a baby wipe wiped some of the wet crayon away.

After that I added some black details around the circles and stamped with Weed Love some images onto the page. I also added some blue crayon droplets and golden pigments in droplets for additional interest to the page. Next I wrote some asemic writing here and there and finally decorated the page with a Grungy Butterfly and created a sentiment with Mix a Sentiment stamp set.

Here is a start-to-finish video for all the steps:

I hope you get inspired by some of the techniques and/or ideas and grab your art journal and start to create! Have fun!
xxx, Sanna

Supplies: