Hello everyone, I just wanted to shortly stop by and share my April Rubber Dance product “unboxing” video with you.
I will be playing with these goodies very soon!! So keep on watching my YouTube channel, my Instagram and this space for tutorial, inspiration and more.
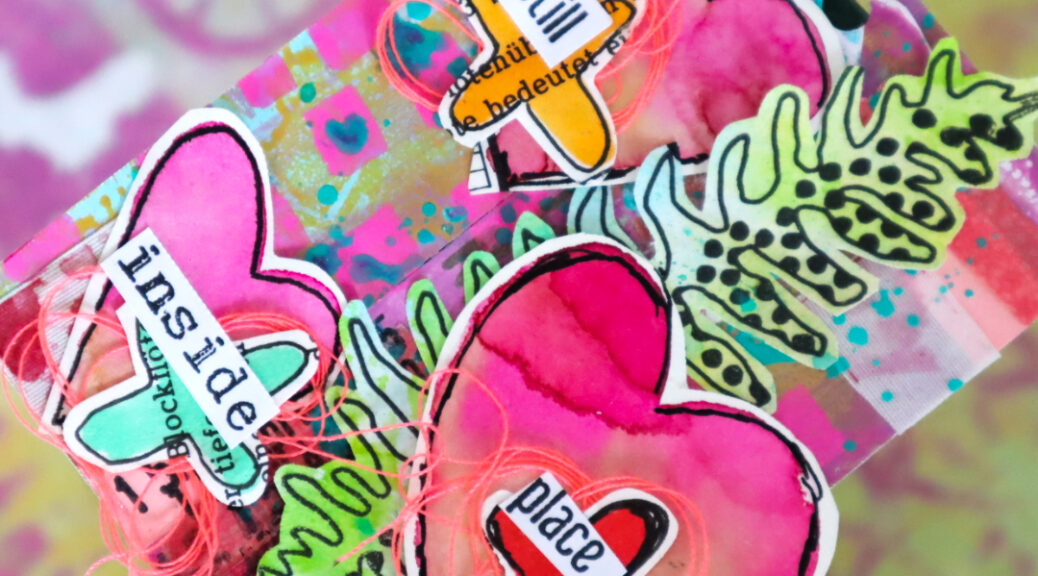
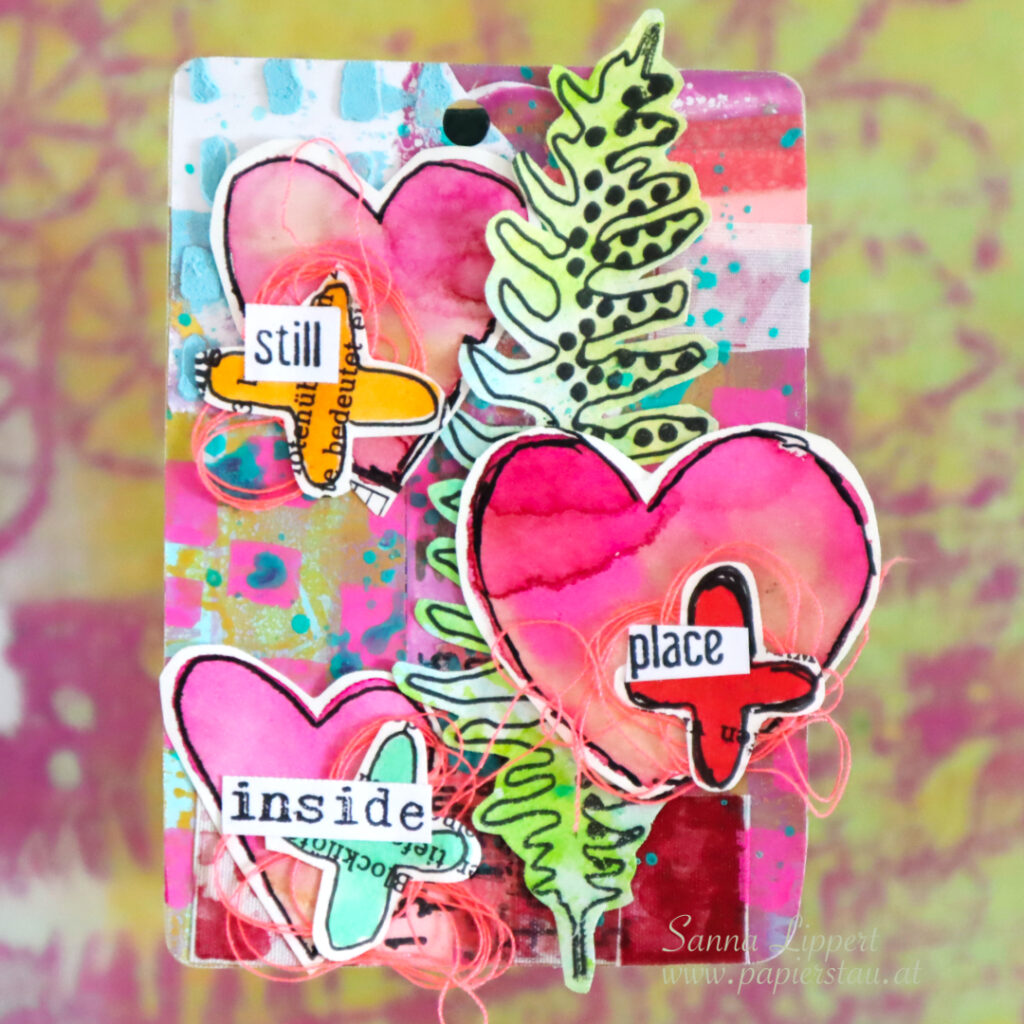
Hello everyone, I am up over at Rubber Danceblog today with a set of cards created using the Loose Florals 2024 stamp set with embossing powder and Shimmer Powders. I created a fun background with those for the collage fodder cluster decorated cards.
I love creating my own “patterned paper” backgrounds for cards and other projects. This is one way of doing that: getting a stamp set out, some white embossing powder and two tones of Shimmer Powder. Letting the color spread on it´s own on paper creates interesting color concentrations and shades and makes every background unique.
After creating the background, I cut it into a right size and adhered it onto a white card base. For decoration I didn´t want to add too much, so I went with a flower cluster from DIY collage fodder pieces I made recently. You can watch the videos on those here, here and here. And here is the video on how I created the card background and finished the cards. Hope you like it!
I hope you´ll give this technique a try!! Happy crafting, xxx, Sanna
Hello, it´s my turn to share a. project over at Rubber Dance blog again. Today I am sharing a page from my art journal that started from a mark making play and ended up being a bright spring themed page. I used the Dotted 1,Organic 4 and Marks 3 stencils and the Mix It Up 5 stamp set to create the page. I also added previously made collage fodder bits done with Doodle Flowers 2 and Butterflies and Moths stamp sets.
This is how my creating process went. I always have a journal close to me, when creating on other projects. That way I can wipe and add random layers to my journal with residue paints, inks and pastes. In the first photo you can see I added some residue pink paint, then some black mark making to the journal page. Next I mixed some modeling paste with neon pink and yellow paint and sky blue paint together and applied those onto the background thru the previously mentioned stencils. I love to tint my white modeling paste with acrylic paints to create different colors.
While the paste was drying, I took a pink tag and stamped some Distress Oxide Ink (kitsch flamingo) with one of the Mix It Up 5 stamp set stamps. Then I grabbed a small piece of residue gelli printed paper, stamped with the same set and black ink some images onto the piece and adhered it onto the tag. After that I arranged a cluster of leaves and flowers to the tag and cut off any residue along the edges.
After that I adhered the tag onto the journal page, created a sentiment with sticker and paper alphas and added some Gloss Spray splatters for finishing touches (Medieval).
Have you tried creating your own tinted modeling pastes? It´s a fun way to add some interest to any project (journal, wall art, card background). It also adds a nice texture and depth to a project. Wishing you a fun time playing with stencils and modeling paste!! If you missed how the fodder was done, you can watch the videos and the photo tutorial here,here and here.
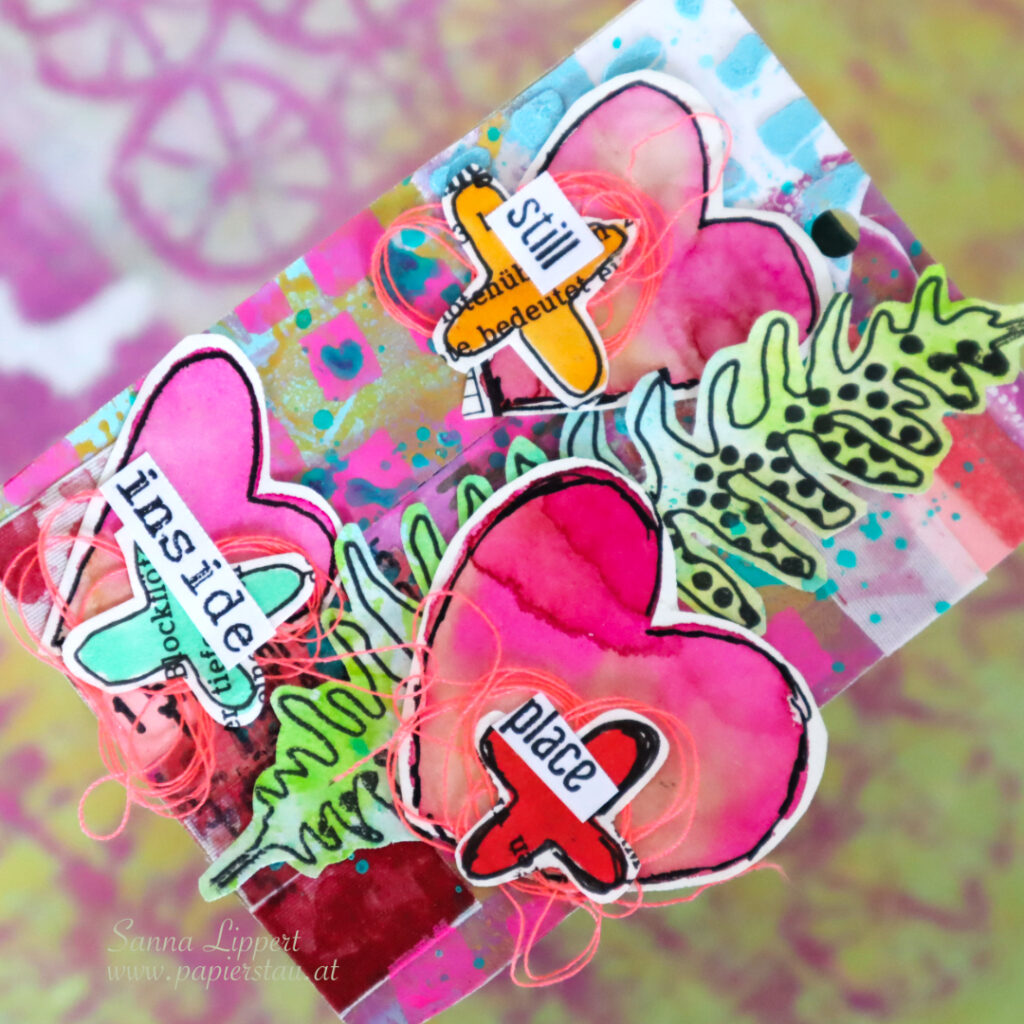
Hello and happy Wednesday! Here is another share from my take on the ShanoukiArt “Full Deck Challenge 2025”. This weeks theme is: “Stack it up!”.
I used layers over layers (as much as I could). Starting with gelli printed leftover paper bits, then adding some texture paste treated paper bits on top. Then some washi tapes. After that some fabric tape bits. Next some pink Posca pen marks and turqouoise Gloss Spray splatter. After that a collage fodder leaf (Rubber Dance) and some hand drawn ephemera (hearts and crosses). In between some yarn and on top some stamped words. I love how this one turned out. The happy colors on top of each other. Pure joy!
The hand drawn bits are from last years 100 day challenge. I am so glad I can incorporate those bits on this challenge. And now to the video:
Hope you liked it and got inspired! See you next week with another one.
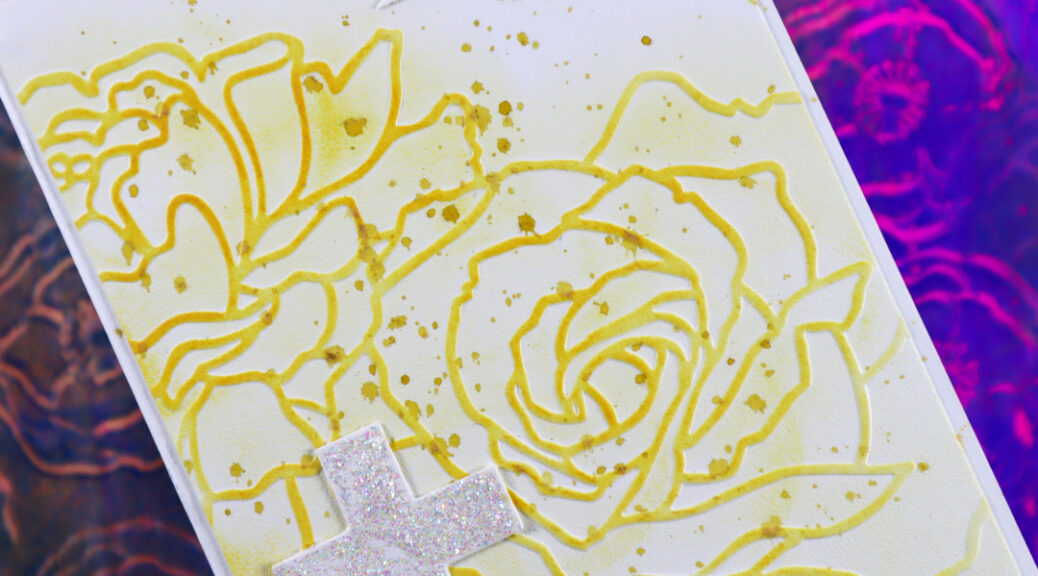
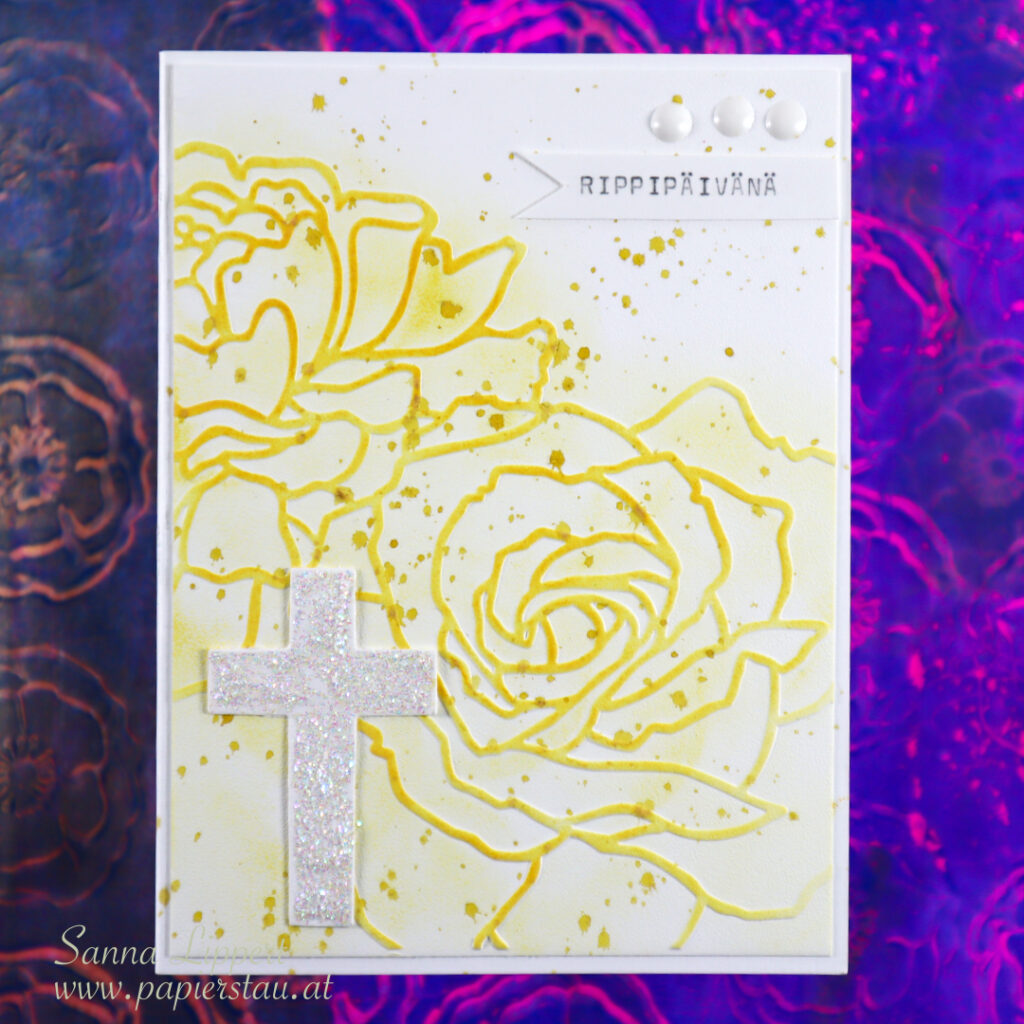
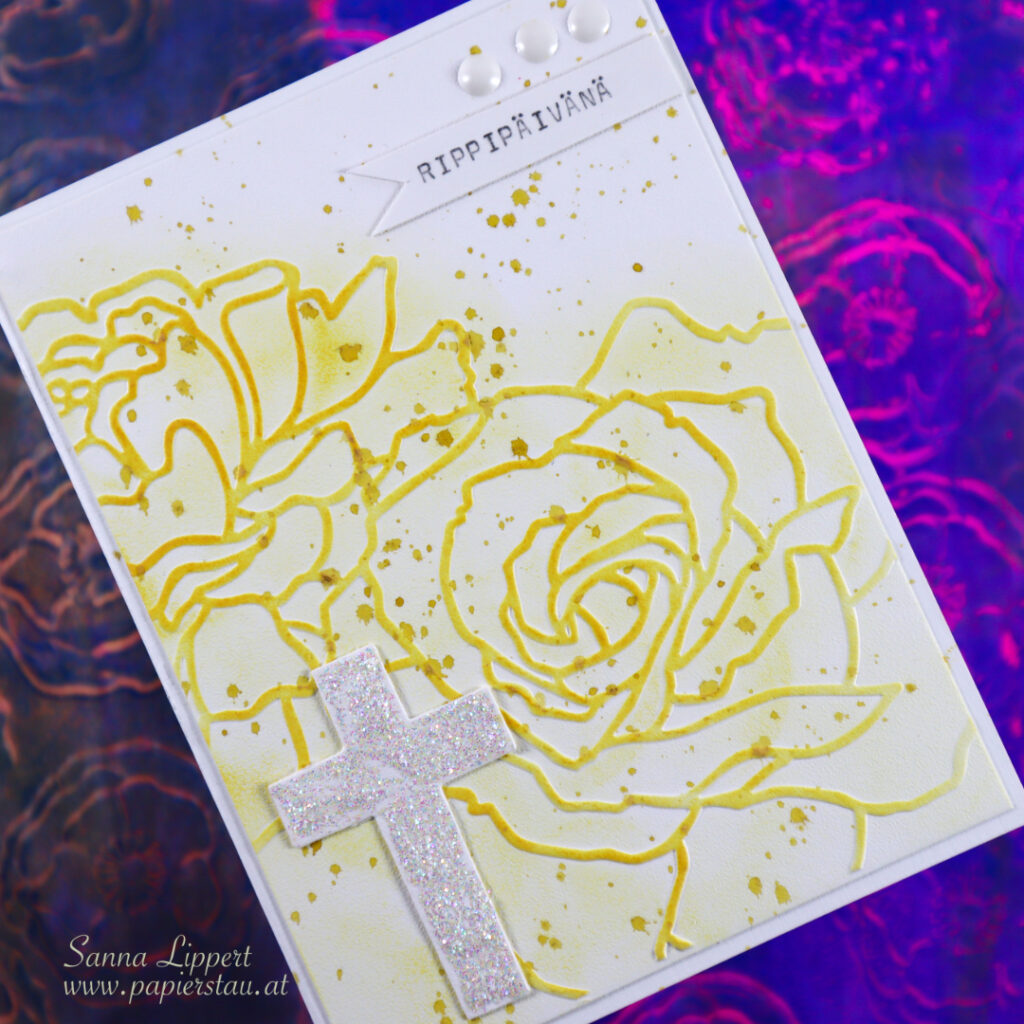
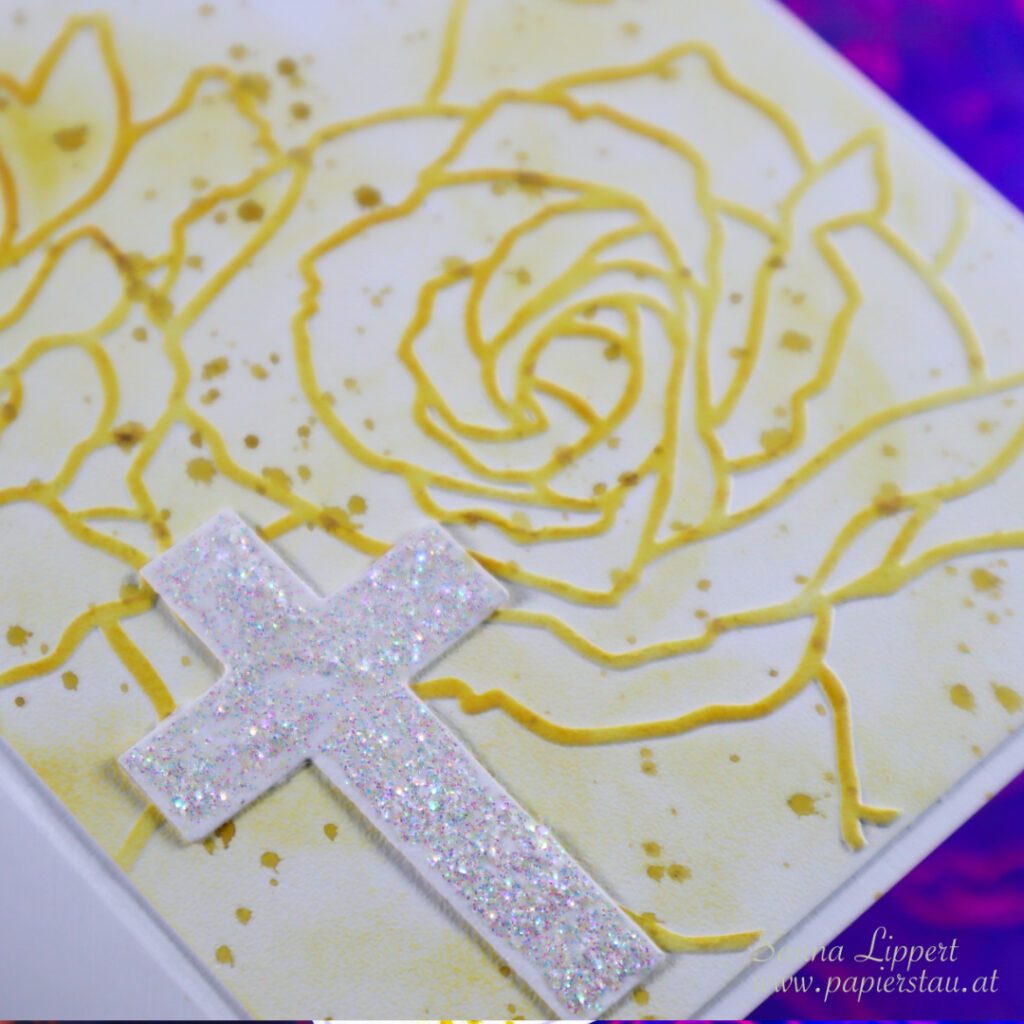
Hello! I have a card share today. It´s a card I made for a family member´s confirmation day celebration.
I used a Sizzix embossing folder on the background with white cardstock and then added some yellow Distress Ink with a blending brush on top. After that I added a layer of Glimmer Mist droplets in yellow.
The white dots on top right corner are Nuvo Drops. The sentiment is written with my old typewriter.
The cross is a very old Sizzix die cut die. Die cut with white cardstock and has a layer of Stickles on top. I hope the recipient loved her card.
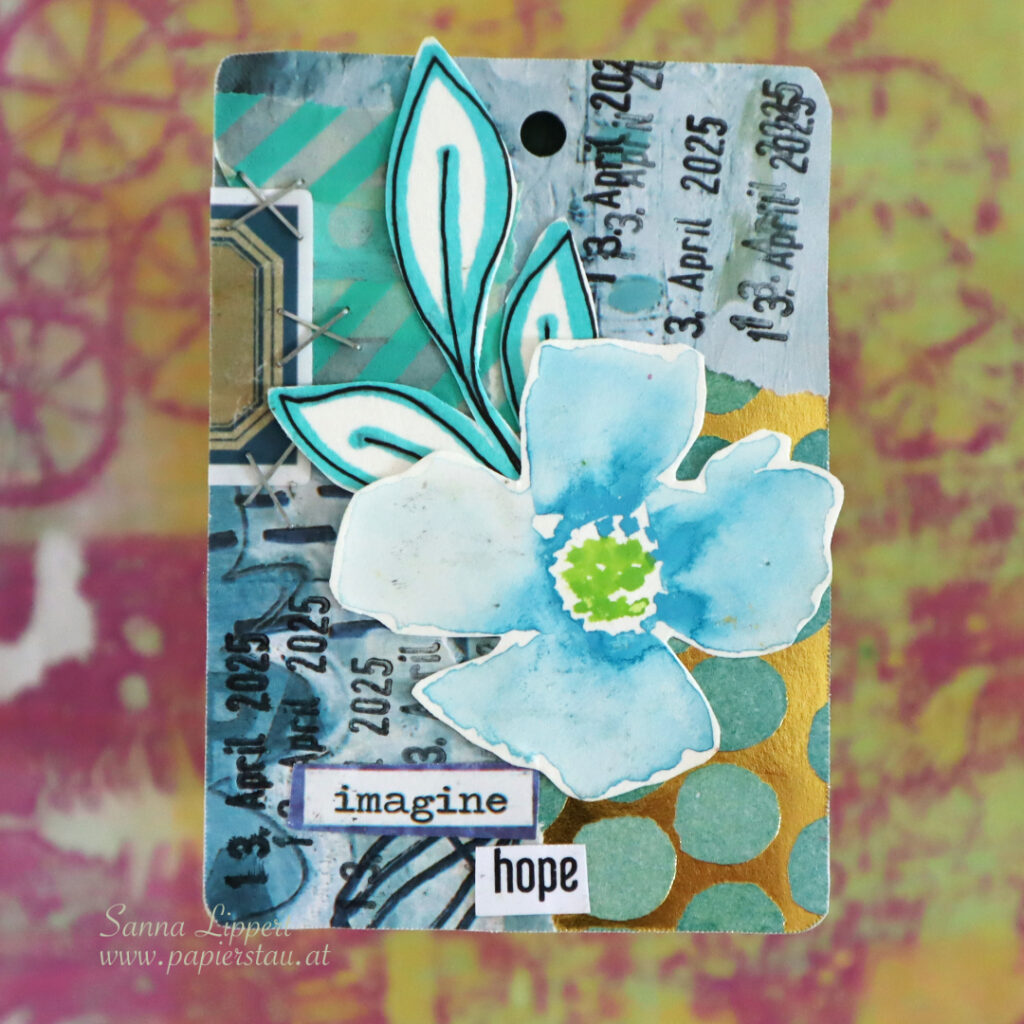
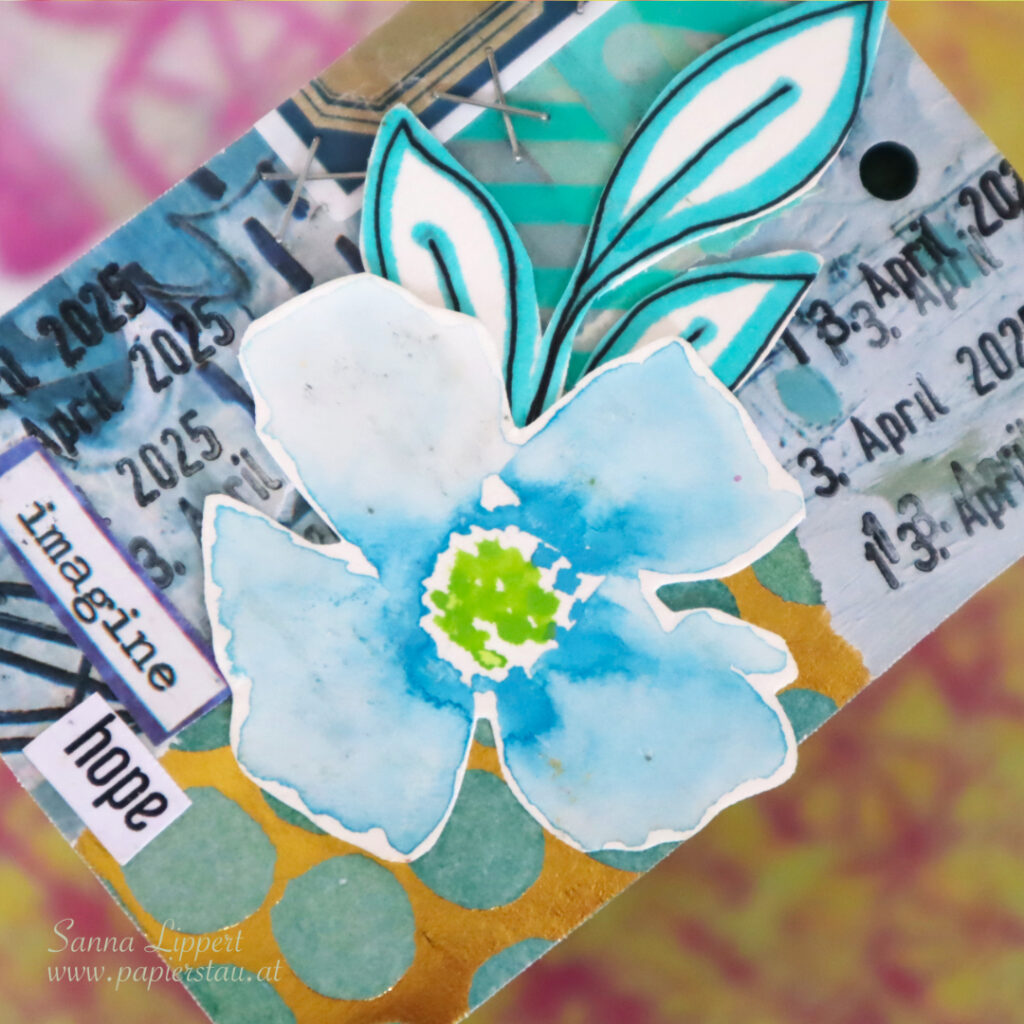
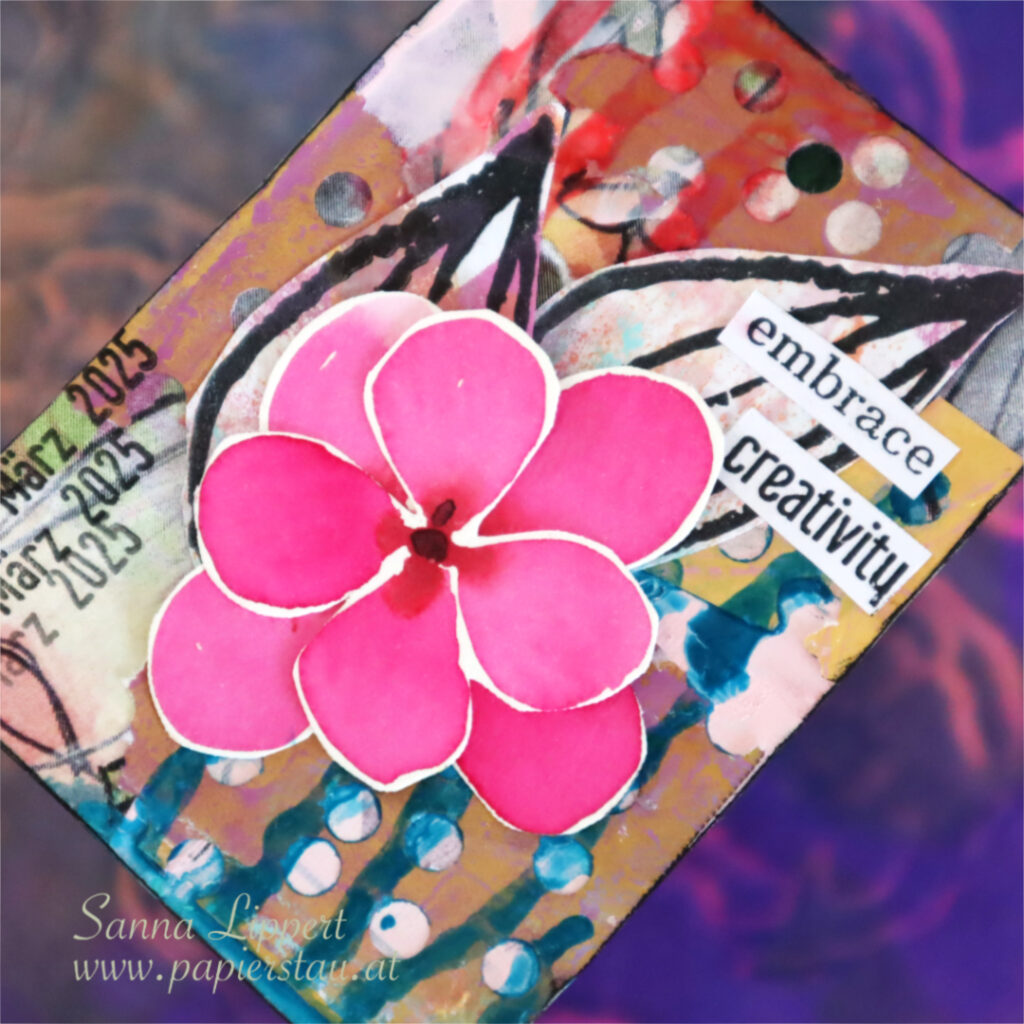
Hello and happy Wednesday! Here is my take on the ShanoukiArt “Full Deck Challenge”, week 14. The theme was turquise and stapler.
I used bits from my 2023 Artist Almanac and a piece of golden paper with turquoise dots. Next I added some washi tape, my constant; the date stamp and a label sticker (a kind of carry-over from my previous deck cards). On top some stapler details. On top of it all a fussy cut word with a Rubber Dance stamped one and some hand painted ephemera (from my 100 day challenge from last year).
As a contrast to last weeks one, this deck card turned out much more calm and harmonious :). And here is the video:
https://youtu.be/yPzwIJgSfSE
I hope you join the challenge, if you have not yet done so. It´s great fun and not so time consuming, as you only make one a week.
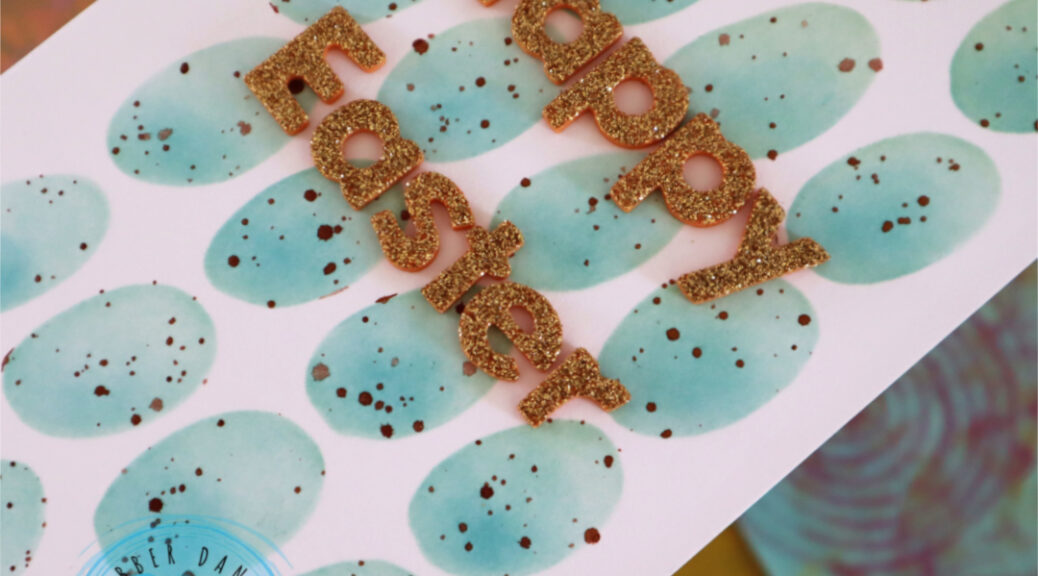
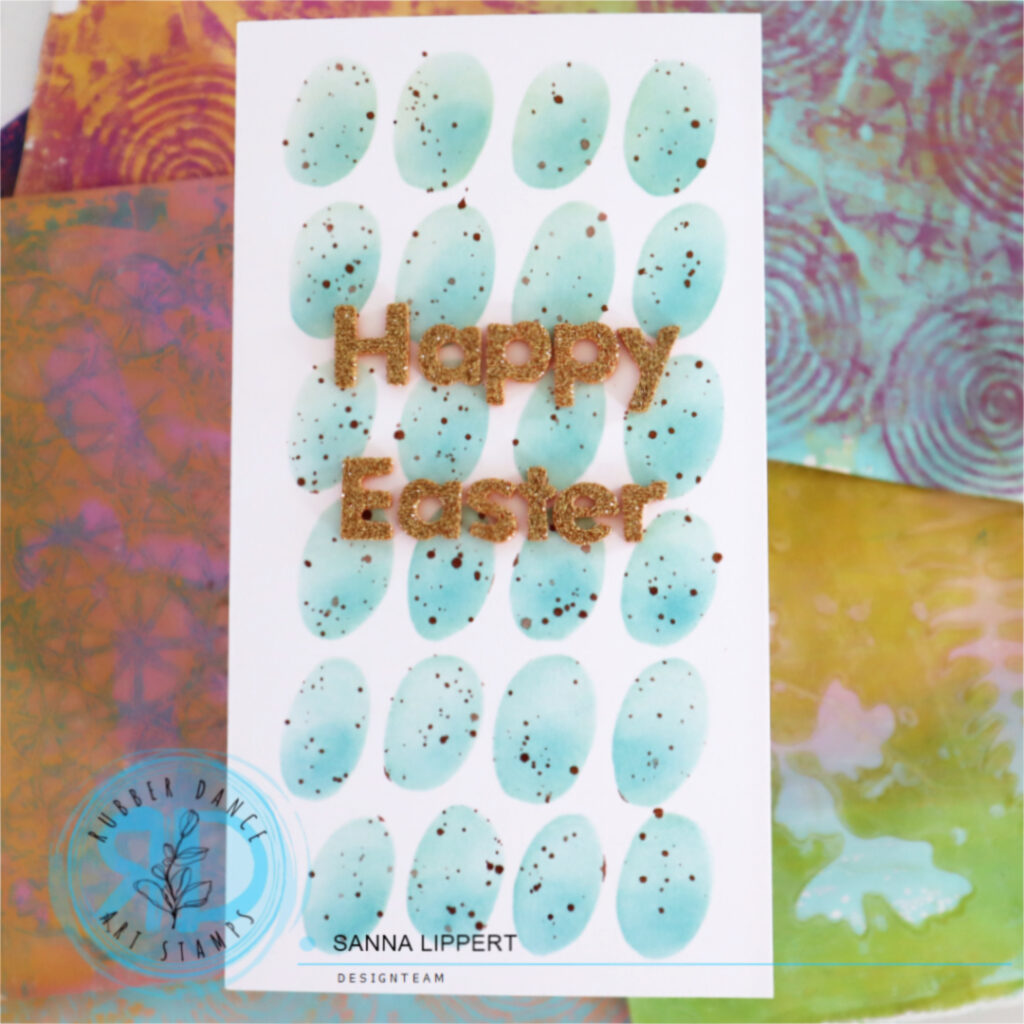
Hello everyone, I am up over at the Rubber Dance blog today again. This time with a really simple, but awesome, stenciled Easter card tutorial. You will need the Big Ovals stencil (one of my faves!), two tones of blue Distress Inks, a brown spray ink of some sort, washi tape and a white card base.
This was the kind of idea that when it hit me, I just immediately had to run to my craft room and try it out. And it worked out so great! I have this simple stenciled egg background for my Easter card and it is so easy to make.
First you need a slimline card base in white. Next take two tones of blue Distress Inks (I used tumbled glass and broken china). Start by adhering the card base with washi tape onto your working surface, next adhere the stencil on top and cover all unnecessary circle areas with washi too.
Now apply the lighter blue tone with a blending brush, then go over the lower circle areas with a darker blue tone. After that leave the stencil as is and splatter brown spray ink thru the stencil. Let shortly dry and carefully remove the stencil and the washi tape. Decorate with a “Happy Easter” sentiment, created with golden glitter alpha stickers. How´s that for a fast and easy-to-do Easter card idea with “Robins eggs!? Here is a video for you to watch – hope you like this idea.
You could also make yellow, light pink or light brown eggs. Whatever colors you prefer. I am going to make a few more in different colors for sure.
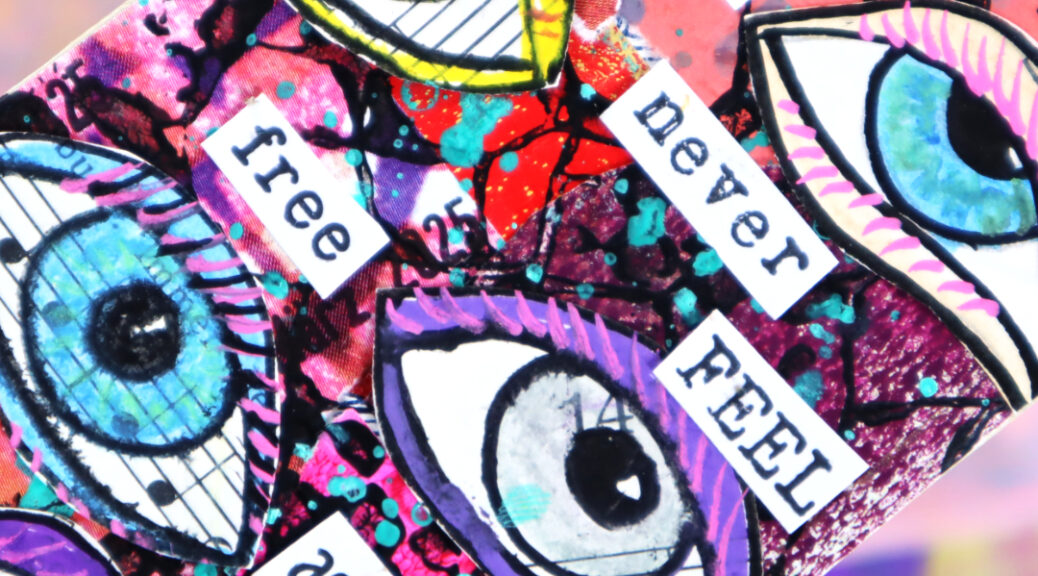
Hello and happy Wednesday! Here is my take on the ShanoukiArt “Full Deck Challenge” number 13: crazy colors & black mark making.
I started off with gelli printed bits (leftovers) and a piece of collage paper gifted to me by Yuna. I then added black paint with a piece of cardboard packaging material and a foam piece for mark making. Then I added some of my constant (date stamps). I wanted more crazy colors, so I added some Gloss Spray droplets in turquoise and then the hand drawn eyes from my last years “the100daychallenge” with some stamped words (Rubber Dance).
I found this weeks challenge hard, but at the end I am happy about the result. It sure has crazy colors on it!
See you again next week with another deck challenge take! Happy crafting, xxx, Sanna
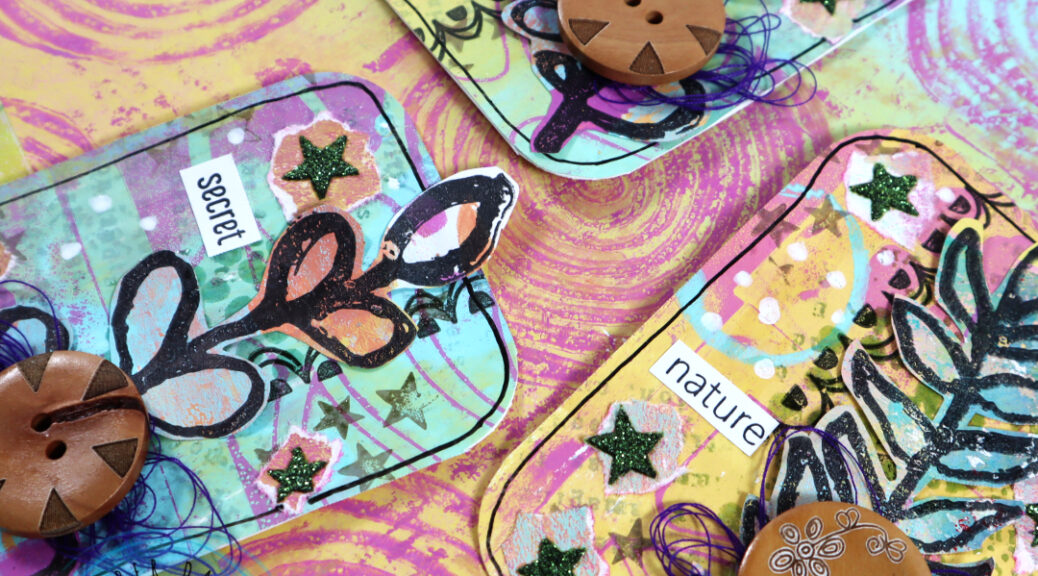
Hello, I am again up over at Rubber Dance blog with another project share. This time I have a set of stamped Artist Trading Cards with a video tutorial for your inspiration. For this set I used a gelli printed background paper, where I used the Marks 2 and Organic 3 stencils with acrylic paints to create the paper. The following layers were done using Pencil Marks 8 and Mix It Up 4 stamp sets and the Stars 1 stencil.
I started by stamping first with Mix It Up 4 stamp set and brown and grey shadow inks onto the paper. Next I stamped some circles with Pencil Marks 8 stamp set and applied Distress embossing glaze (weathered wood) with a heat tool on top.
Next I grabbed the scallop border stamp from the Mix It Up 4 stamp set and stamped with black ink onto the paper. After that I took some pre-made paper that had stenciled glitter paste on it (thru Stars 1 stencil). I wripped some stars from the paper and adhered them randomly onto the background. Next I decorated the ATC´s with leaf collage fodder (see the reel for that here), some yarn and a wooden button. For finishing touches I added some black pen outlining, some white Posca dots and a stamped and fussy cut sentiment from the Mix a Sentiment 2023 stamp set.
Here is a start-to-finish video for you to watch. Hope you enjoy it!
See you again soon with another inspirational project. Happy crafting! xxx, Sanna
Hello and happy Wednesday! Here is my take on the ShanoukiArt “Full Deck Challenge” number 12: “holes and drippy paint”.
I love how this turned out! I started off with collage papers gifted to me by Yuna. Then I added some Dina Wakley heavy body paint in light pink into the open areas. On top of that I added some small bits of gelli printed paper leftover to which I made holes with my Drop-A-Dile.
After adhering the papers with holes onto the background, I added Gloss Spray (in pink and blue) drippings. Next I added my constant (the date stamp) and after that I decorated the deck card with some Rubber Dance fodder and hand drawn flowers. The leaves are from the set “Pencil Marks 8” and the flowers are from my last years “the100daychallenge” project. For finishing touches I added again some stamped words (Rubber Dance stamp). I love how this deck card turned out!!!
Here is the video for you to watch:
See you next week with another deck challenge take! Happy crafting, xxx, Sanna