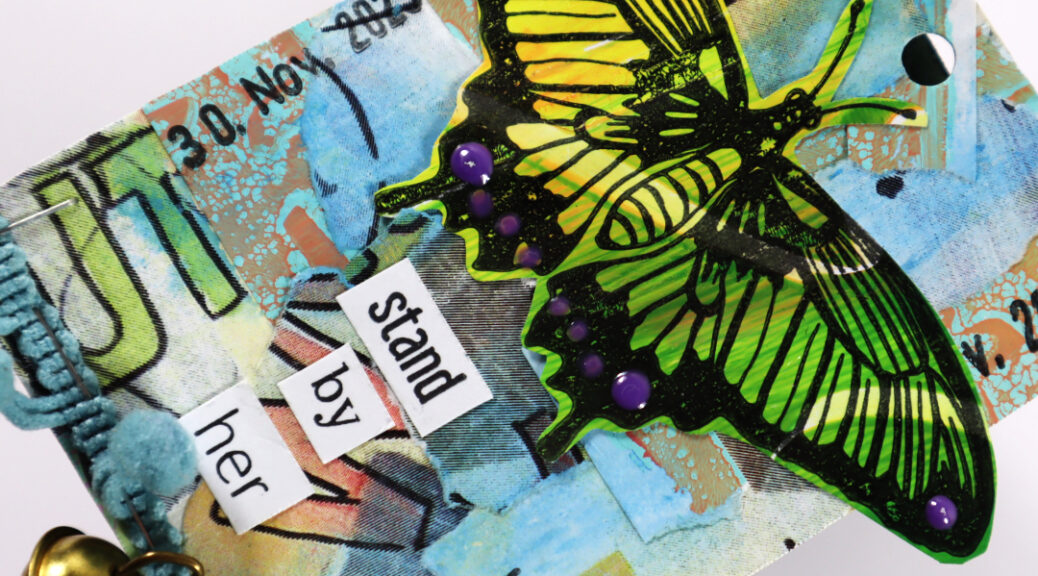
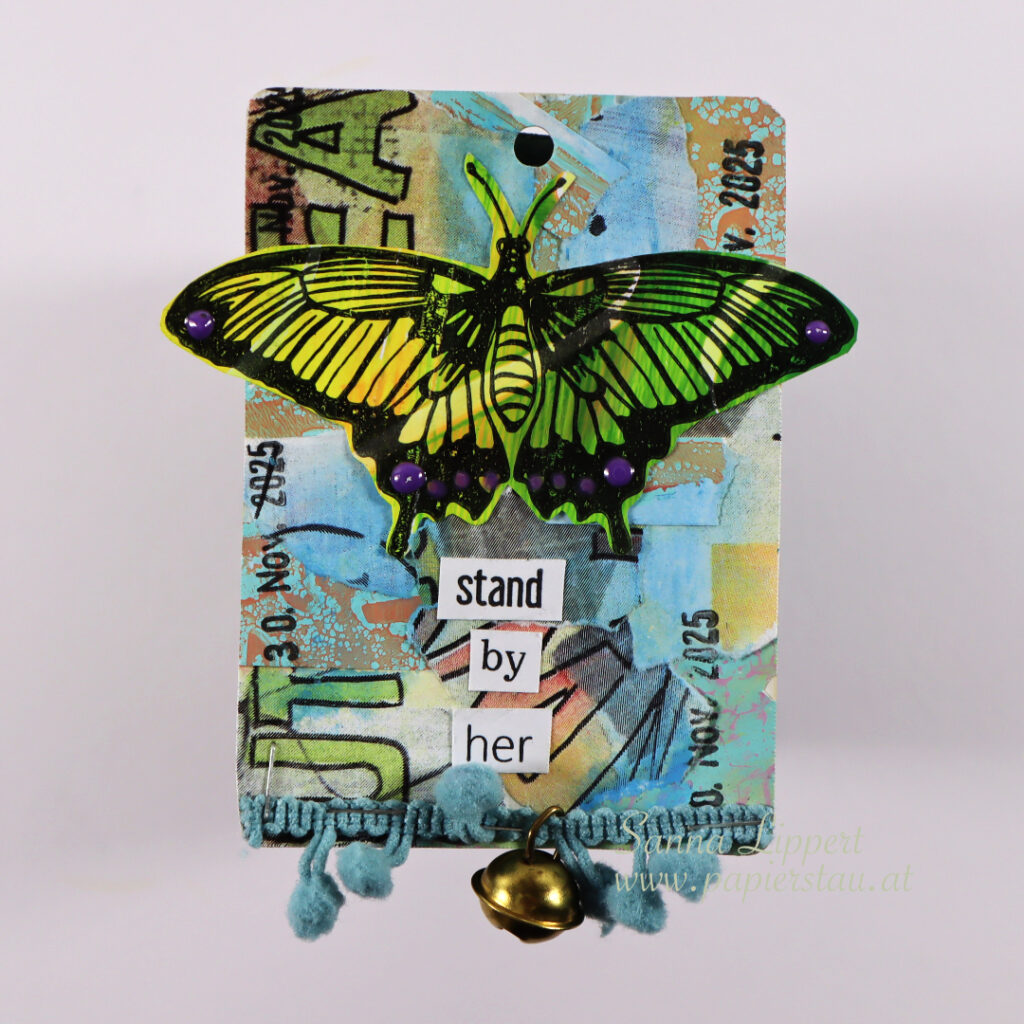
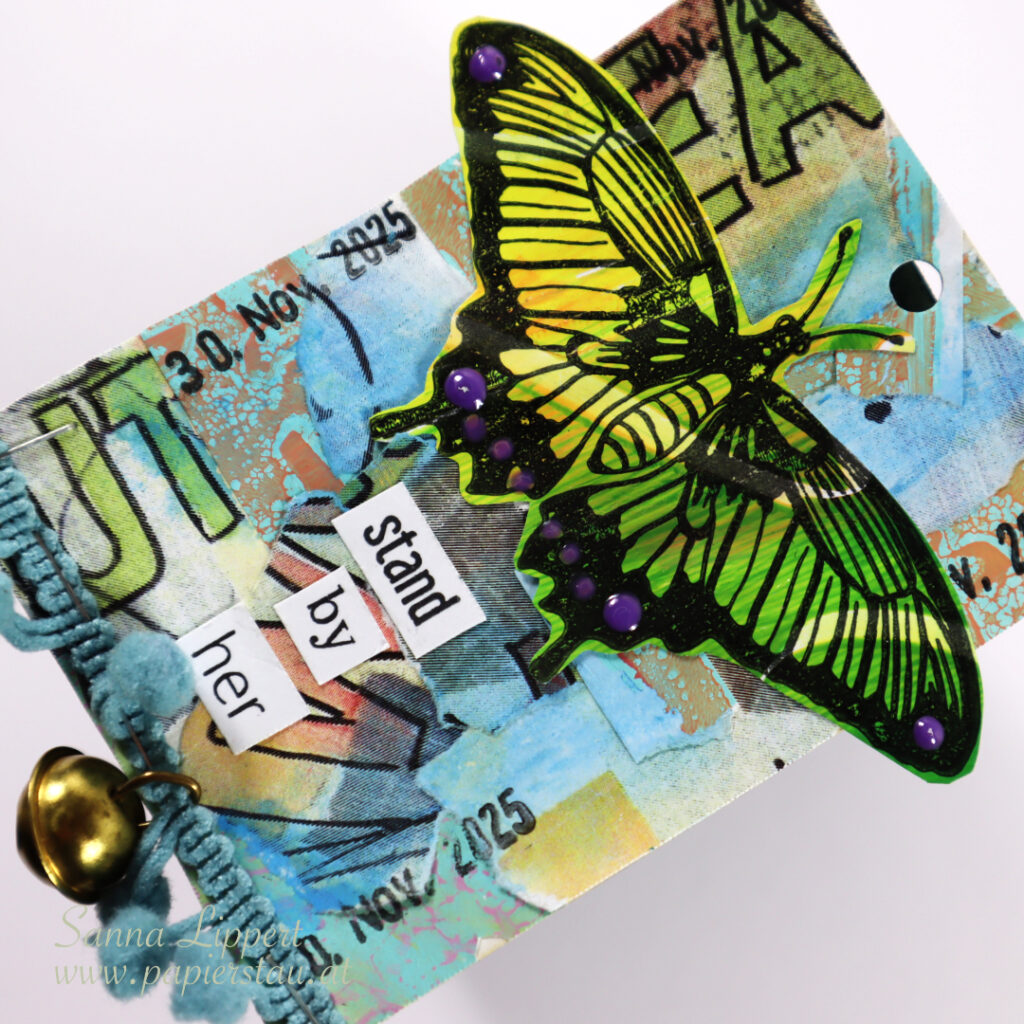
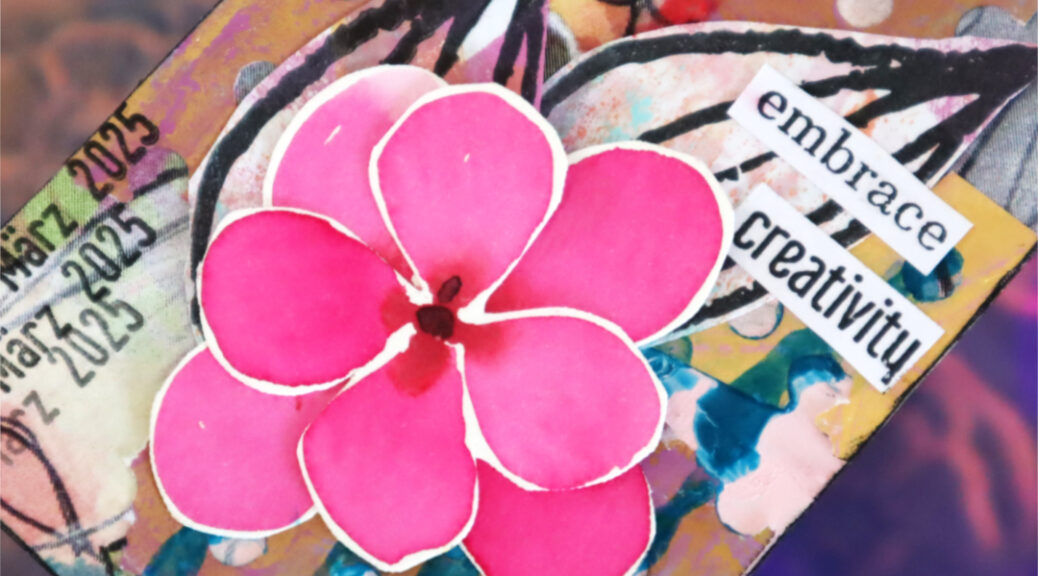
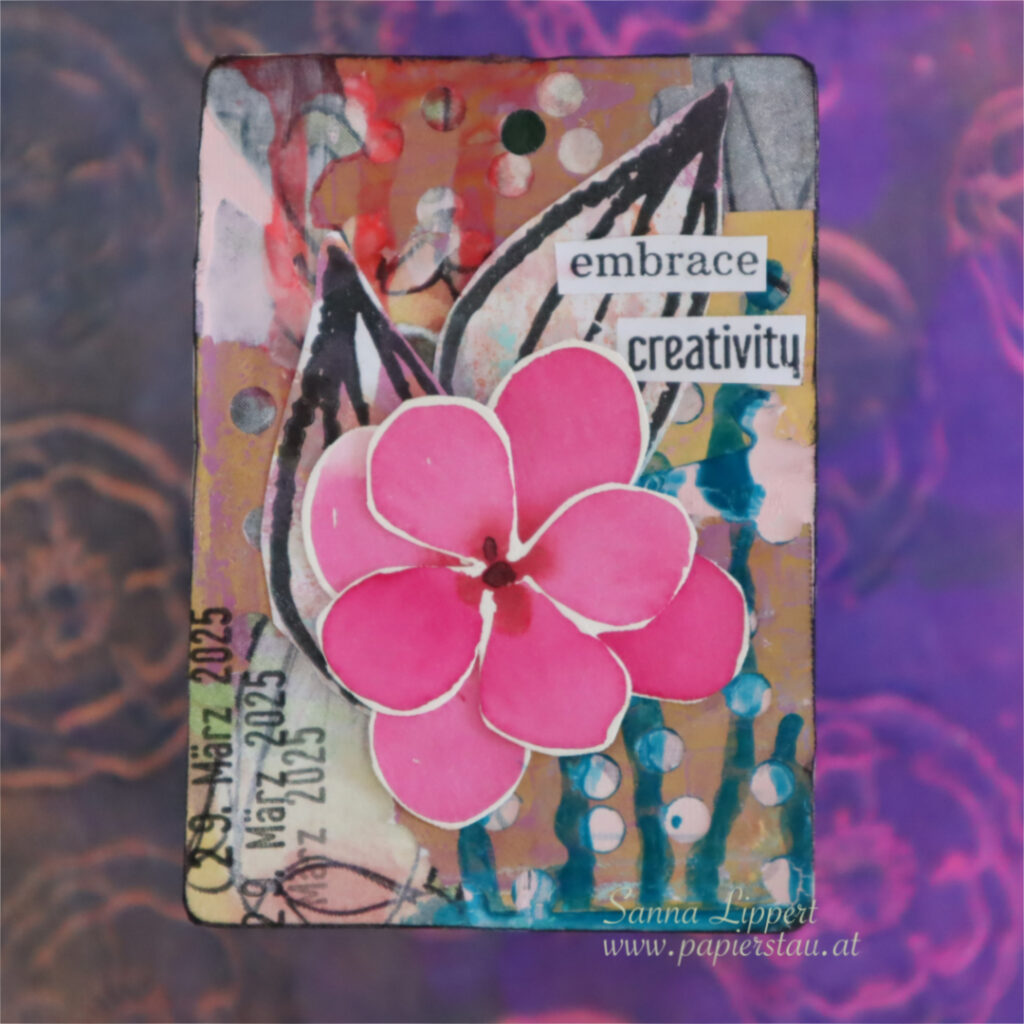
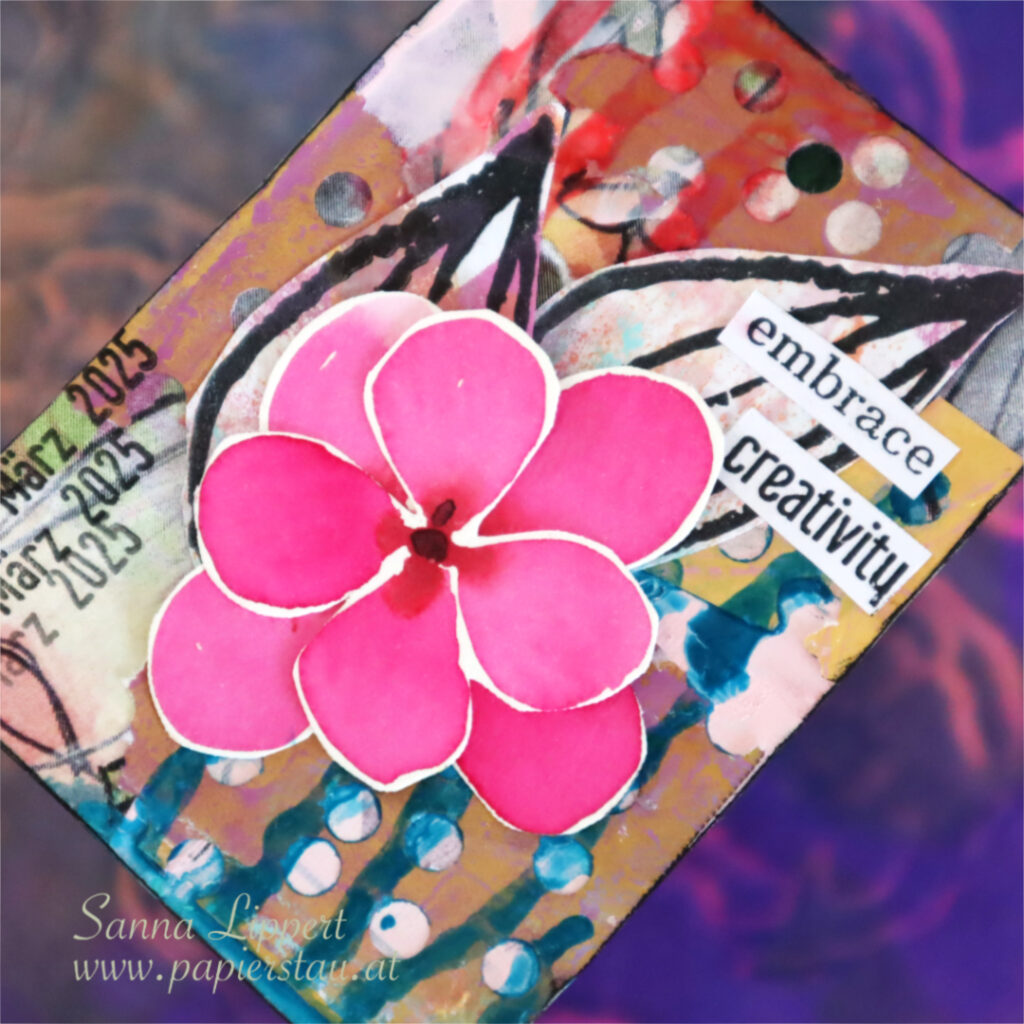
Hello and happy Sunday! Here is my take on the ShanoukiArt Full Deck Challenge number 48: dangle.
I used collage papers gifted to me by Yuna on the background again. In addition I took some gelli printed collage papers (done with Cross It stencil by Rubber Dance) and mixed those together. On top some Neocolor II crayon and my constant – a date stamp.
As a focal point I used a Rubber Dance butterfly and some Tonic Studios Nuvo Drops. My dangle is a bell and a pom pom ribbon.
Here is the process video:
See you in a few days with number 49!! Happy crafting, xxx, Sanna
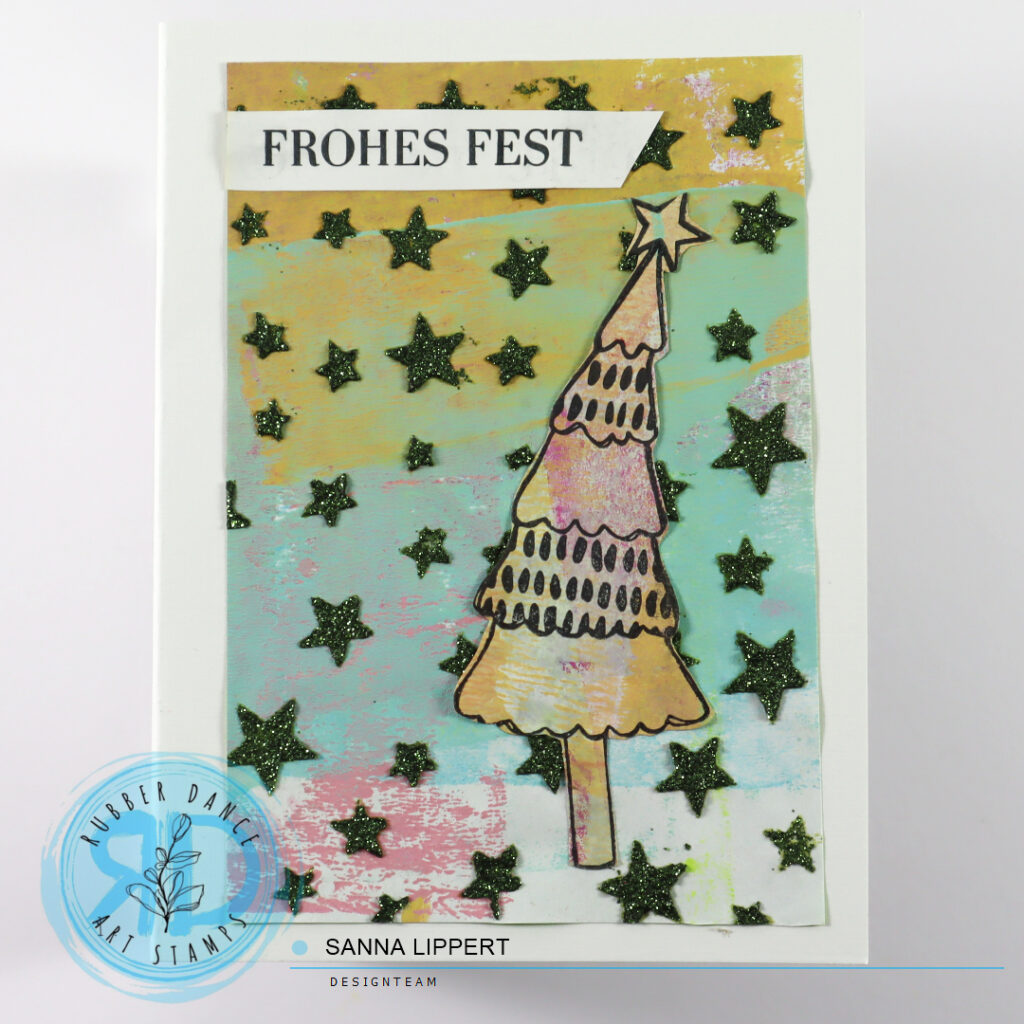
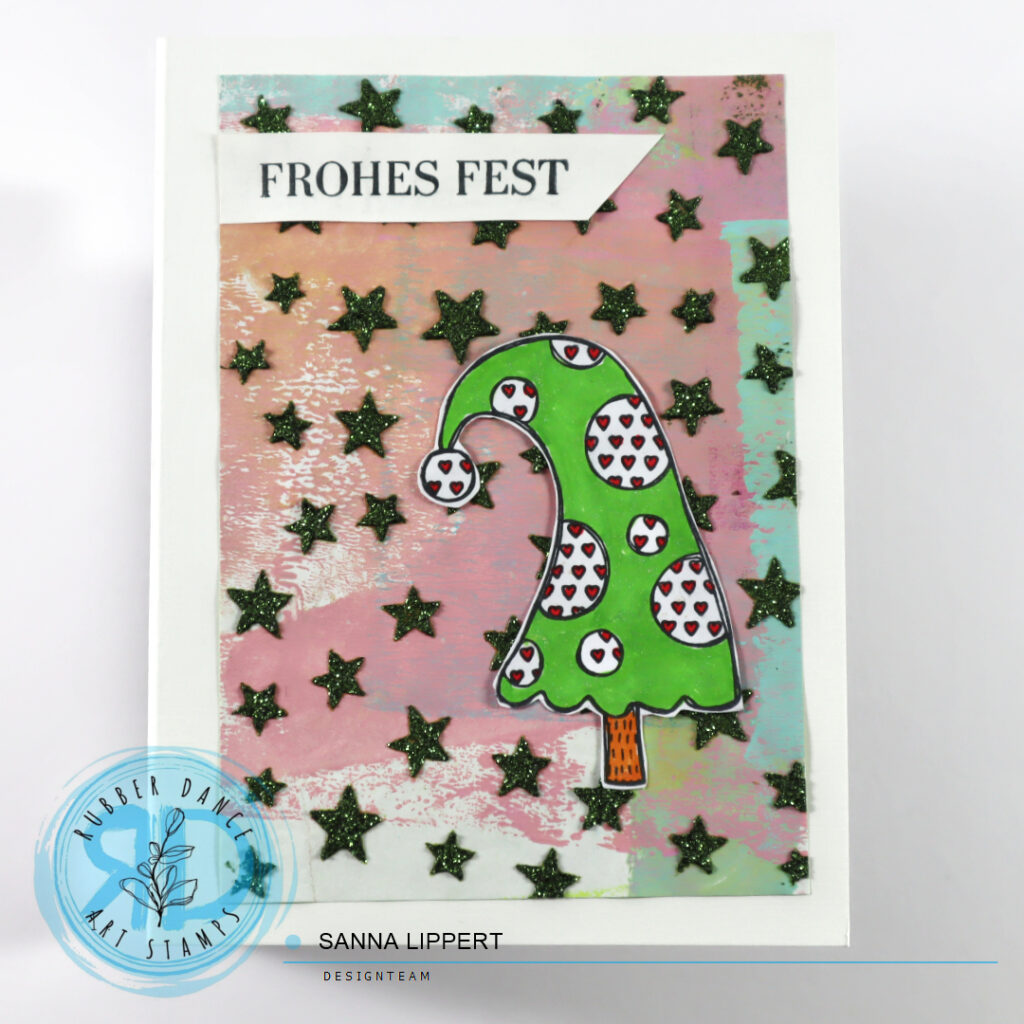
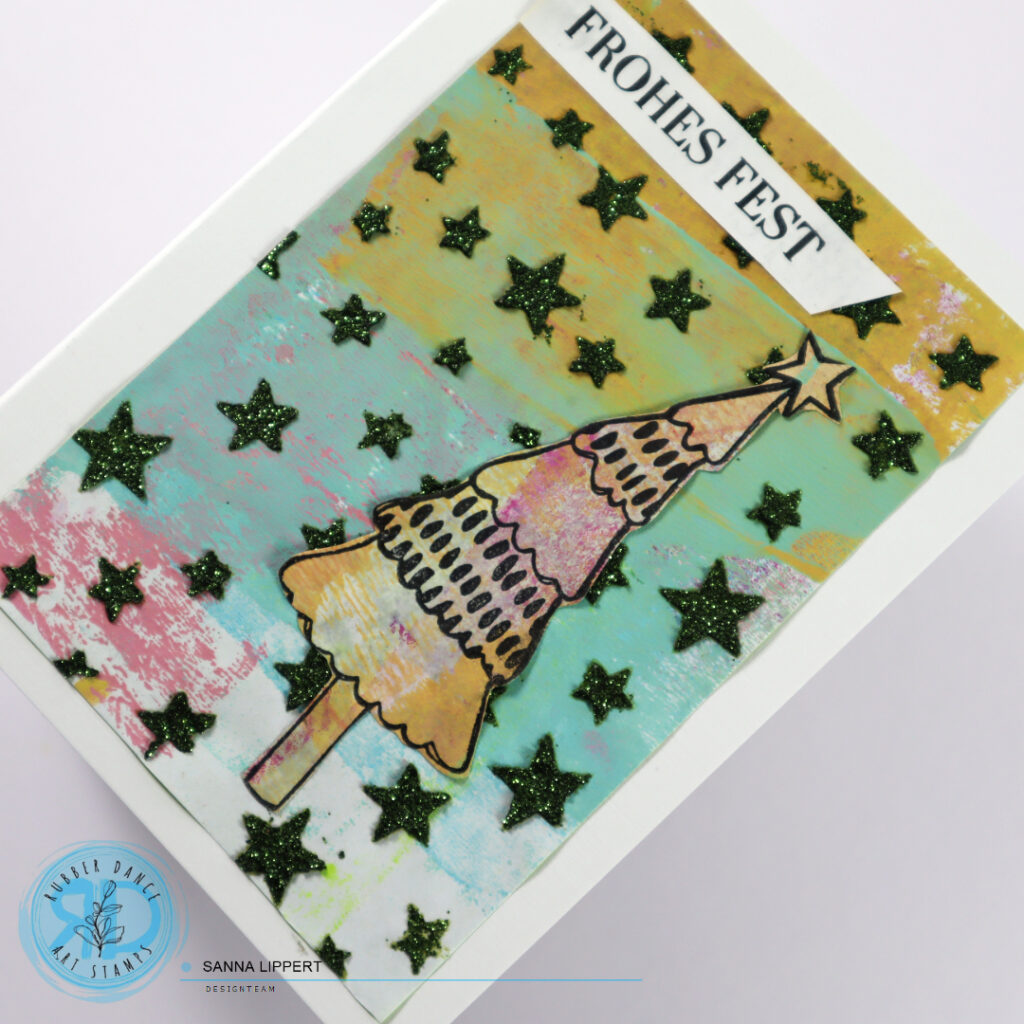
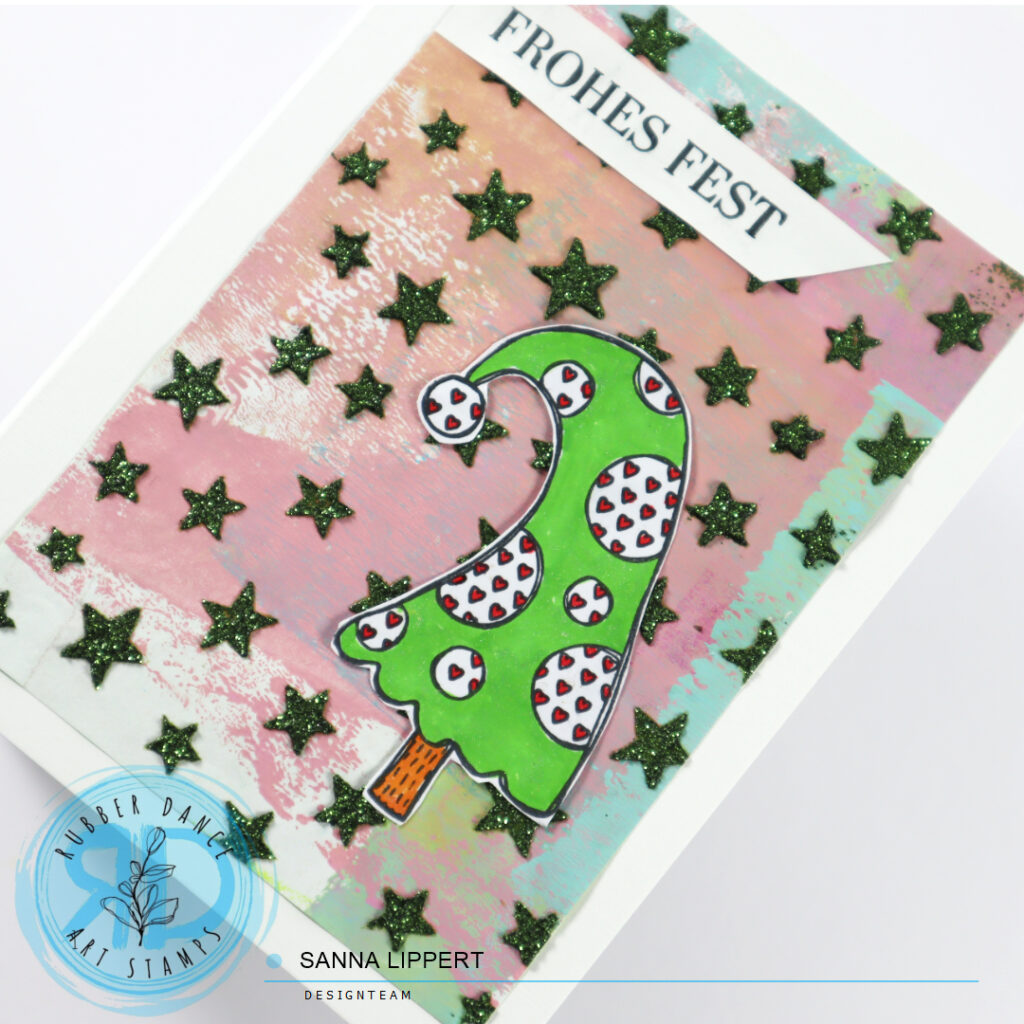
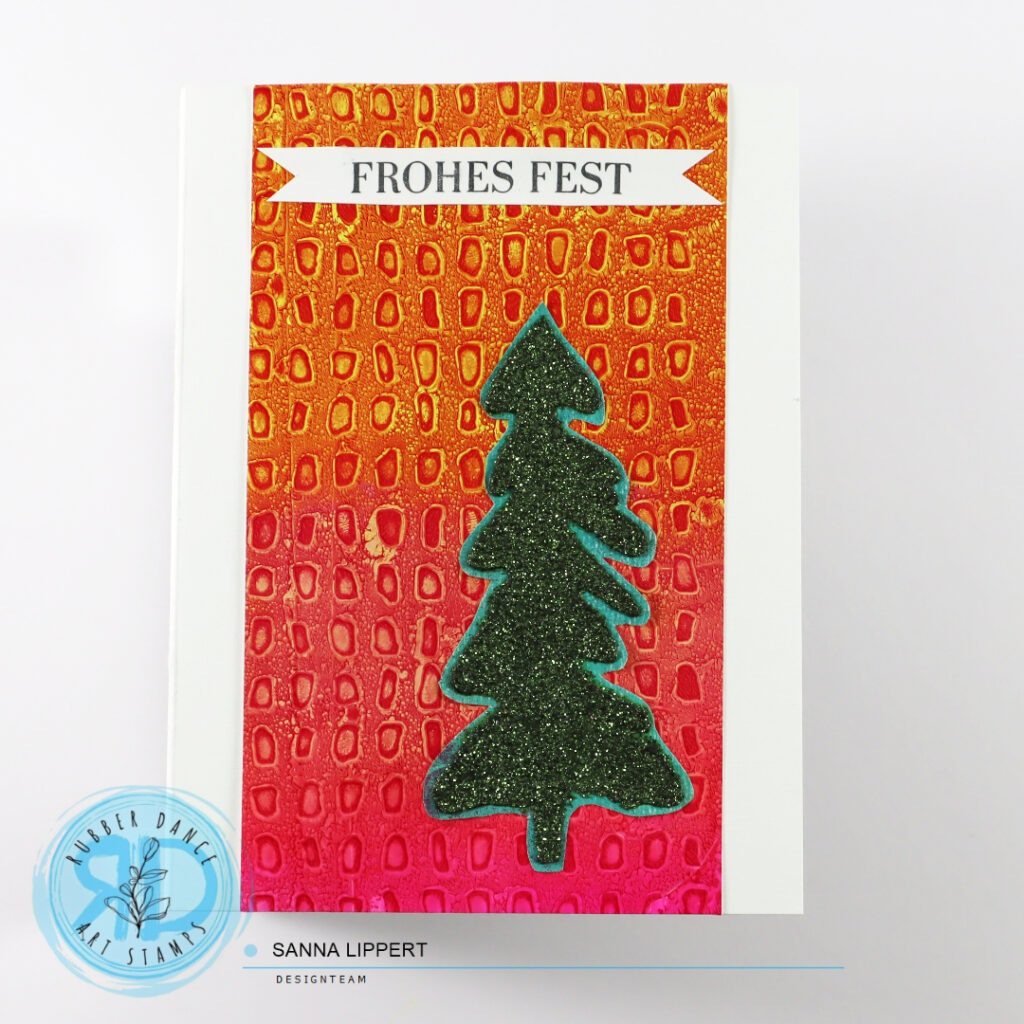
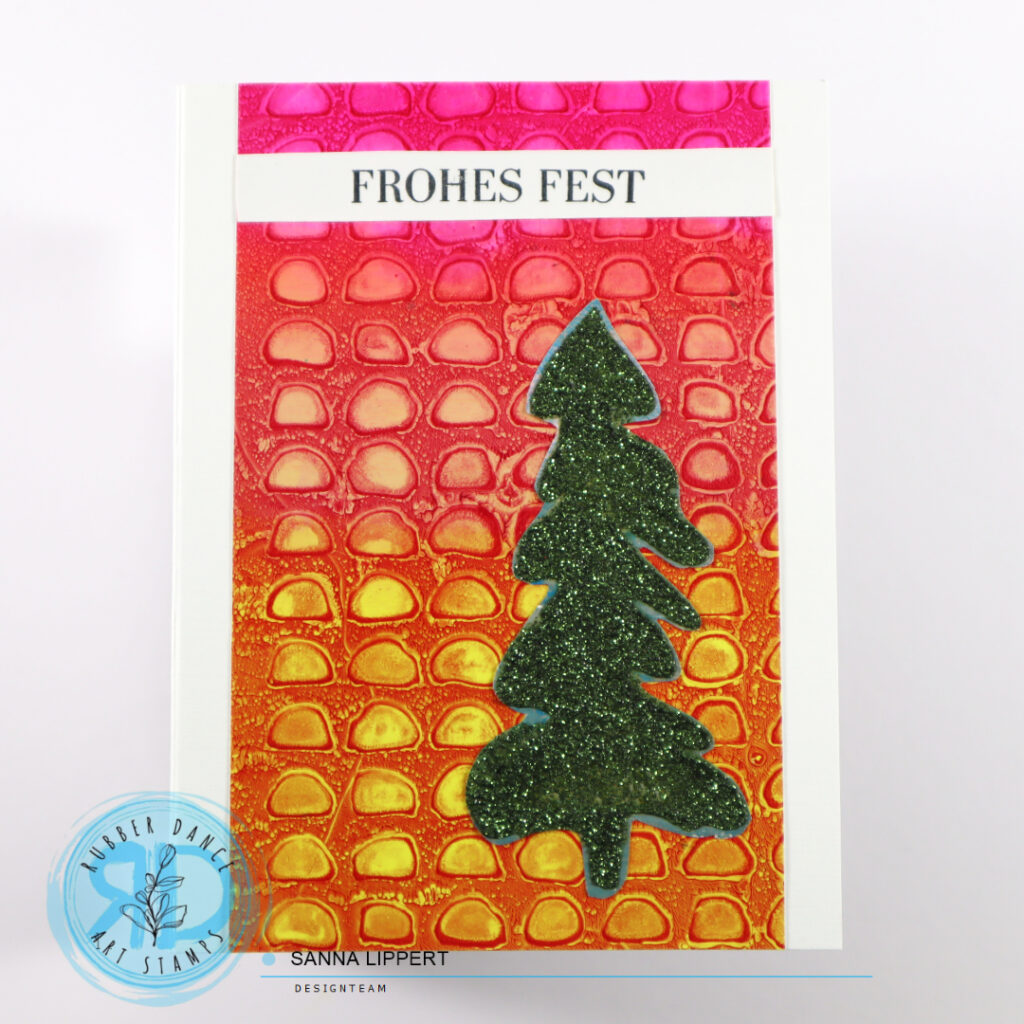
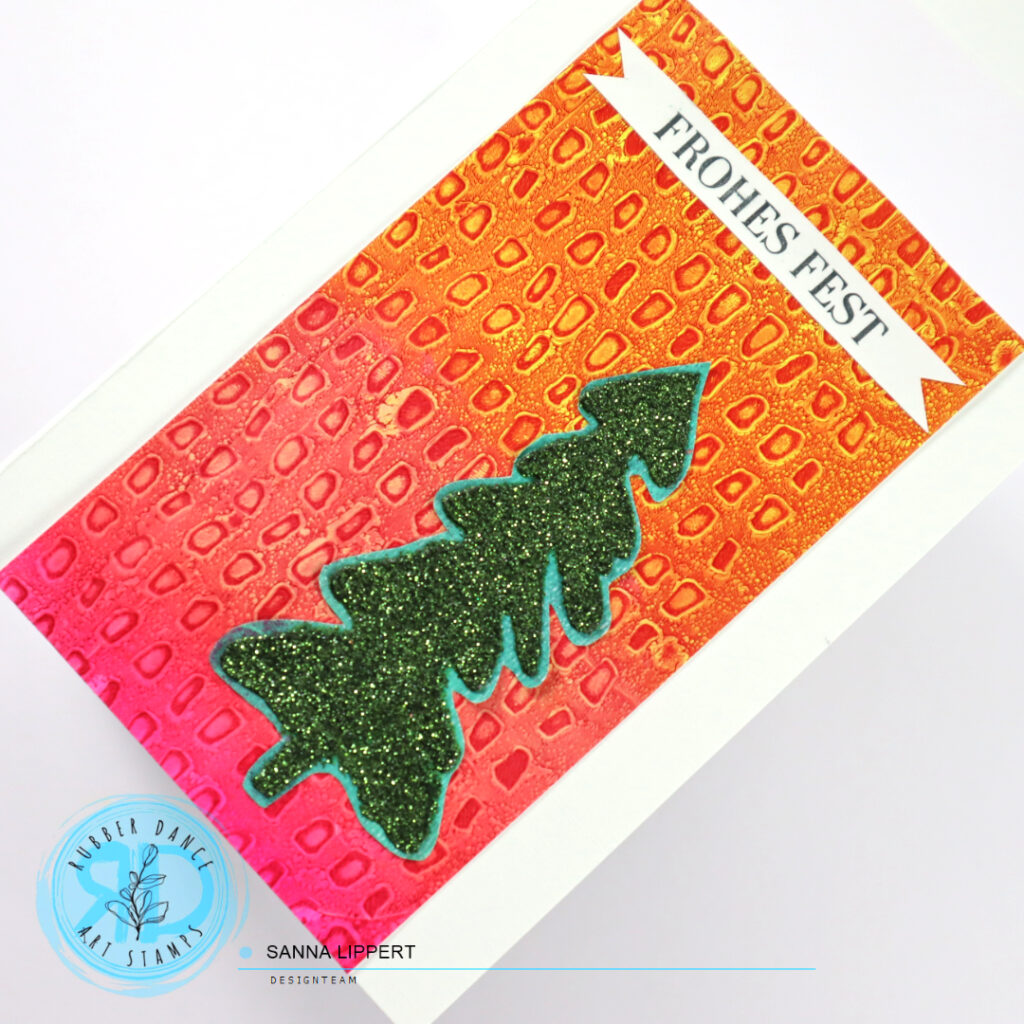
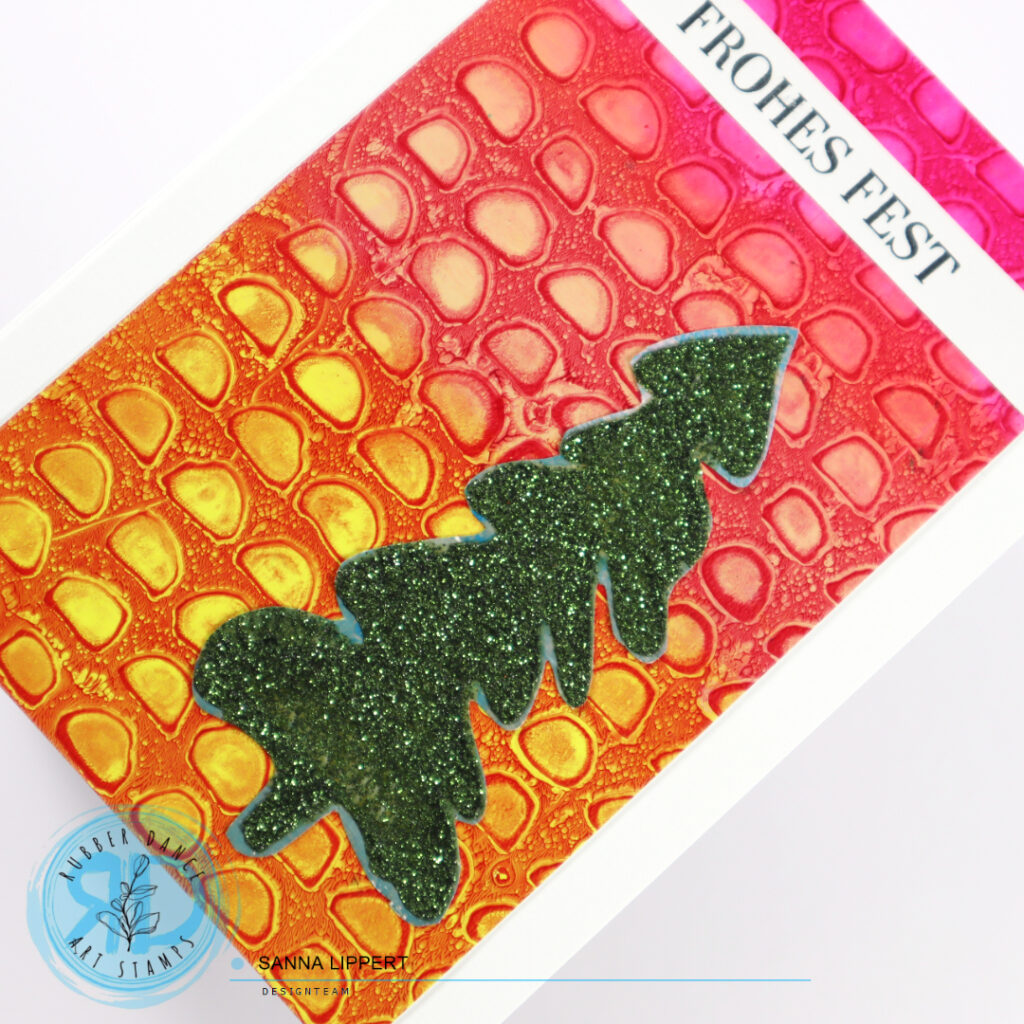
How about putting some of the collage paper piles we all have into good use and create some Christmas cards with them? Here are some I did:
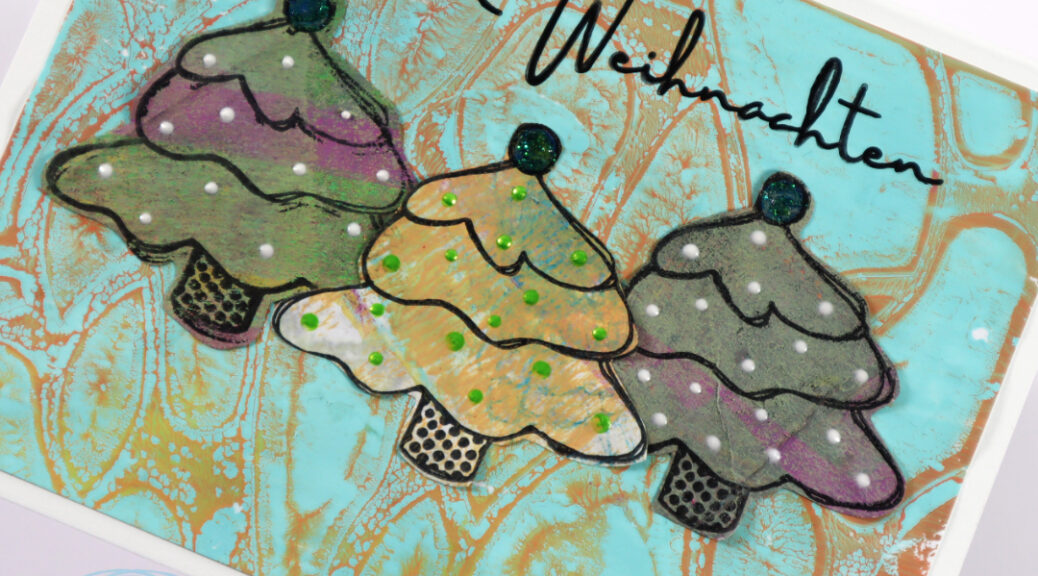
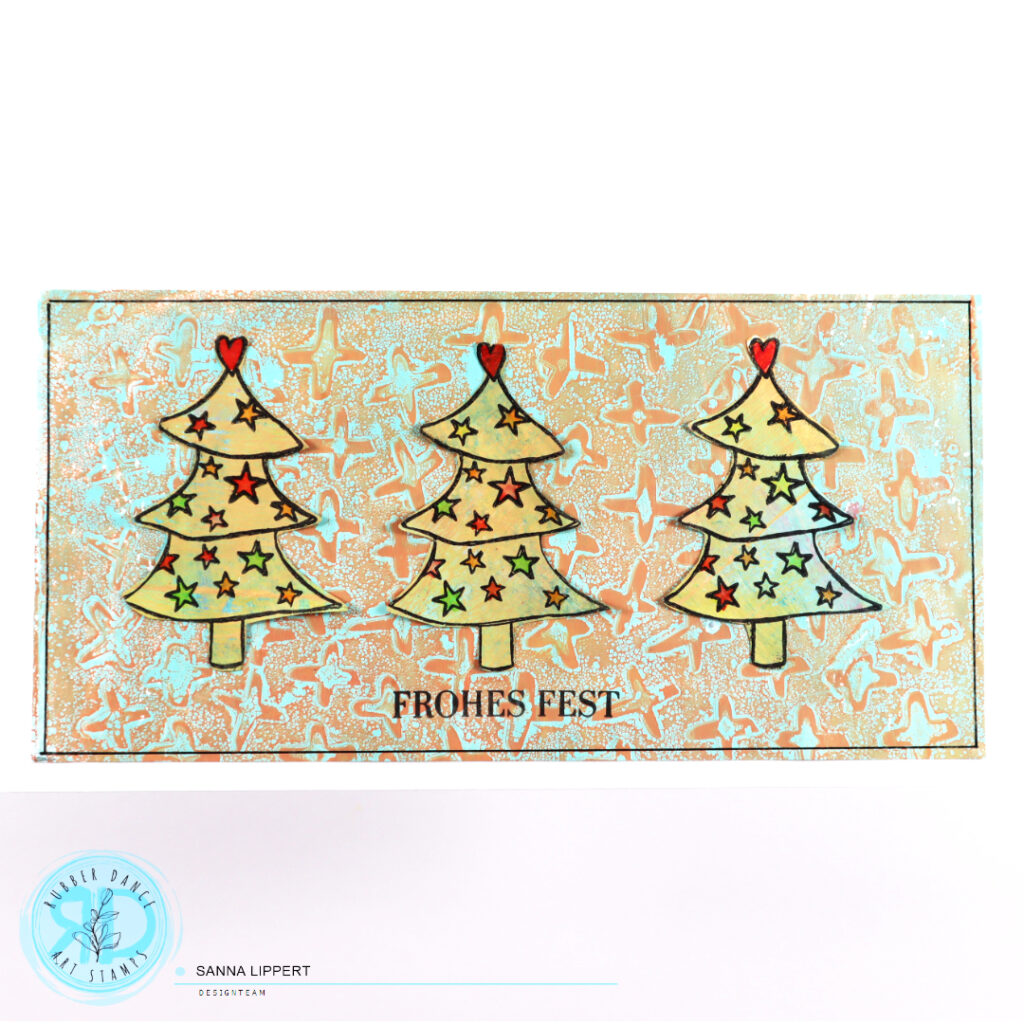
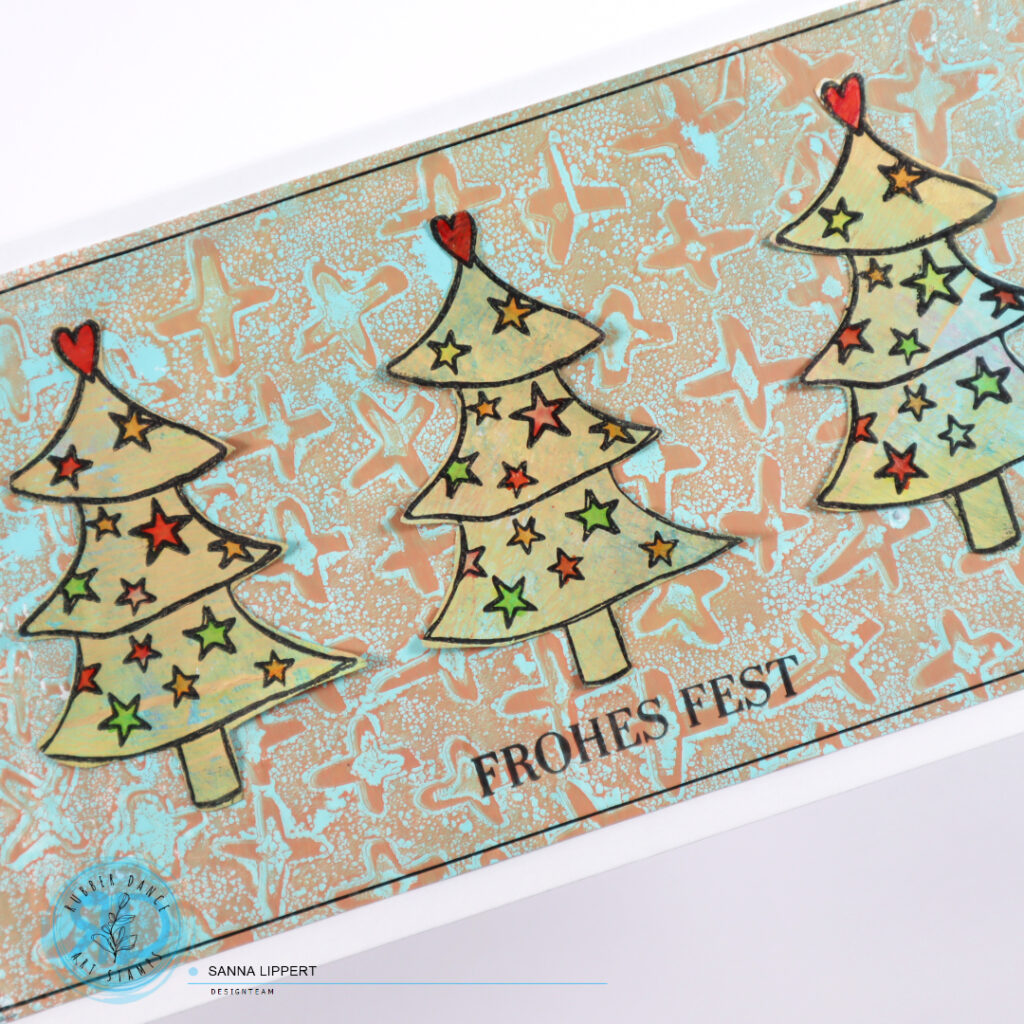
I have a glitter paste stenciled background paper on these cards (made with Tonic Studios paste and Stars 1 Rubber Dance stencil). On top I´ve added some on collage paper stamped (Textured Xmas Trees 2) trees. Finished with Kartengrüße stamp set sentiments. The green tree was stamped on plain paper and then colored with Edding glitter brush pens.
For the second set I´ve used the Marks 3 and Marks 2 stencil with a Gelli Arts gel plate for the backgrounds. On top I´ve used the Xmas Trees 1 stencil with Tonic Studios glitter paste and the sentiment is again done with Kartengrüße stamp set. I really like these bright colors! Who says Xmas cards can´t be bold in color?!
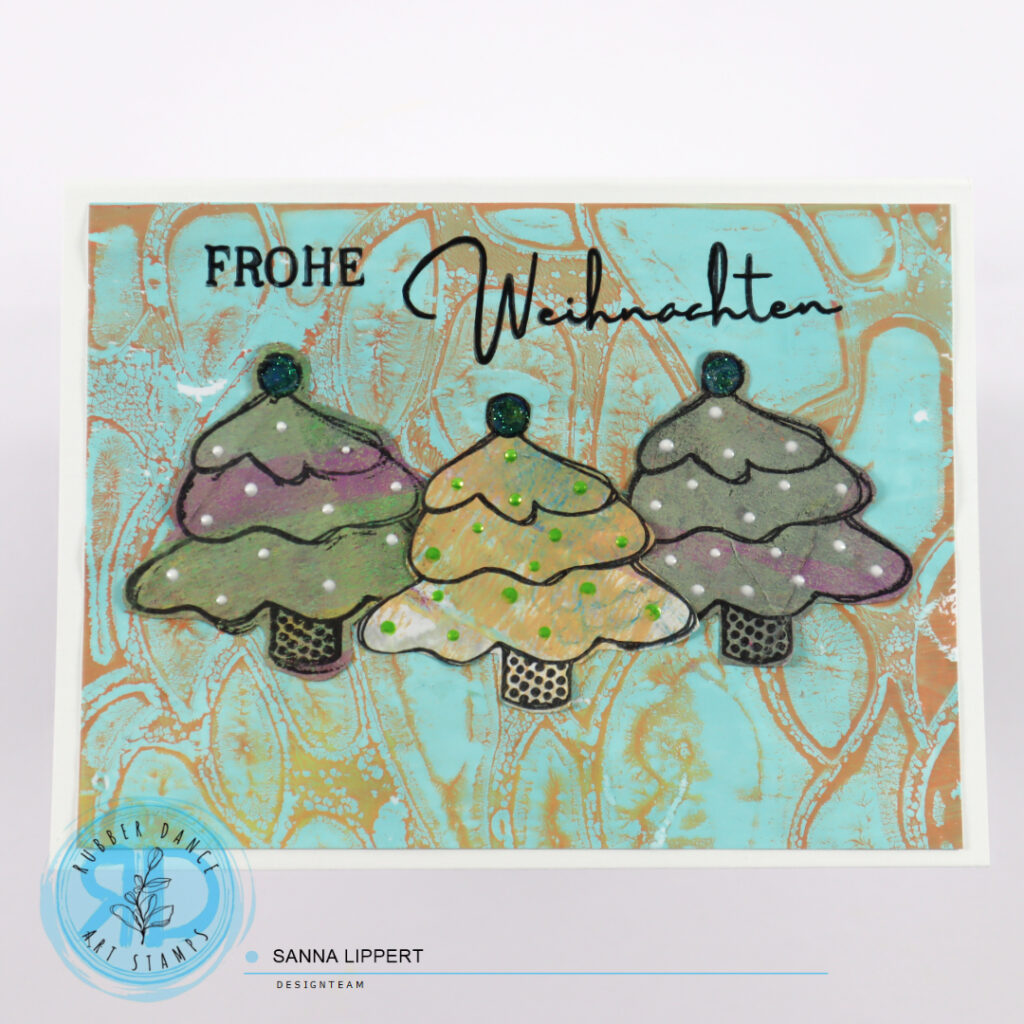
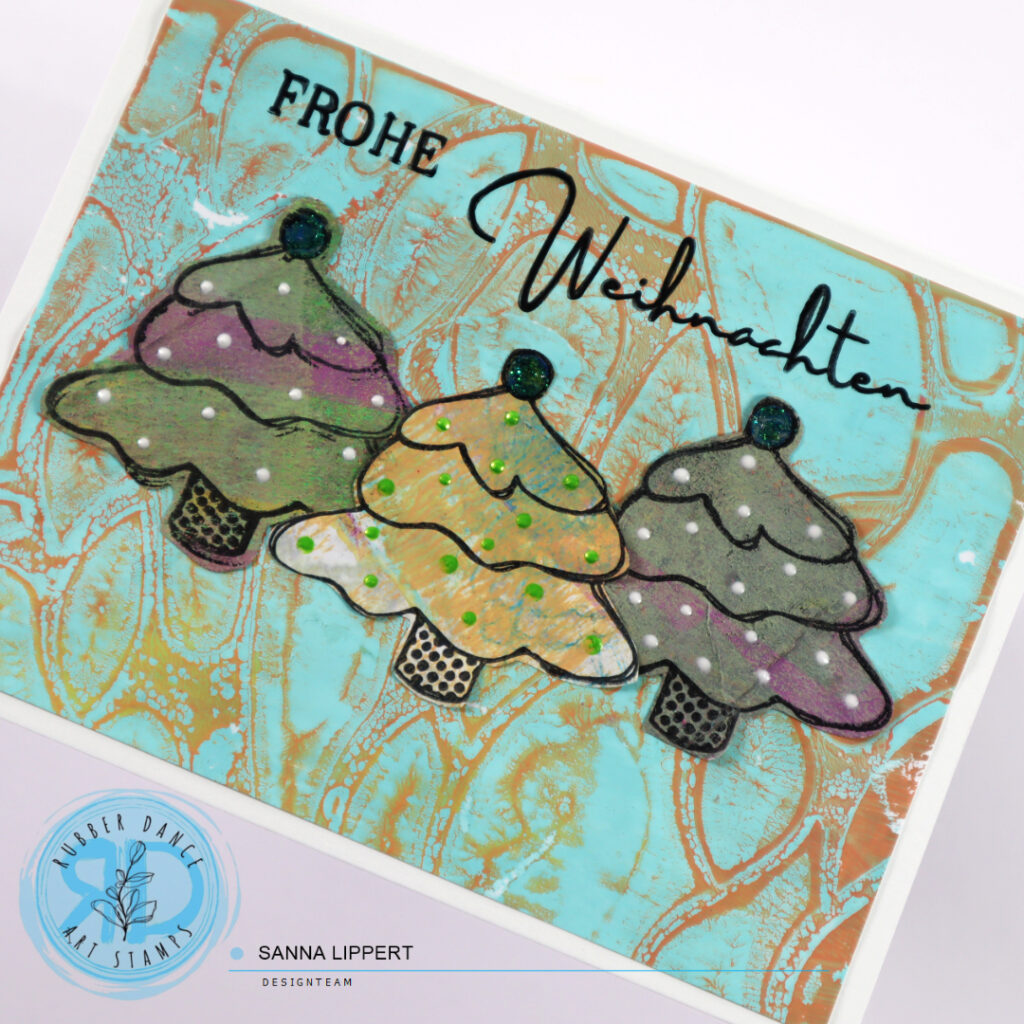
And for the final set I´ve used the Organic 3 and Cross It stencil with a gel plate on the background. The trees (Textured Xmas Trees 2) got stamped onto another gelli printed collage paper and fussy cut. I´ve added some glitter pen details to the slimline card´s trees and the smaller card has some Tonic Studio Nuvo Drops as decor. Sentiments on both were stamped with the Kartengrüße stamp set.
Have fun creating some Xmas cards with collage papers, stamps and stencils!!! xxx, Sanna
Hello and happy Wednesday! Here is my take on the ShanoukiArt “Full Deck Challenge” number 12: “holes and drippy paint”.
I love how this turned out! I started off with collage papers gifted to me by Yuna. Then I added some Dina Wakley heavy body paint in light pink into the open areas. On top of that I added some small bits of gelli printed paper leftover to which I made holes with my Drop-A-Dile.
After adhering the papers with holes onto the background, I added Gloss Spray (in pink and blue) drippings. Next I added my constant (the date stamp) and after that I decorated the deck card with some Rubber Dance fodder and hand drawn flowers. The leaves are from the set “Pencil Marks 8” and the flowers are from my last years “the100daychallenge” project. For finishing touches I added again some stamped words (Rubber Dance stamp). I love how this deck card turned out!!!
Here is the video for you to watch:
See you next week with another deck challenge take! Happy crafting, xxx, Sanna
I started by applying heavy body paint in “olive” with a palette knife onto the background. On top of that I used a foam brush to dab “sand” and “apricot” tones thru Big Ovals and Dotted 1 stencils. After that I outlined some of the dabbed paint “circles” with a black pen. Next I took a piece of a old dictionary book and wripped and glued strips of paper onto the background.
Next I wiped some “aloe” tone with my fingers onto the wripped dictionary page pieces to blend them into the background. I then added a layer of “tangelo” with a palette knife onto the page. Next I took the Cross It stencil out and added some white paint thru it onto the orange areas for contrast.
After that I took a black with glimmer mist misted tag out and again dabbed the “lemon” paint onto the tag thru the Wheels stencil. After that I put some “lime” toned paint onto the palette knife and wiped some of it onto the tag. The next layer was done using “stoked” tone and the Marks 2 stencil. I then added the last bits of “turquoise” paint with a palette knife thru the Stars 1 stencil onto the tag.
I sprinkled some Gloss Spray in “turquoise” for interest onto the art journal page. I then glued the stenclied black tag onto the art journal page. After that I added a misted doilie for decoration and created a cluster of leaves with “Doodle Flowers 2″ leaves next to it. There is a video at the end of this post on how I created the leaves.
I finished the page with a paper doll by Tim Holtz and some black and white alphabet stickers. Here is the start-to-finish video for further information:
And this is the video on how I made the leaves fodder:
I hope I could inspire you today. Happy creating! Sanna
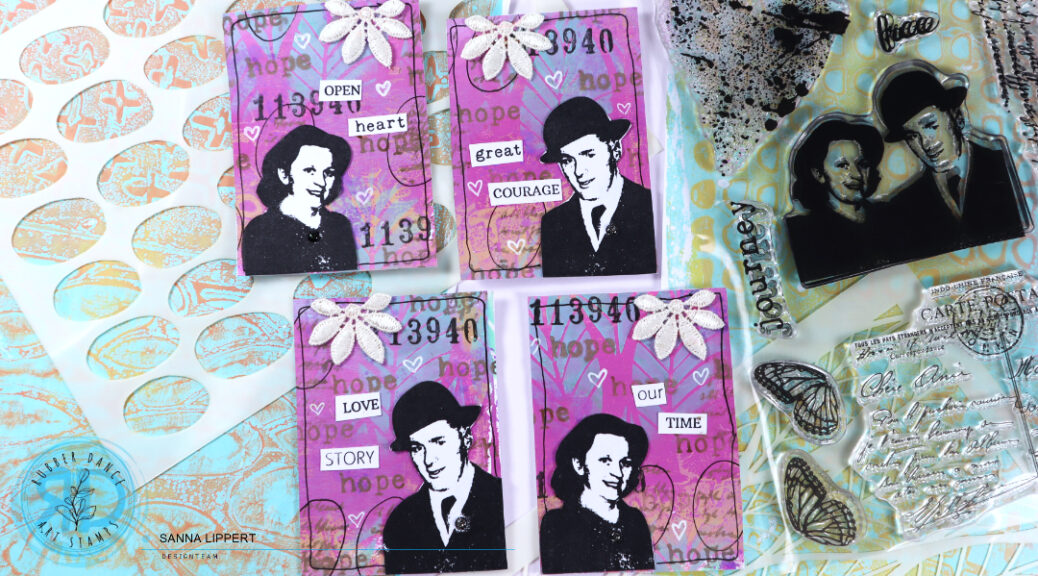
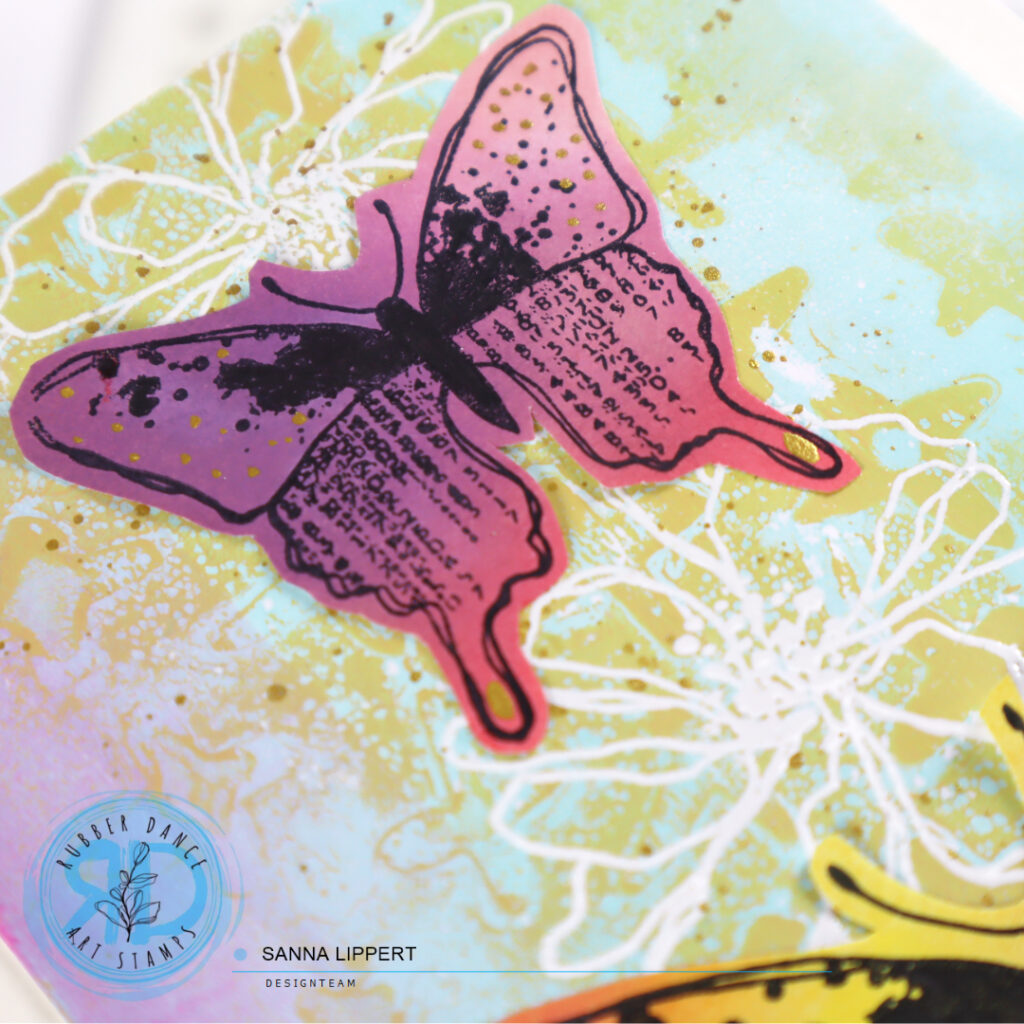
Hello, it´s my turn again over at the Rubber Dance blog today and I am up sharing another take on residue gelli prints turned into card focal points. Like on my last post, I created another set of die cut focal points out of residue gelli printing papers. This time using different color combinations and stenciling the card backgrounds, instead of stamping.
I first die cut the residue gelli printing paper with die cut dies into different forms and sizes (banners, circles and squares). I then added some stamping with black stamp ink and some heat embossed details with red embossing ink and the Pencil Marks 8 stamp set.
After that I took the Ornament 1 stencil and added brown Distress Oxide Ink thru it onto the die cut pieces. Then I took the Mix It Up 4 stamp set and added some stamping with blue StazOn ink here and there onto the background.
Next I took out some premade Sketchy Leaves 5 stencil fodder and adhered them onto the die cut pieces. On top of those I added some yarn and a fodder butterfly, created with a gel plate and Butterflies and Moths stamp set.
I also wanted to add a stamped word onto the focal point elements and took out the Mixed Sentiments 1 stamp set. I just used one word from each sentiment, instead of the whole quote.
Instead of adding a stamped background, I chose to stencil Distress Oxide Inks thru the Ornament 1, Dotted 1 and Organic 4 stencils onto the card bases and then adhered the die cut pieces with fodder onto the cards.
I also wanted to add a stamped sentiment to every card, so I used an older German birthday sentiment stamp set from my own stash for stamping them.
After finishing the cards, I added some Gloss Spray droplets to the butterflies wings here and there for additional color and interest.
Here is a video on how I created the Sketchy Leaves 5 stencil fodder that I used on some of the focal point elements:
And here is a short video on the focal point elements and how I put the cards together:
I hope I could inspire you to play with your Rubber Dance stamps and stencils and create colorful cards.
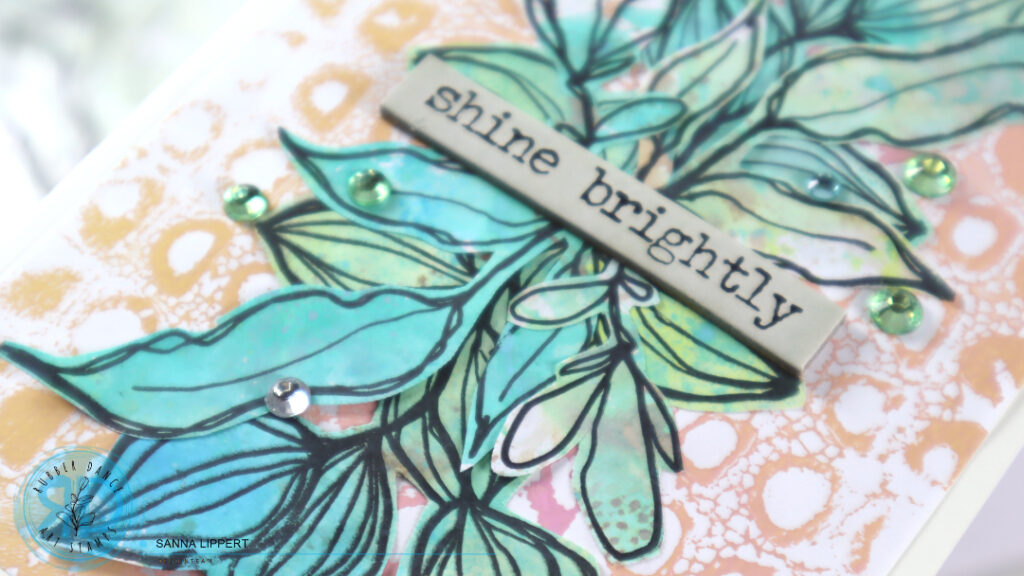
Hello everyone, I have an Artist Trading Card set up over at the Rubber Dance blog this time. I created these Artist Trading Cards with the Mix It Up 6 stamp set, Leaves #2 and Big Ovals stencil. As a background I used a gelli printed paper that I have used on a previous project (here).
The background paper, like mentioned above, is from my previous project and done using acrylic paints, a gelli plate and Cross It, as well as Marks 2 stencils. I used that paper as my starting point and added even more layers on top of it to create an interesting, artsy background for my ATC´s.
I started with the Leaves #2 stencil and cracked pistachio Distress Oxide ink by applying the ink thru the stencil randomly onto the background with a blending brush.
After that I took the Mix It Up 6 stamp set and the Big Ovals stencil and placed it on top of the paper. With ground expresso Distress Oxide I first added some stamped text thru the big ovals stencil onto the background. Then I outlined some of the stamped areas with a black pen thru the same stencil to make them stand out more from the background.
Next I stamped some wilted violet Distress Oxide toned splatters with the heart shaped stamp from the same stamp set and also some black numbers onto the background. After that I took the stamp image of the couple and stamped them with black stamp ink onto white paper and fussy cut them. In addition I added some ground expresso stamped words (hope) onto the background for more interest.
Finally I took some of the Mix A Sentiment 2023 stamp set words that I had left over from my previous projects and added them to go with the images. I also decorated the pages with a black pen outline and some fabric, vintage flowers and white gel pen hearts as well as some glitter enamel dots.
I hope I could inspire you to play with the Mix It Up 6 stamp set and the featured stencils! Have a great time creating!! xxx, Sanna
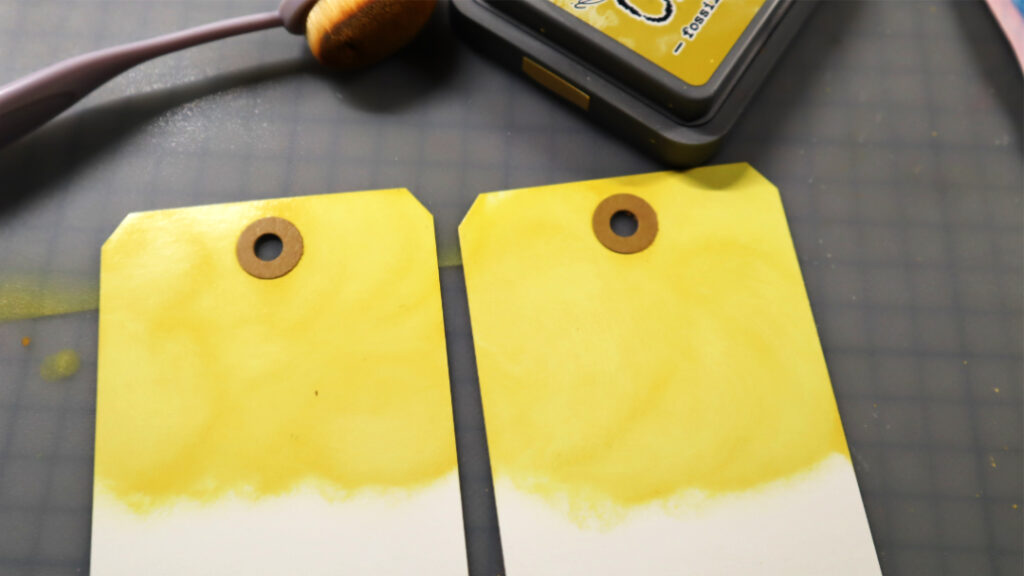
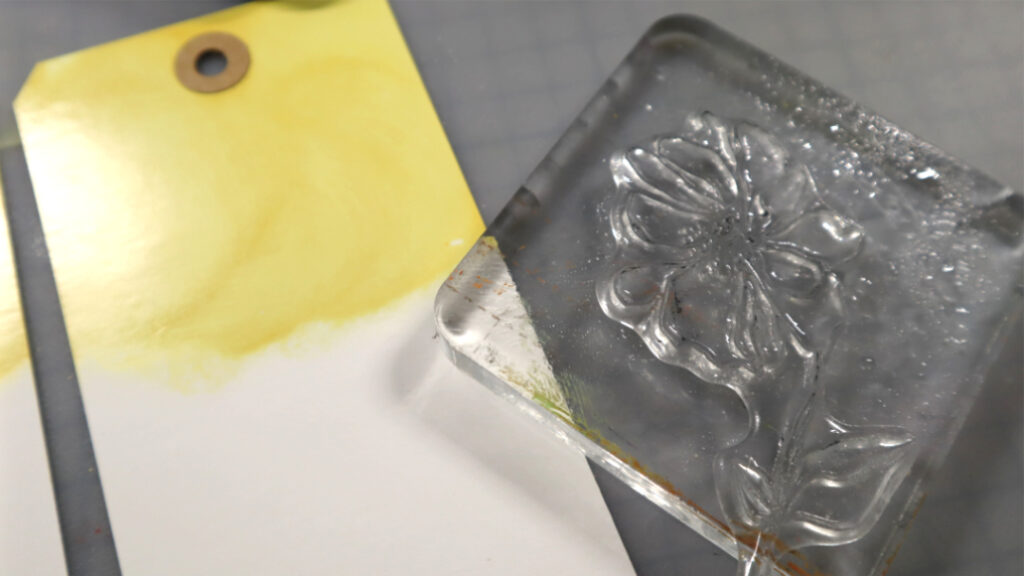
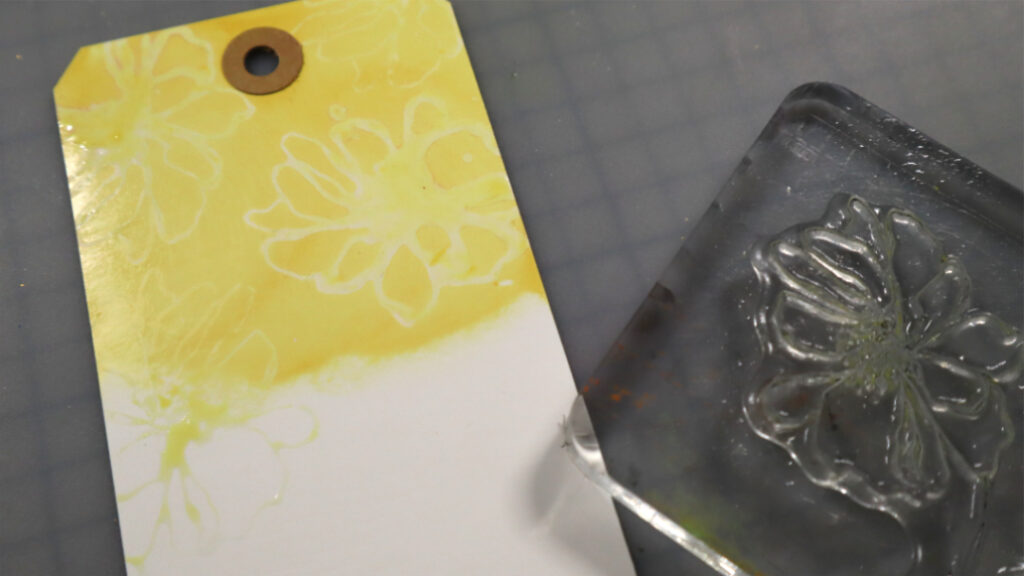
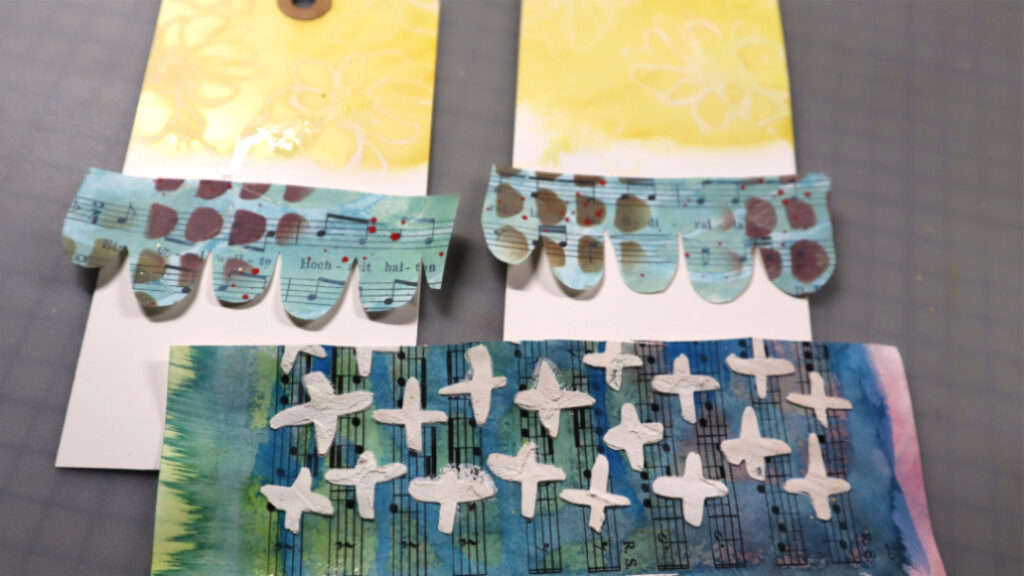
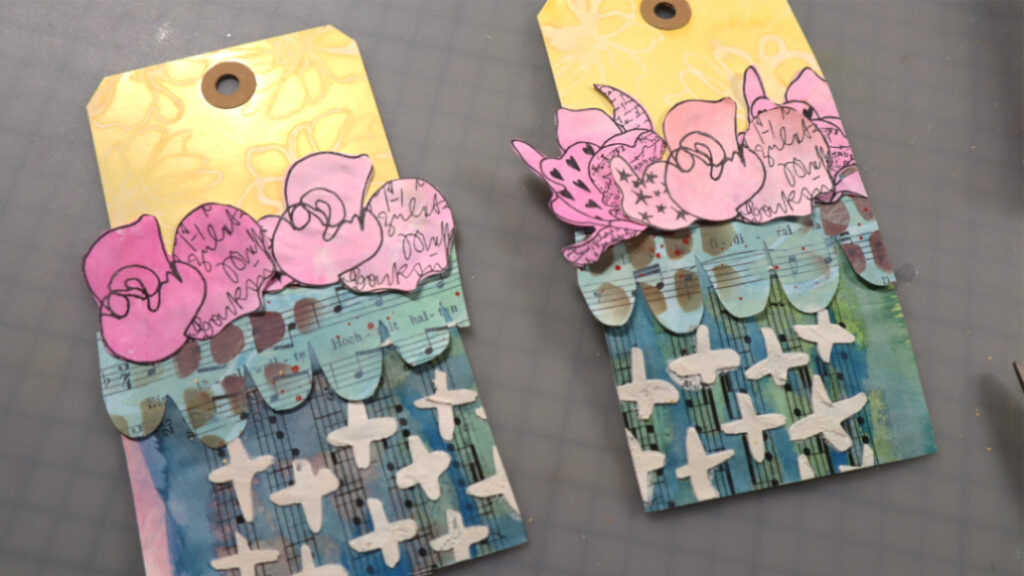
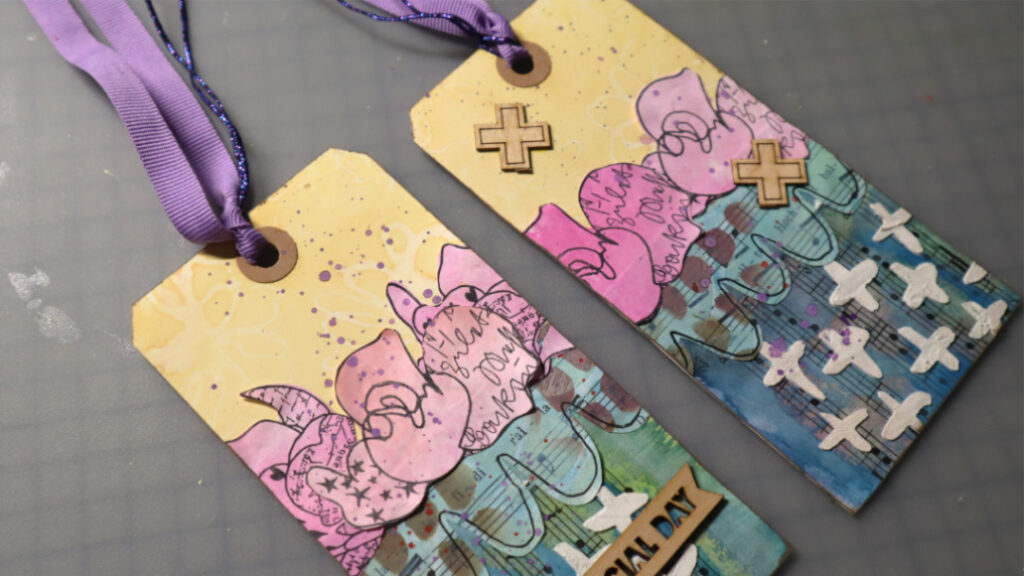
Hello everyone, here is another Rubber Dance Art Stamp product inspiration post with a fun step-by-step tag tutorial for today. For these tags I used the “Sketchy Flowers 3” stamp set to create the fun background details and added all kinds of leftover bits from my previous projects to go with them.
Here is how I created the tags:
First I applied Distress Oxide Ink (fossilized amber) with a blending brush onto white tags. Next I attached a flower stamp from the “Sketchy Flowers 3” stamp set onto an acrylic block and gave it a light water mist. Then I pressed the stamp image into the inked areas and repeated the step until I had enough “water stamped images” on the background.
Next I took out some leftover papers (all from my previous projects shared here on the blog), plus a misted blue music note paper to which I had added some texture paste thru the “Marks 2” stencil. I first fussy cut those papers into size and preferred patterns, then added leftover “Doodle Flowers” on top and adhered the pieces on place. After that I added purple watercolor droplets onto the tags, chose matching ribbons and added some chipboard pieces to finish the tags.
I hope to have inspired you a little to use all leftover pieces for fun smaller projects, so nothing goes to waste! Have fun! xxx, Sanna
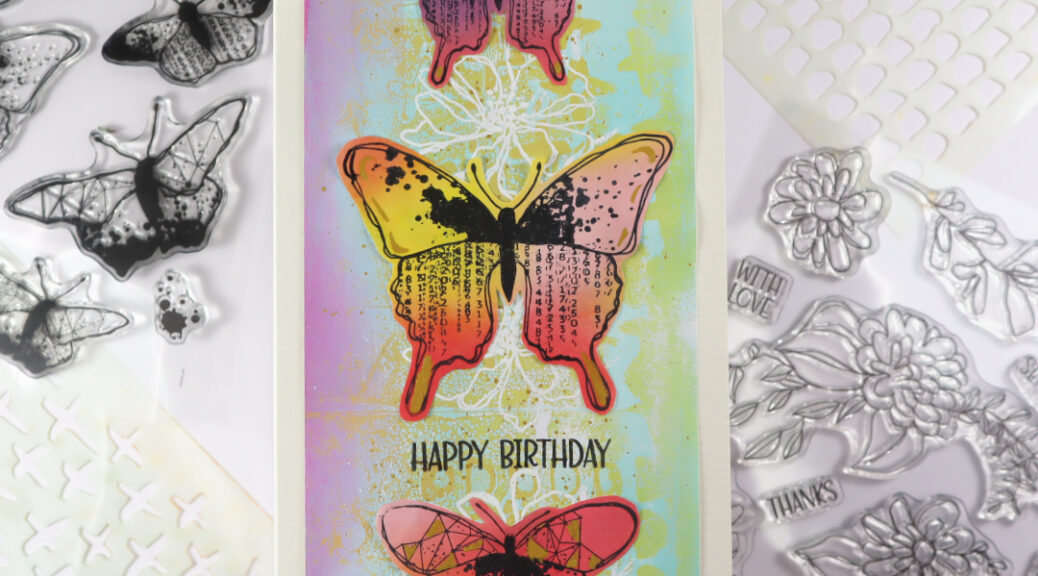
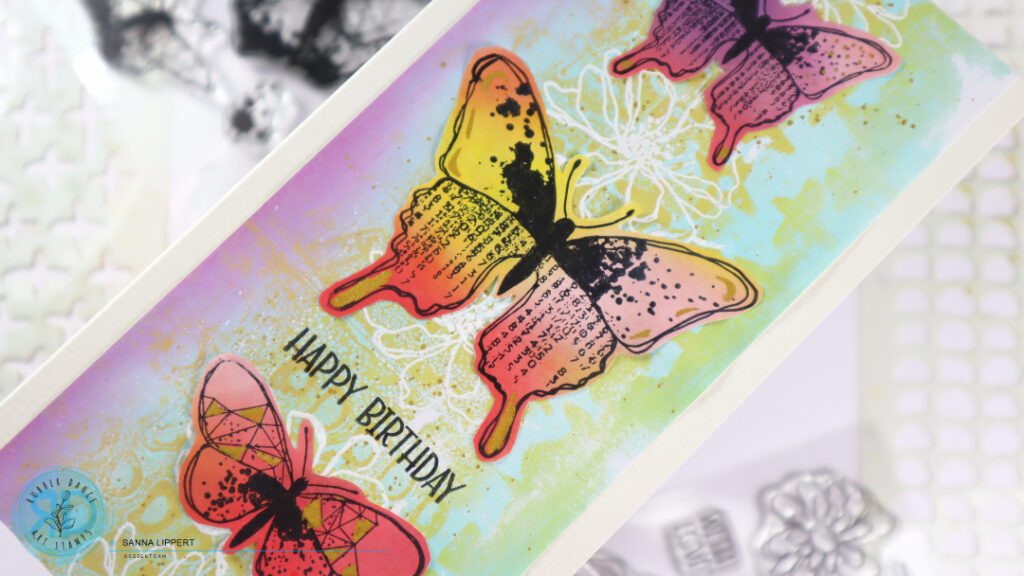
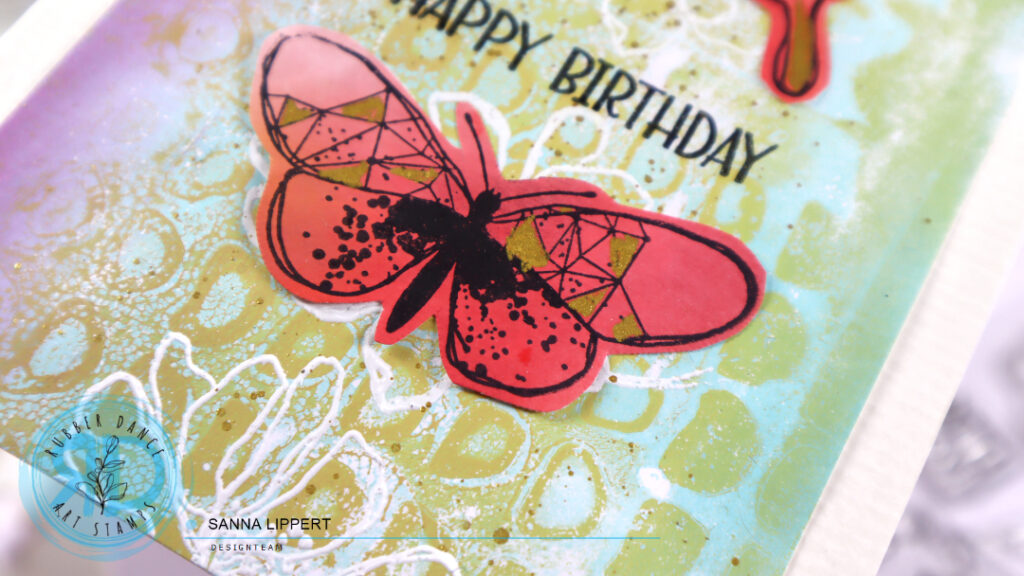
Hello everyone, I am again up with a slimline birthday card over at the Rubber Dance blog today. I created this card with Grungy Butterflies fodder, a gelli printed background and heat embossed Sketchy Flowers #3 as background details. For the DIY gelli print paper I used the Cross It and Marks 2 stencils with pastel toned acrylic paints.
For the background I used one of the gelli prints I created previously in bulk with a gelli plate. I took a slimline card base in cream to add the diy paper onto as a background, but before adhering that piece onto place I added some stamping with the Sketchy Flowers #3 set with embossing ink and heat embossed the flower images with white embossing ink. On top of that I added some golden pigment splatters for additional interest and then arranged a row of Grungy Butterflies on top. The video on how I created this fodder, is added to the end of this post.
I also decorated the butterflies with some golden details before adhering them into place. For the sentiment I used black stamp ink and one of the stamp sentiments from the Sketchy Flowers set.
Here is the video on how I created the butterfly fodder and a start-to-finish video about the card creating process as well as a peek into the gelli print papers I created in bulk:
I hope I could inspire you to play with your stamps and stencils and create fun mixed media cards!! xxx, Sanna
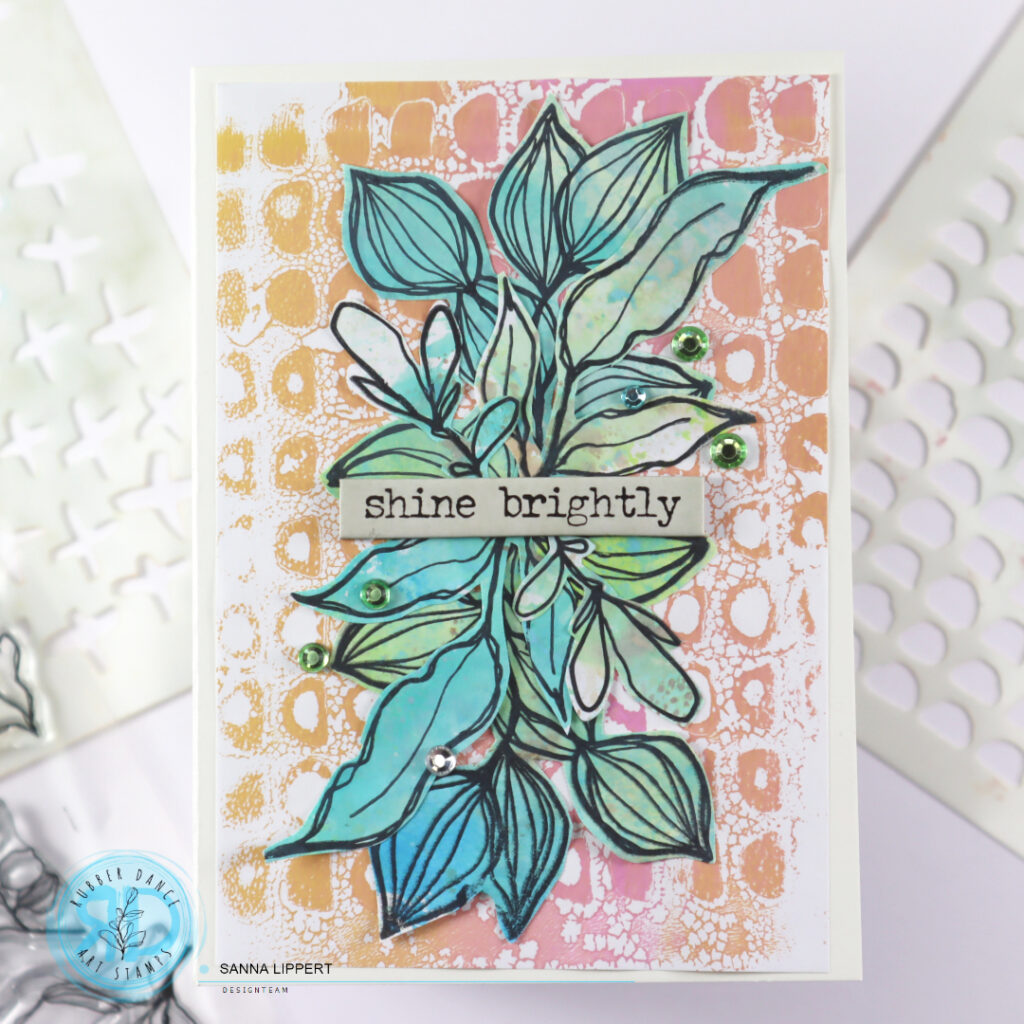
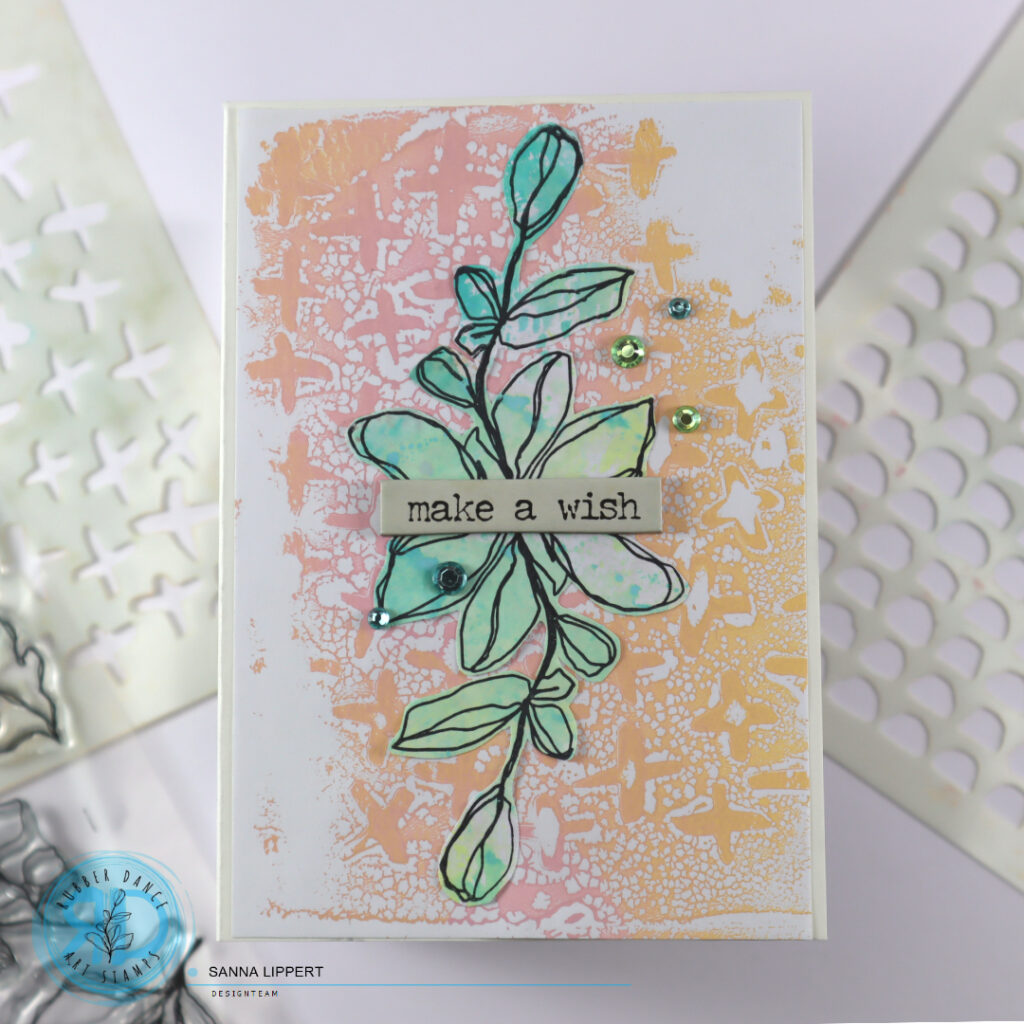
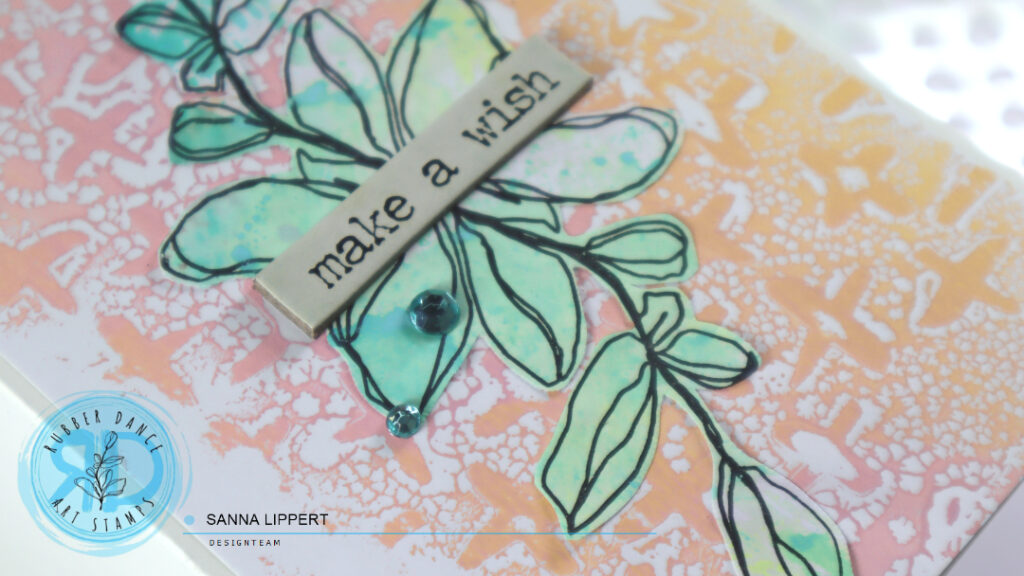
Hi, it´s again my turn to share a project over at the Rubber Dance blog with two Sketchy Leaves fodder cards. The backround on these cards is created with a gelli plate, acrylic paints and “Marks 2” as well as “Cross it” stencils in pastel tones. I created a few different gelli printed papers at once and used the one with some white space on it as a background for these cards. In my opinion, this adds lots of interest to the card, when the background is irregular in pattern.
I also created plenty of fodder with the Sketchy Leaves stamp and Distess Oxide inks at once and used some of them on these cards as a focal point. There are videos on the gelli printing, the fodder making and the step-by-step of the card creating process at the end of this post.
On the gelli printing video I am also using the “Organic #3″ stencil and I make several prints at once, because I will be using these prints on my future projects, too. Some prints are not perfect, but I don´t mind that. I am just going to pick the parts I like and use those later.
After creating the background papers with the stencils I then created plenty of fodder with Distress Oxide inks and the “Sketchy Leaves” stamp set. Here is a video on how I did that:
Finally, after the previous two steps, I put the cards together. Here is a sept-by-step video about the process:
I hope I could inspire you today to make fun gelli prints and create some cards with them and fodder. And while you are at it, be sure to create plenty of variations of both in different colors, so you have material for many projects ready, when inspiration hits.
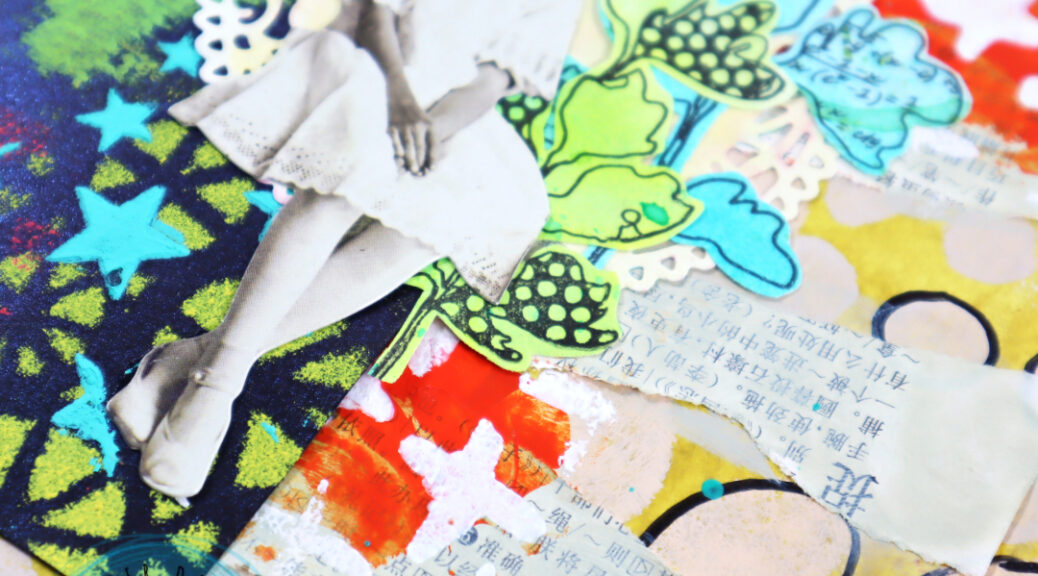
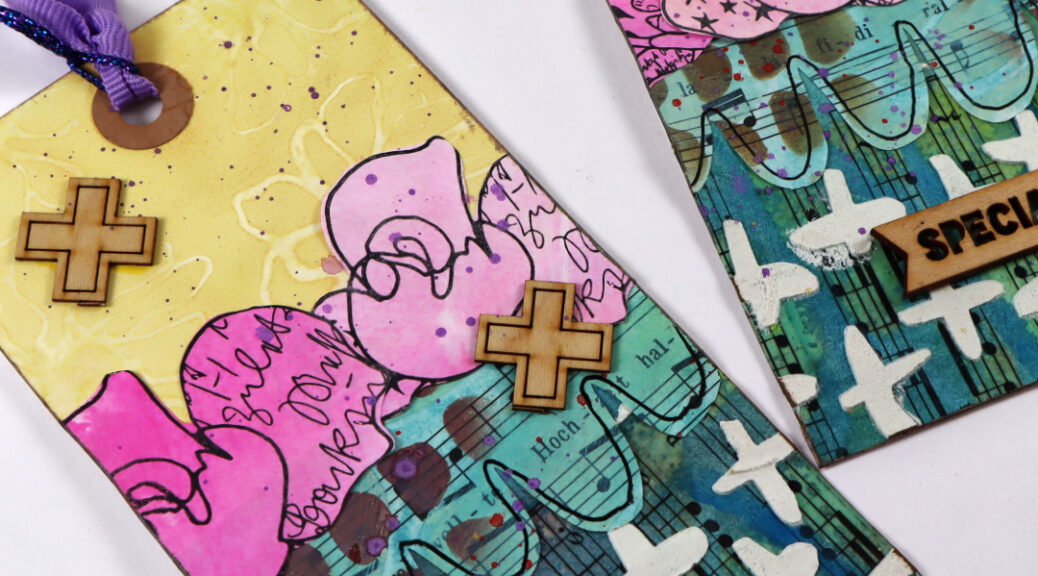
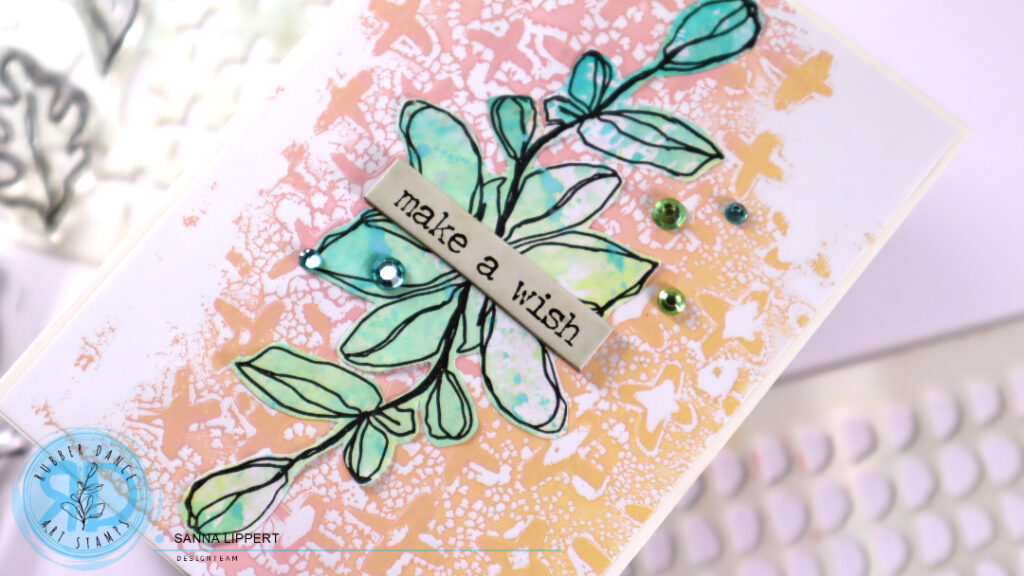
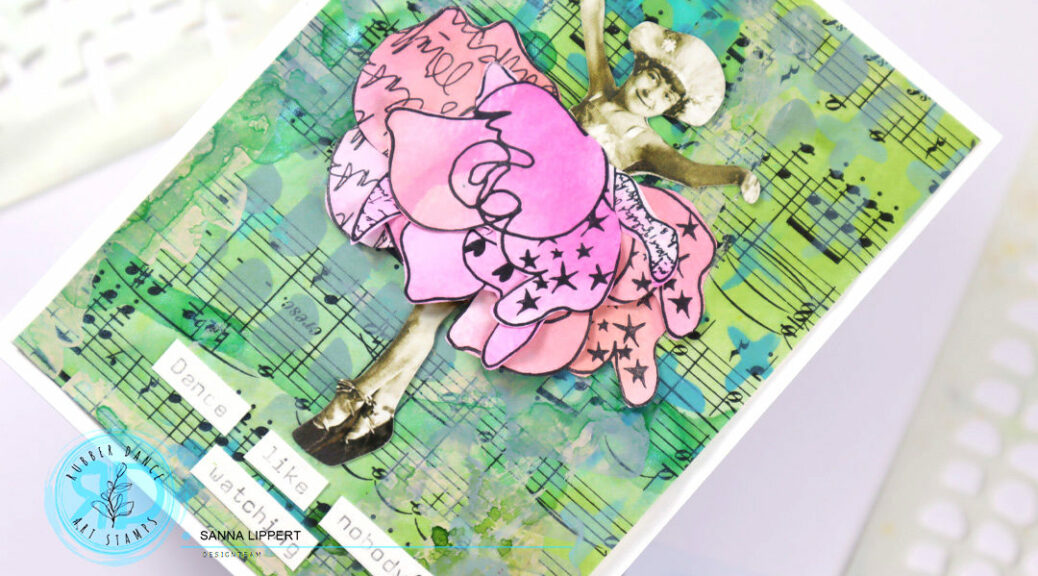
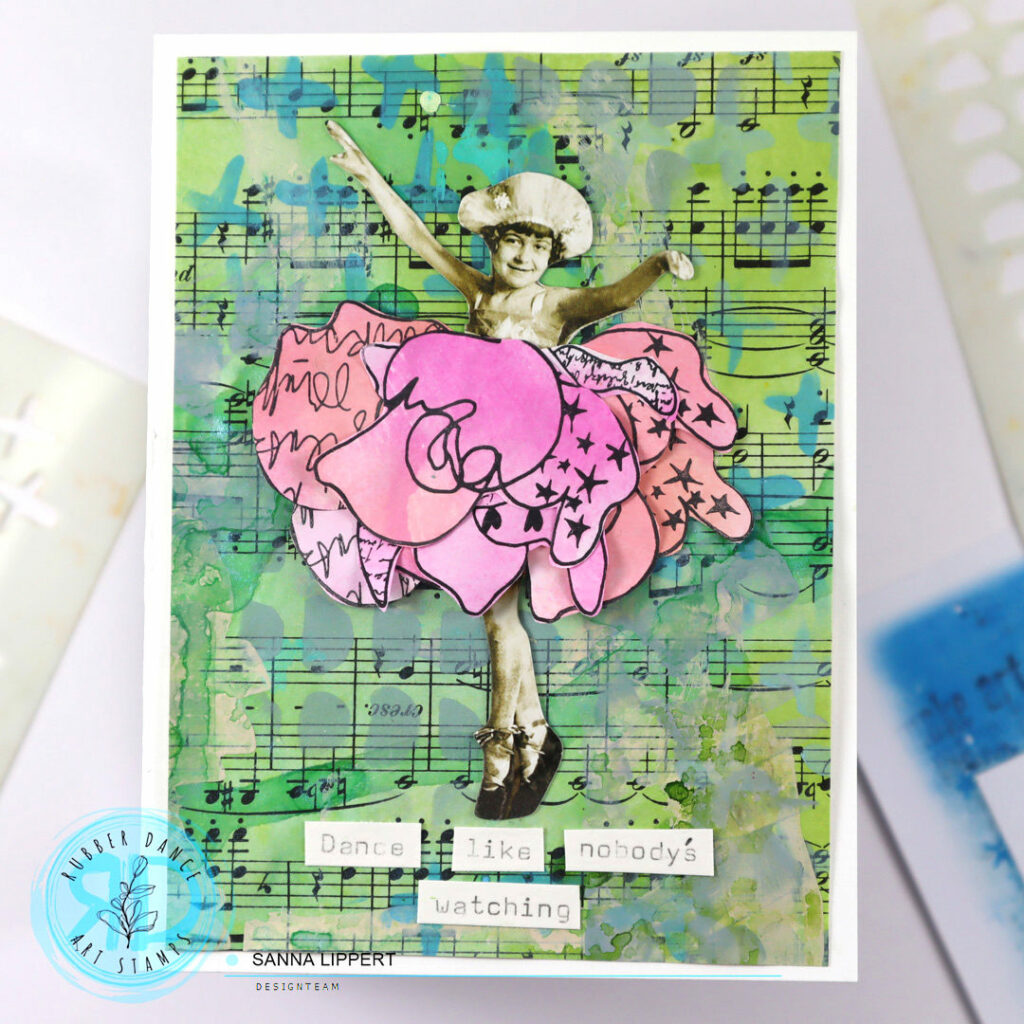
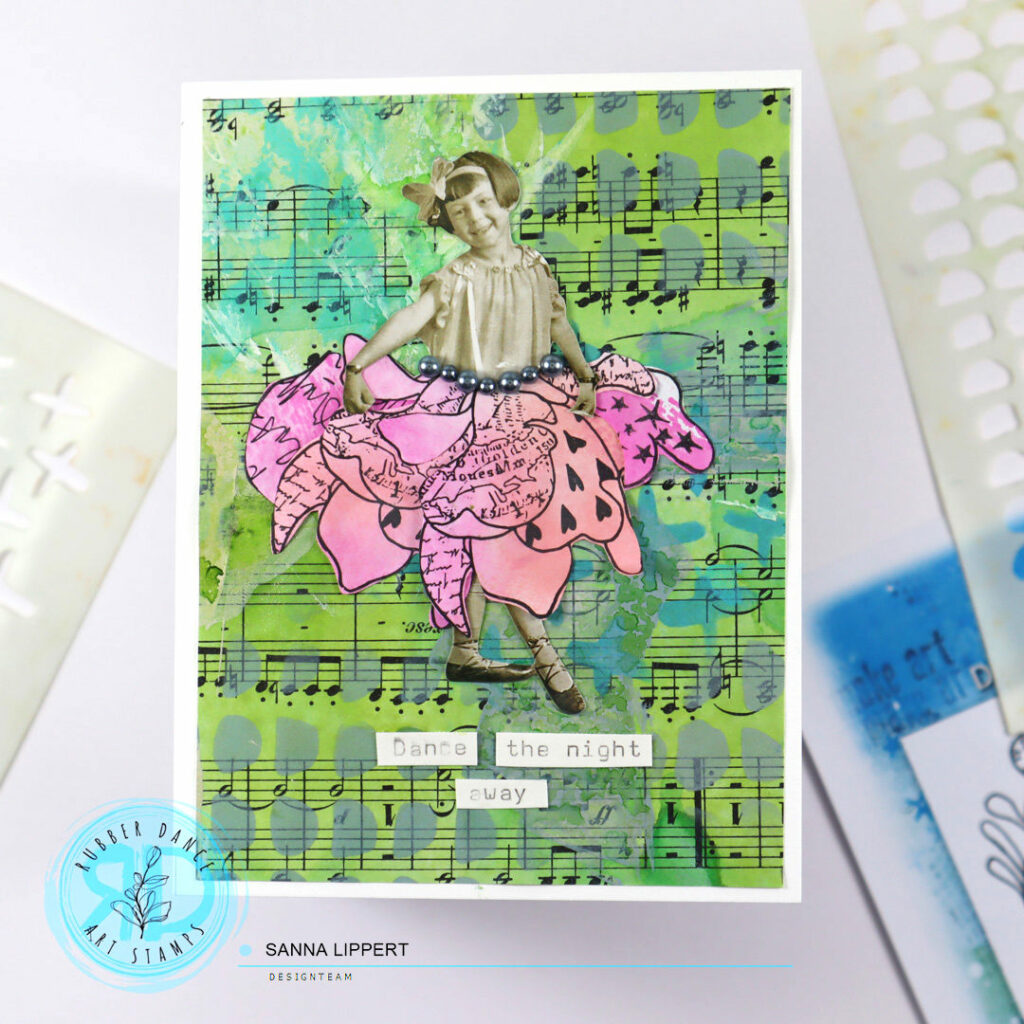
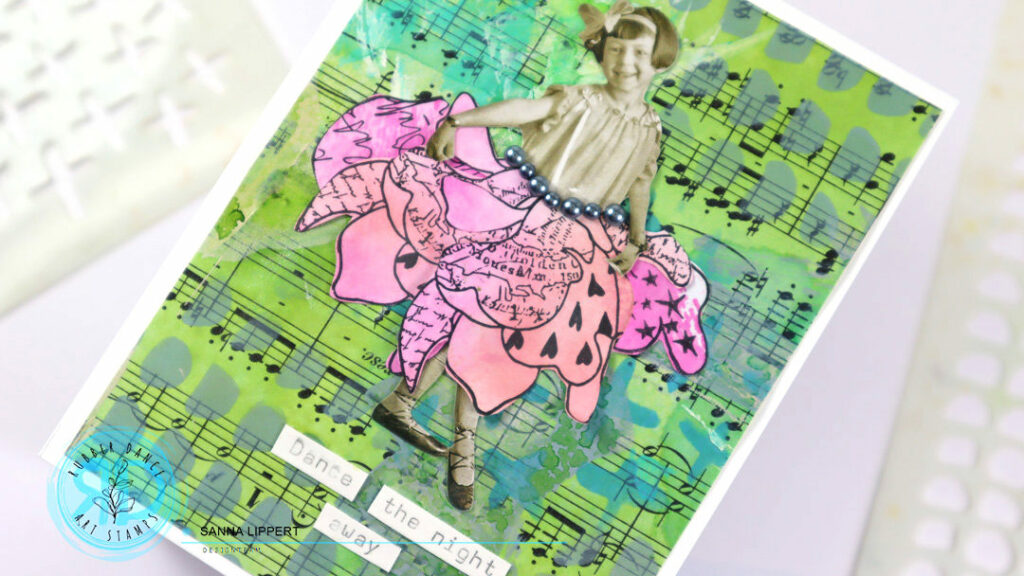
Hello lovelies! I am up over at the Rubber Dance blog today with two mixed media cards using the Doodle Flowers stamps with a little twist. This is one of my first Rubber Dance stamp sets that I absolutely fell in love with. I wanted to use the flowers in a different way and created pink toned “skirts” for the paper dolls with them. For these cards I used the Doodle Flowers stamps with pink toned Distress Inks and Marks 2 and Cross It stencils with Distress Oxide Inks. You will find a video tutorial at the bottom of this post.
Unfortunately the Doodle Flowers in the Clear Version are almost sold out, but they are still be available as a rubber stamp set. It’s linked at the bottom of this post. And I’m sure they will be a follow-up clear stamps set in the future, with some brand new flowers 😉 !!!
Here is how I created the cards: I first added two pink Distress Ink tones onto a craft sheet and sprayed them with water. Then I wiped the paper onto the wet ink. After the paper was dry I stamped several images of Doodle Flowers onto the paper and fussy cut them (only the flower buds). Next I took an old music note sheet (if you don’t have music paper you can also use the Rubber Dance music stamp to make some on your own), misted it with light blue and green spray ink and after that added stencil marks with grey, green and blue toned Distress Oxide Inks and a blending brush onto the music sheet.
Next I cut the stenciled backgroud paper into a right size, adhered it onto a card base and then took a paper doll and added that as a centerpiece to the card with a skirt arranged from the fussy cut Doodle Flowers stamp images. Finally, I typed a sentiment with my old typewriter and adhered it onto each card. If you don’t own a typerwriter, you might like the Rubber Dance Mix A Sentiment stamp set!
Here is a start-to-finish video of how I created the cards:
I hope you liked this little card inspiration! Happy crafting, xxx, Sanna