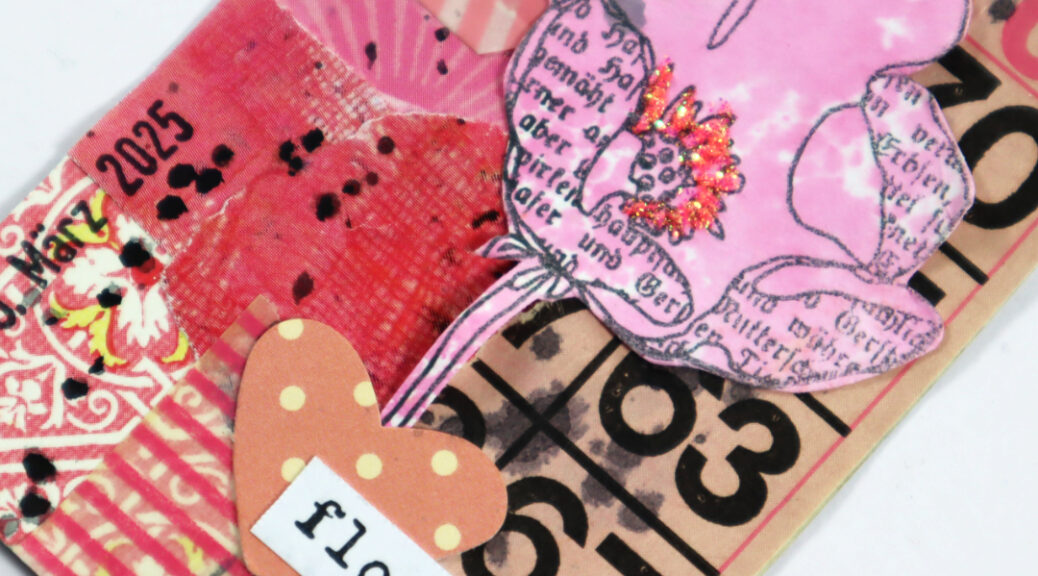
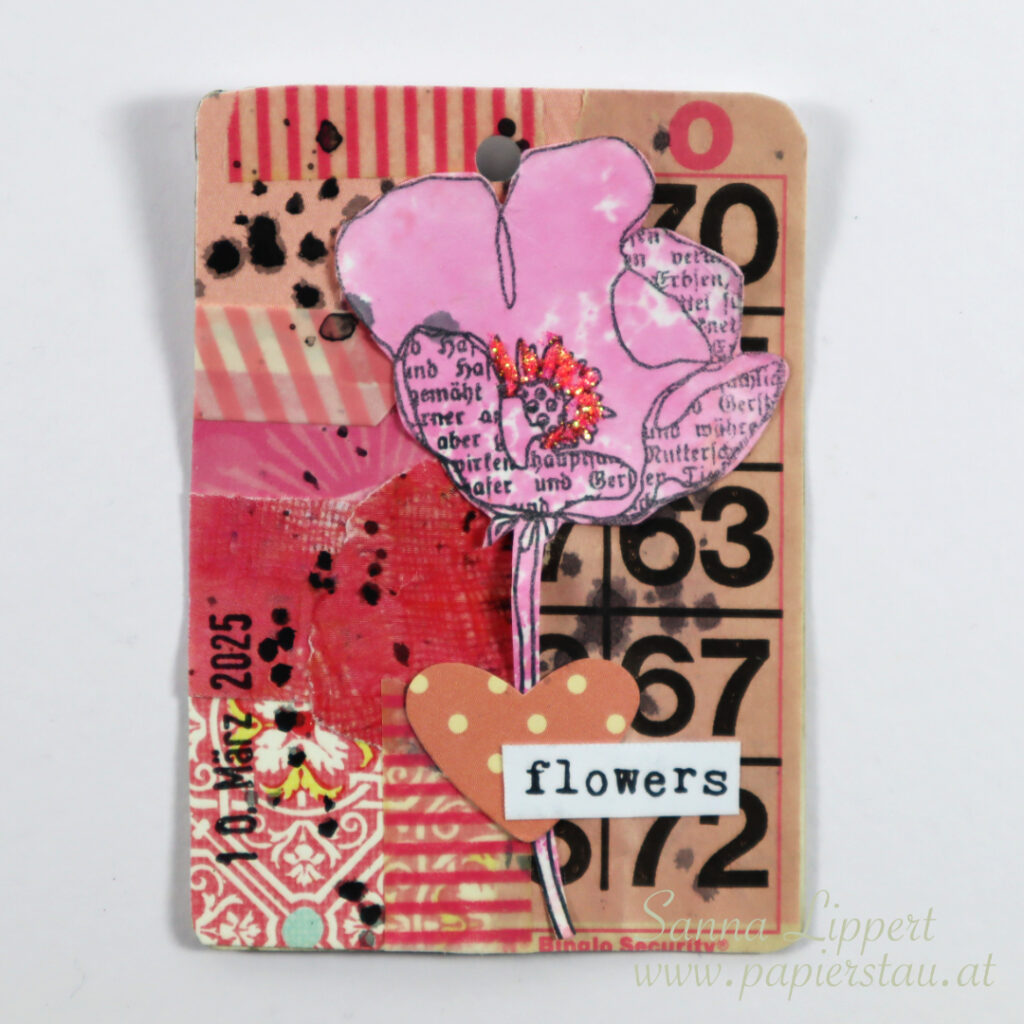
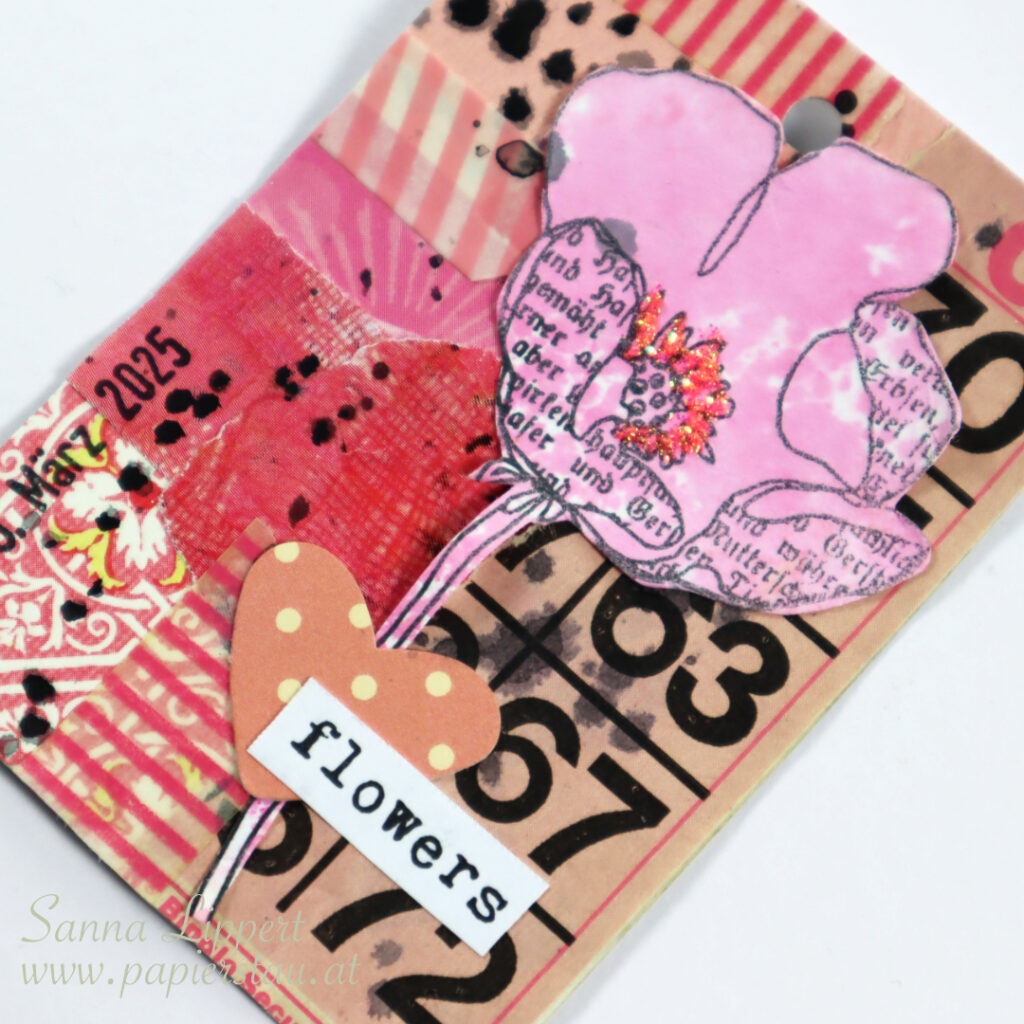
Hello there! I am a bit late posting this, as I was quite under the weather the past week or so. But better late than never, here is my take on the FDC challenge number 9 “pink with black splatter”.
For this one I gathered all kinds of paper bits and bobs (also vintage ones) and wripped them in smaller pieces to create the background collage.
On top of that I added my constant: a date stamp. And I again used washi tape as my continous – but different colors here. I hope you enjoy the start-to-finish video:
For finishing touches I added some older ephemera, a stamped and colored Rubber Dance flower and sentiment and some Stickles for sparkle. The black splatters are done with Neocolor II black and plenty of water.
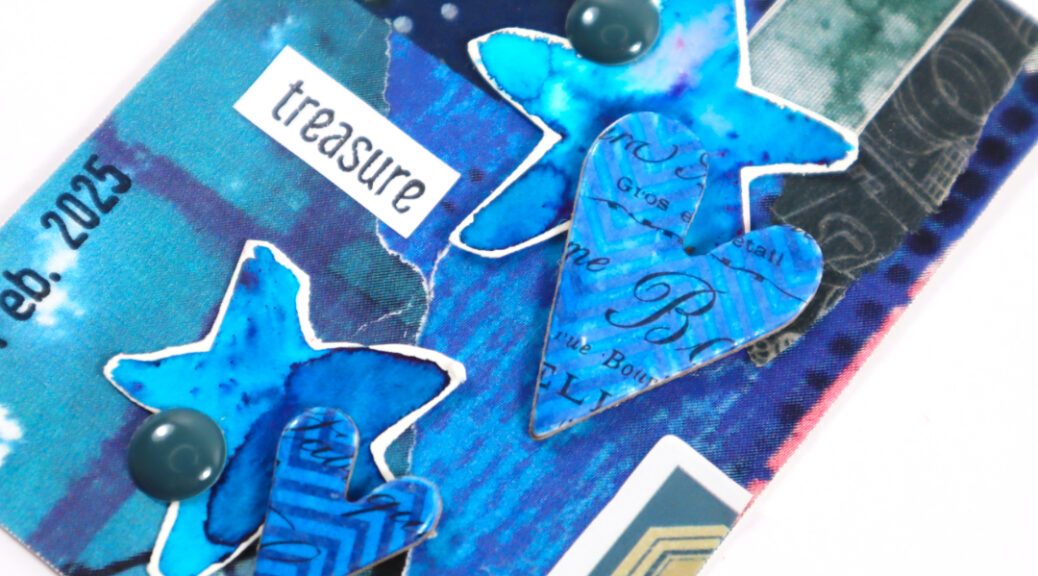
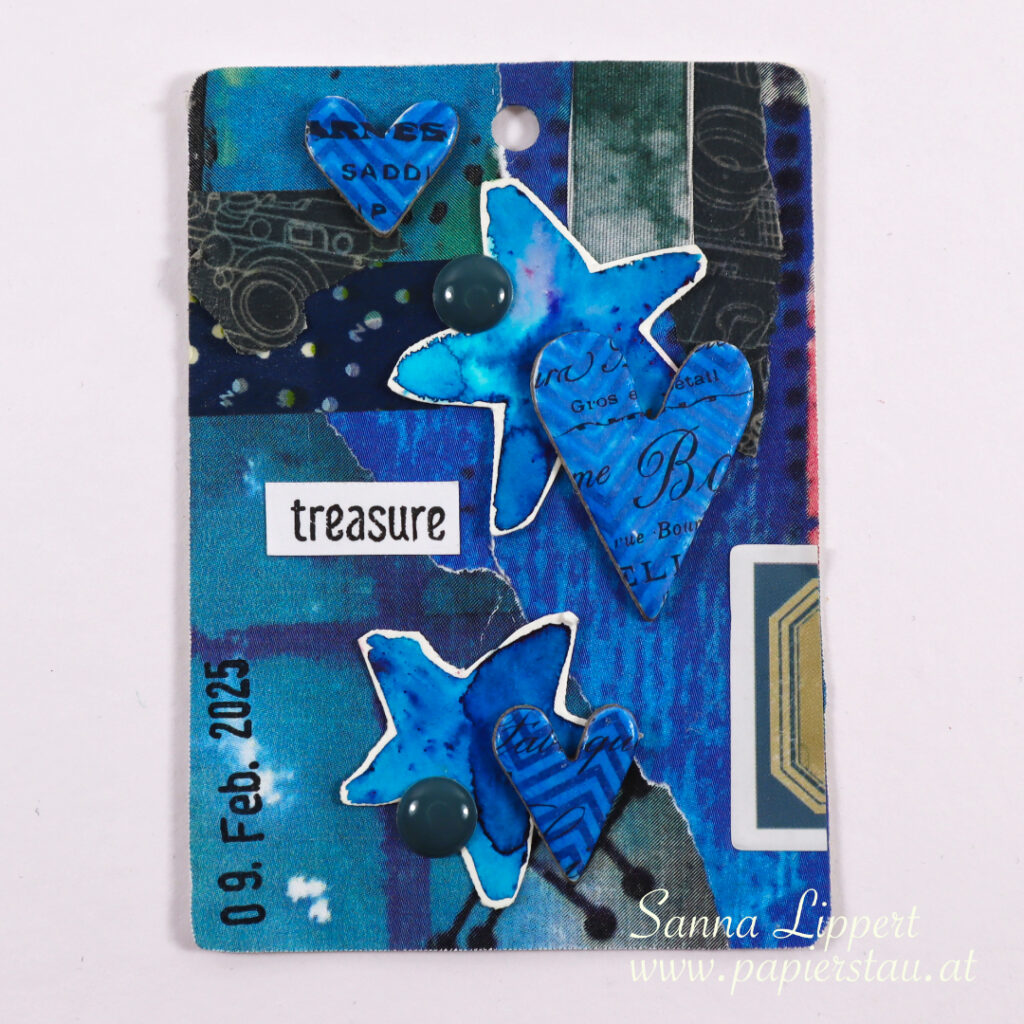
Hello, here is my take 7 for the “Full Deck Challenge 2025”, called to life by ShanoukiArt. This time it´s about “be free” and “dark blue”.
I used mainly paper gifted to me by Yuna again on this one. The label sticker ist a continuous from my last deck card, as well as the stamped word (Rubber Dance stamp).
My constant is a date stamp and I again added washi tape, some 49andMarket fabric tape and some hand drawn stars from my last year´s 100 day challenge. The hearts and the enamel dots are from my old stash. I colored the hearts with a marker dark blue. Here is the process video:
I hope to have inspired you with this one. I love the blue tones here so, so much. See you next week with the next deck card. Happy crafting, xxx, Sanna
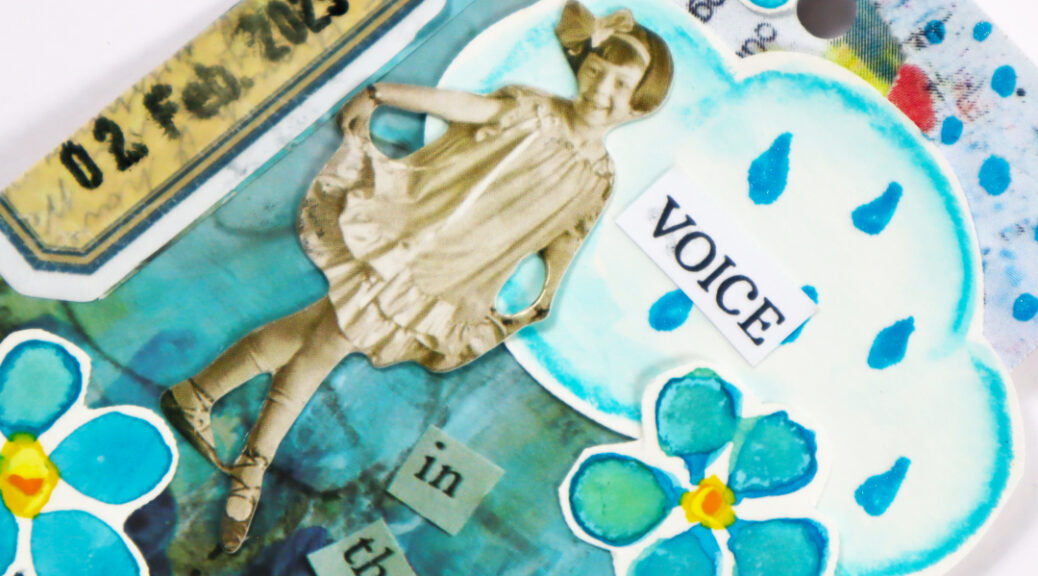
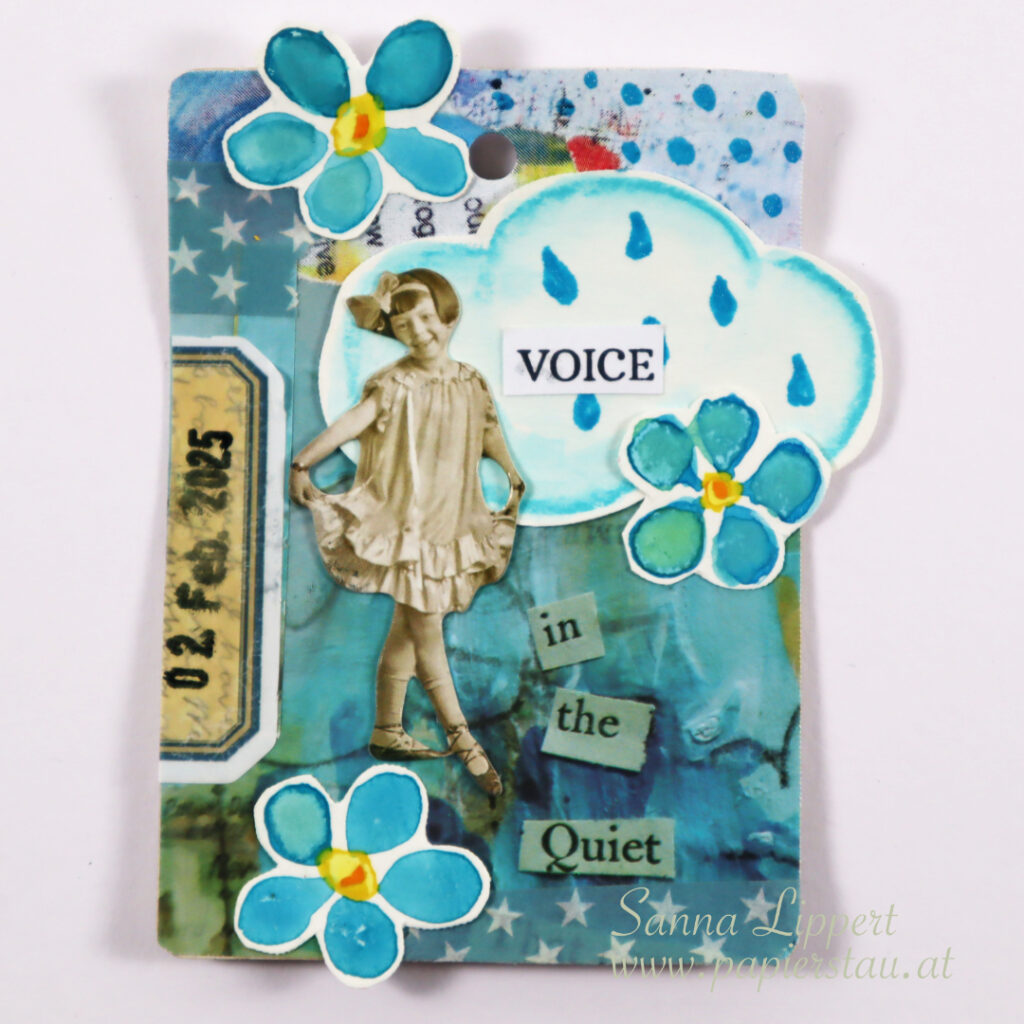
Hello, here is my take on the 6th Full Deck Challenge with the theme: light blue.
I think this is my personal favorite so far. I love the color. I found a Artist Almanac 2023 page that had lots of light blue on it. To it I again added bits from Yuna´s collage papers that she gifted me. The label sticker is the same, like on my previous deck card.
My constant, again, is a date stamp. To that I added some light blue washi tape, some fodder I drew last year for the 100 day challenge (flowers and cloud). For finishing touches I used a paper doll by Tim Holtz and a stamped word (Rubber Dance stamps).
Here is the video:
See you next week with another deck card share! Happy crafting, xxx, Sanna
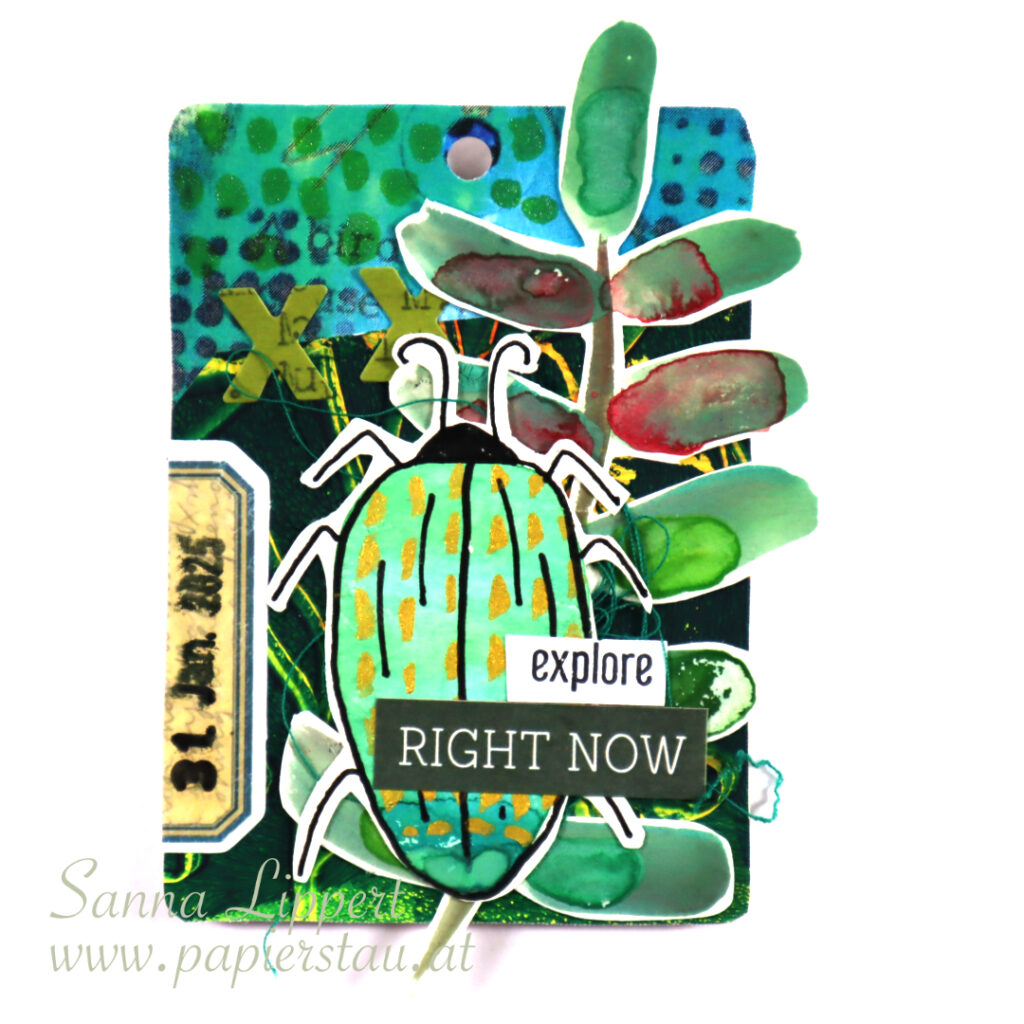
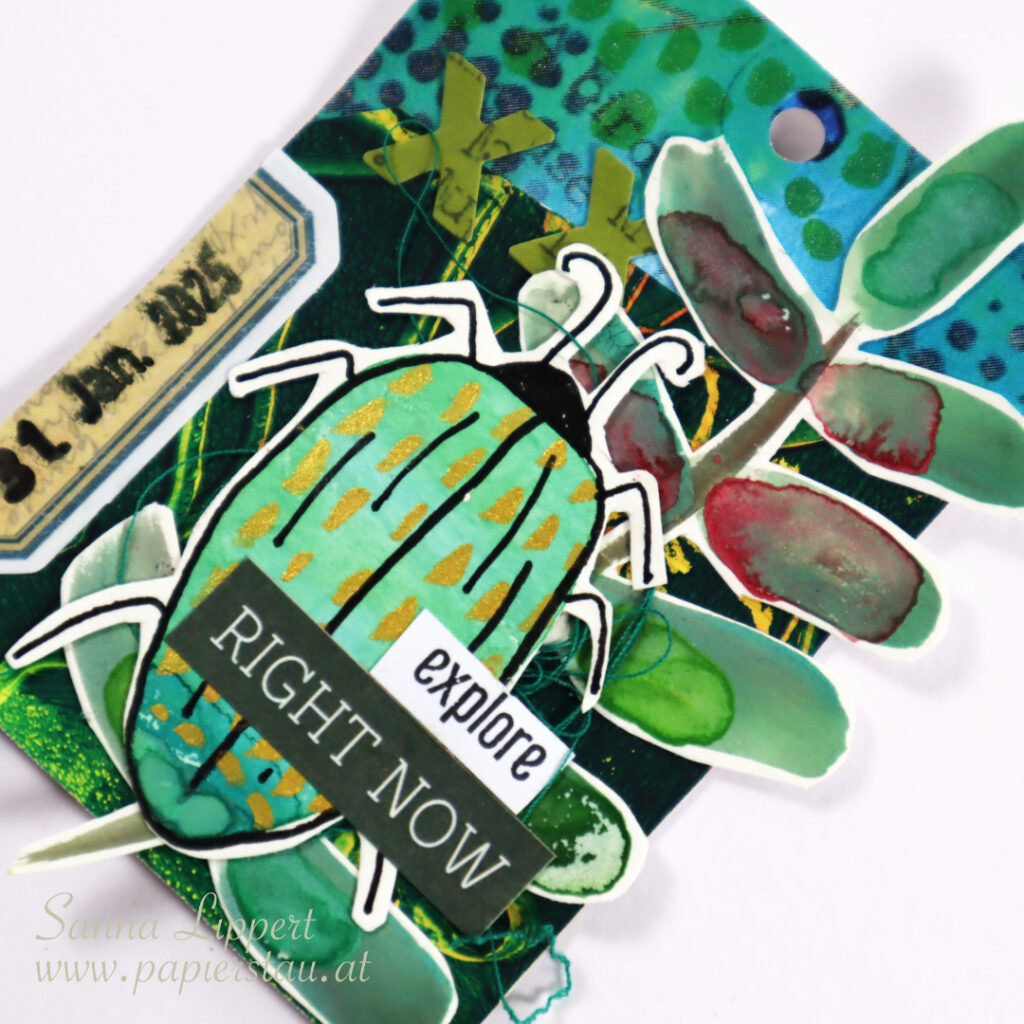
Hello, here is my next deck card share for the 2025 Full Deck Challenge. This time the theme is “dark green”.
I used a paper gifted by Yuna on the background, as well as a gelli printed paper (I used Rubber Dance stamps for that). In addition I used my constant (a date stamp) and some old Sassafras alphabet stickers. The label sticker is something I took from previous deck into this one.
Then I added a stamped word (Rubber Dance stamps) and a word sticker, some yarn and two fodder pieces that originate from my last year´s 100 day challenge. I fiinished the background with a Edding glitter brush pen in green.
Here is the video for you to watch:
I am enjoying this challenge very much! Not too much pressure, as it´s only one a week.
Hello! I decided to join the 2025 Full Deck Challenge. It´s been called to life by ShanoukiArt and this years theme is a collage on a deck of playing cards (or similar). A deck card a week with a different “theme”.
Here are some “rules”: one should do a continuous thing, like for example adding postal stamps (like she does) to every deck card to have something on them that binds them together. I choose to add a date stamp on every deck card. In addition one should take a bit of something from the previously done deck card material and use that on the next one too.
There is a Facebook group (look for Full Deck Challenge Group) to join for sharing one´s creations and also her YouTube channel to the weekly challenge.
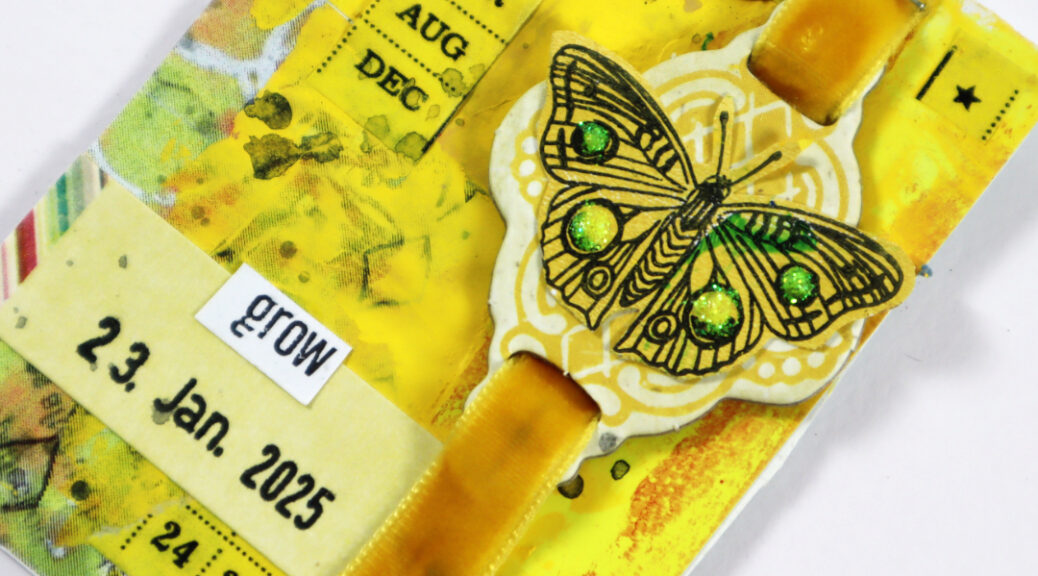
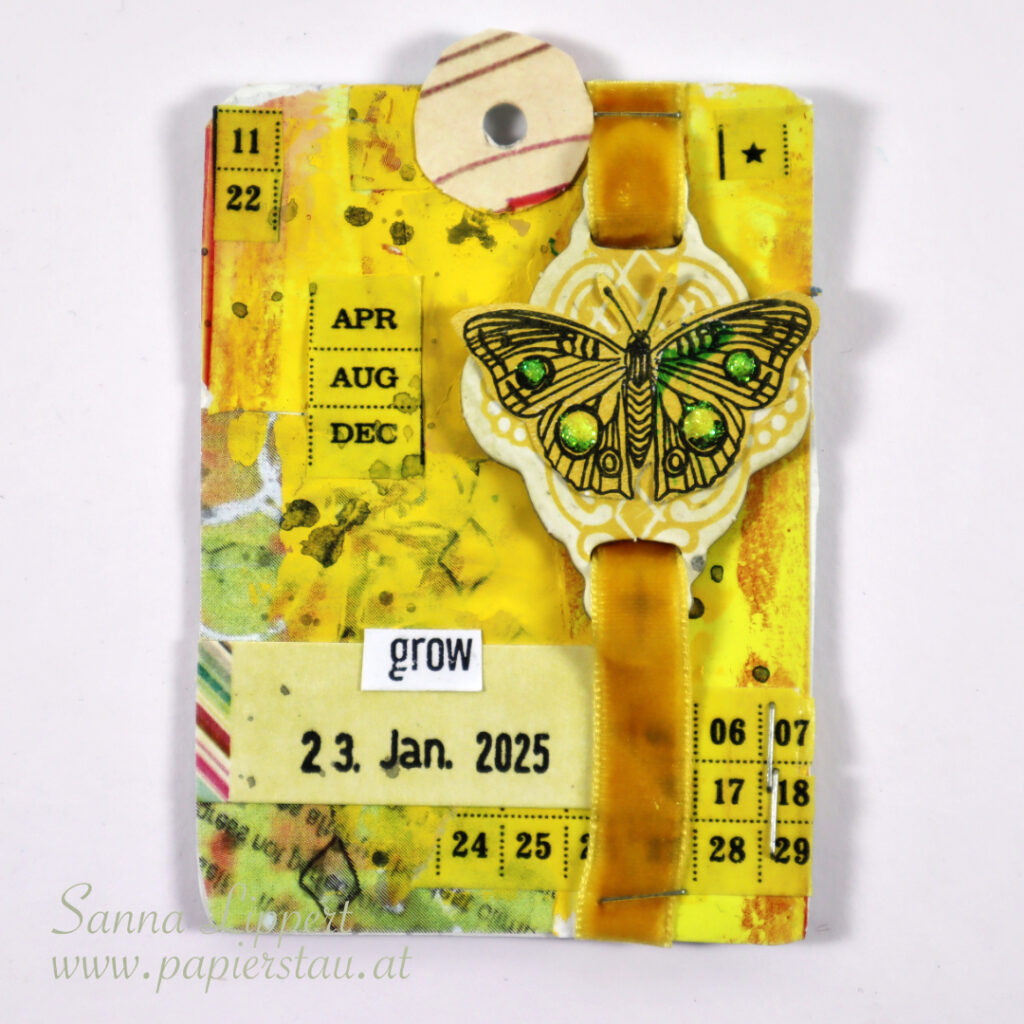
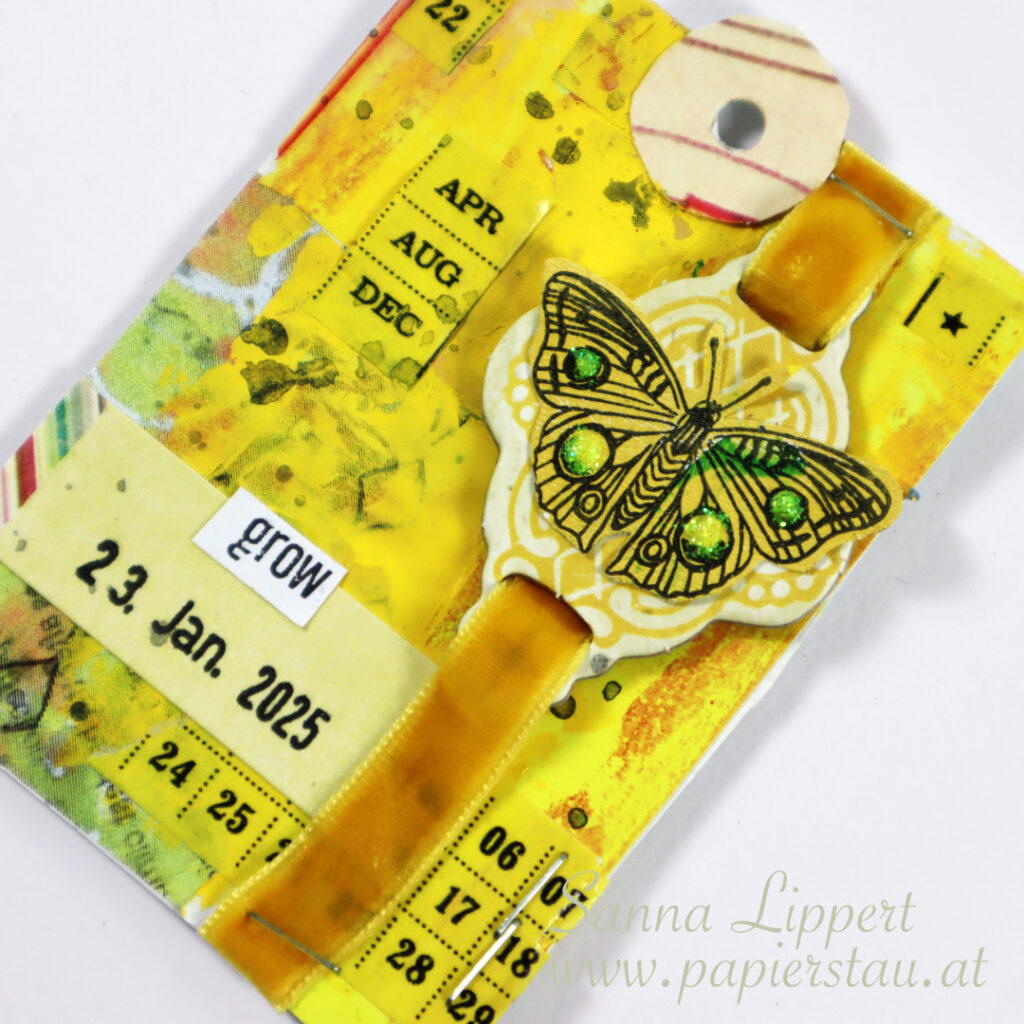
It sounded so much fun that I decided to join. At least I´ll try. Here is my take for deck card 3 with the theme “YELLOW”:
Yellow is one of my favorite colors! I used the yellow parts from the gelli printed paper I used on the previous deck cards, then added again some paper bits gifted me by Yuna again. Some yellow washi tape, some Dina Wakley heavy body paint in yellow and velvet ribbon, a chipboard piece, a date stamp and a stamped butterfly (like on the previous deck card). And some glitter glue. Oh, and the Rubber Dance stamp stamped word again, too.
and here is the video:
So far I am really enjoying this! Happy crafting! xxx, Sanna
Hello! I decided to join the 2025 Full Deck Challenge. It´s been called to life by ShanoukiArt and this years theme is a collage on a deck of playing cards (or similar). A deck card a week with a different “theme”.
Also one should do a continuous thing, like for example adding postal stamps (like she does) to every deck card to have something on them that binds them together. I choose to add a date stamp on every deck card. In addition one should take a bit of something from the previously done deck card material and use that on the next one too.
There is a Facebook group (look for Full Deck Challenge Group) to join for sharing one´s creations and also her YouTube channel to the weekly challenge.
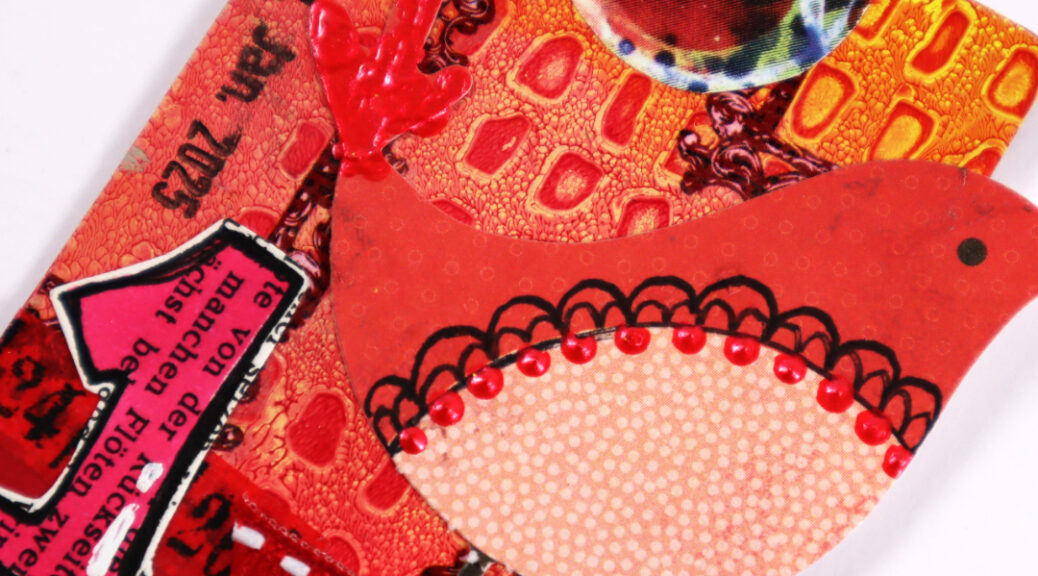
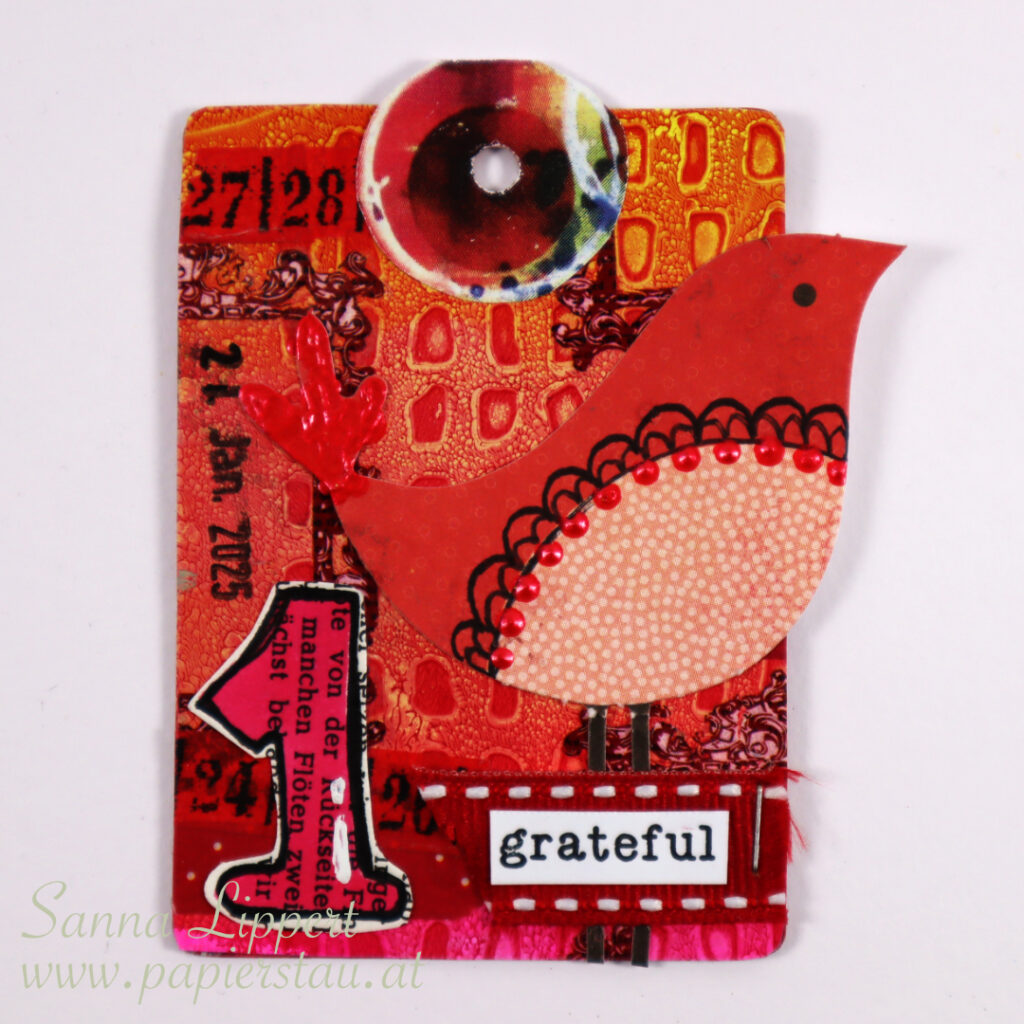
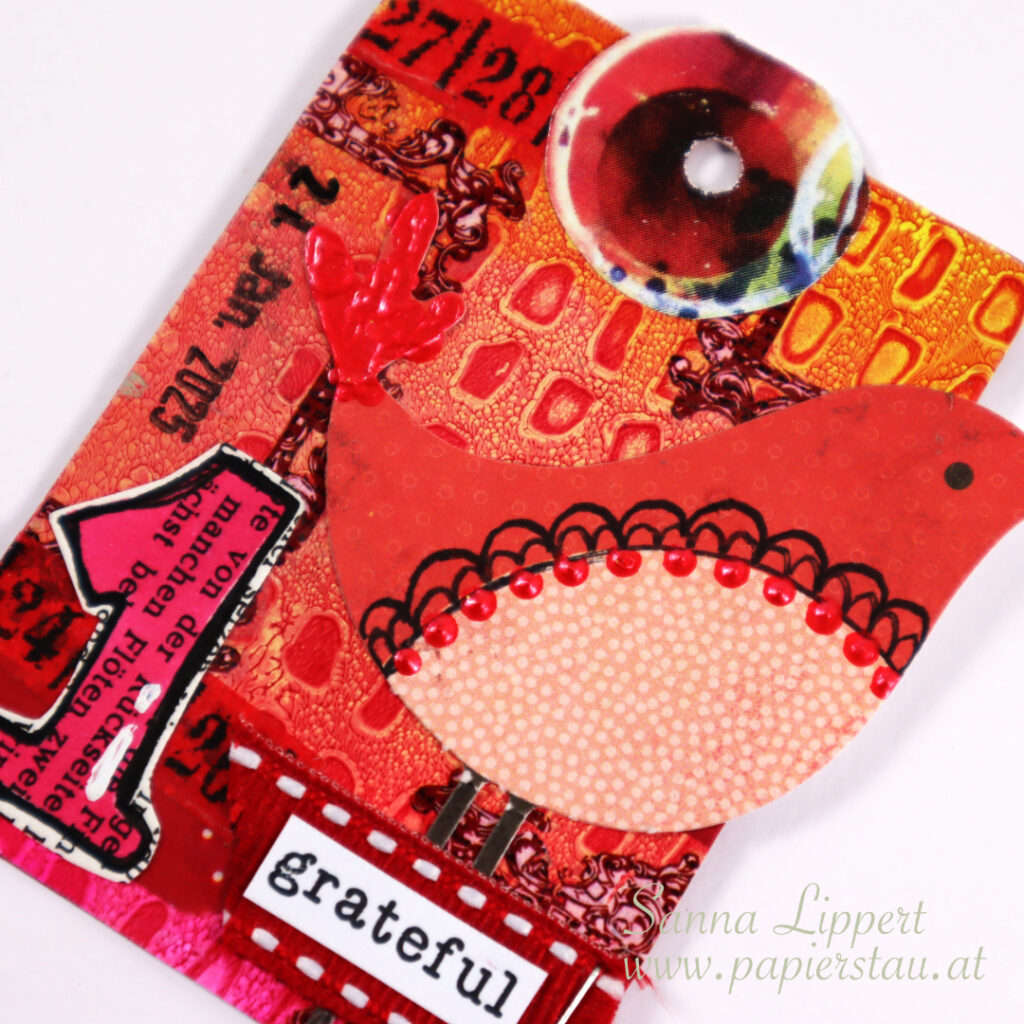
It sounded so much fun that I decided to join. At least I´ll try. Here is my take for deck card 1 with the theme “RED”:
I used gelli print paper on the background (created with Rubber Dance stencil). Also I added some washi tape, a bird ephemera, some ribbon, old rub-ons, a number from my last years 100 day challenge, a Rubber Dance stamp word and finally, some papers gifted me by Yuna from Australia.
And here is a short video of the process. In the end of the video there is a link to ShanoukiArt´s original video, just in case you want to join too.
Wishing you all a wonderful day & happy crafting! xxx, Sanna
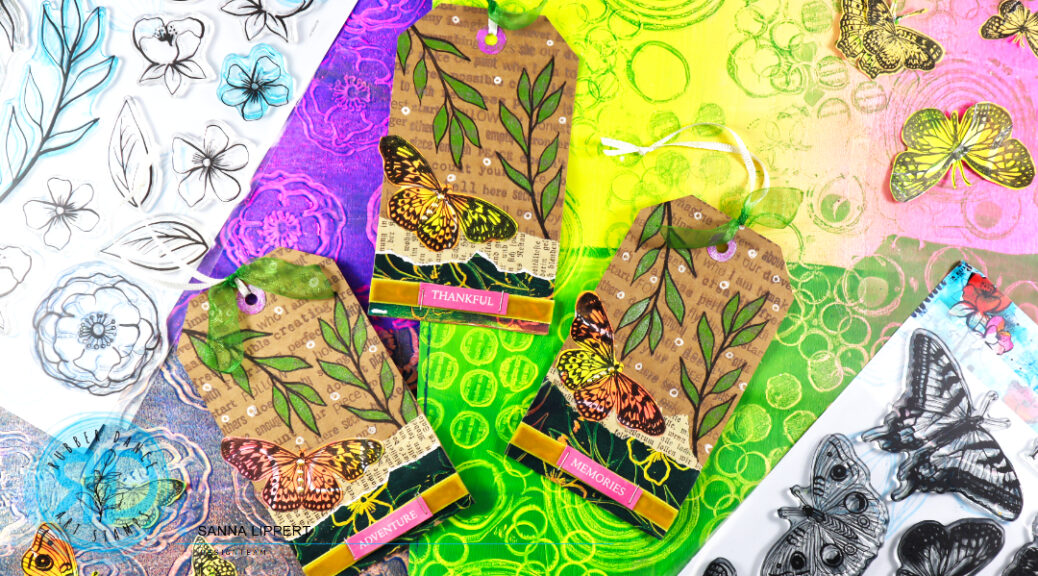
I first started by stamping brown Distress Oxide Ink with the Mix A Sentiment 2023 stamp set onto the kraft tags. Next I took black stamp ink and the leaves from the Loose Florals 2024 stamp set and stamped black leaf images onto the tags.
Then I colored the leaf images with glitter brush pens and added some gelli printed strips to the bottom of the tags with some old book page pieces. For the gelli print piece I used the same Loose Florals 2024 stamp set.
After that I added some white gel pen circles to the background for interest and adhered some butterfly fodder and ribbon to the tags.
For finishing touches I added some liquid pearls to the butterflies and attached sticker sentiments to each tag.
Here is also a quick step-by-step to how the butterfly fodder was done:
First create a colorful gelli print. I used three tones of paint and “drew” random scribbles to the paint. Next I stamped “Butterflies and Moths 2024” with black stamp ink onto the gelli print. After that I fussy cut all the images. This way I have plenty of fodder ready for my next projects.
Creating the fodder and tags was so much fun. I hope you give it a try! While at it, make sure to try out different color combinations and patterns. This way you have plenty of material to work with for future projects.
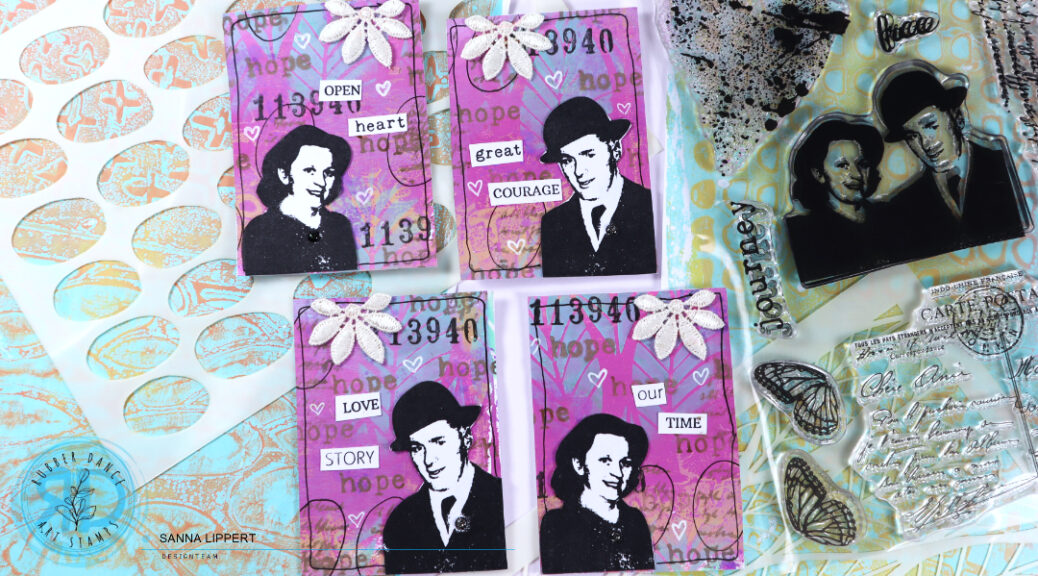
Hello everyone, I have an Artist Trading Card set up over at the Rubber Dance blog this time. I created these Artist Trading Cards with the Mix It Up 6 stamp set, Leaves #2 and Big Ovals stencil. As a background I used a gelli printed paper that I have used on a previous project (here).
The background paper, like mentioned above, is from my previous project and done using acrylic paints, a gelli plate and Cross It, as well as Marks 2 stencils. I used that paper as my starting point and added even more layers on top of it to create an interesting, artsy background for my ATC´s.
I started with the Leaves #2 stencil and cracked pistachio Distress Oxide ink by applying the ink thru the stencil randomly onto the background with a blending brush.
After that I took the Mix It Up 6 stamp set and the Big Ovals stencil and placed it on top of the paper. With ground expresso Distress Oxide I first added some stamped text thru the big ovals stencil onto the background. Then I outlined some of the stamped areas with a black pen thru the same stencil to make them stand out more from the background.
Next I stamped some wilted violet Distress Oxide toned splatters with the heart shaped stamp from the same stamp set and also some black numbers onto the background. After that I took the stamp image of the couple and stamped them with black stamp ink onto white paper and fussy cut them. In addition I added some ground expresso stamped words (hope) onto the background for more interest.
Finally I took some of the Mix A Sentiment 2023 stamp set words that I had left over from my previous projects and added them to go with the images. I also decorated the pages with a black pen outline and some fabric, vintage flowers and white gel pen hearts as well as some glitter enamel dots.
I hope I could inspire you to play with the Mix It Up 6 stamp set and the featured stencils! Have a great time creating!! xxx, Sanna
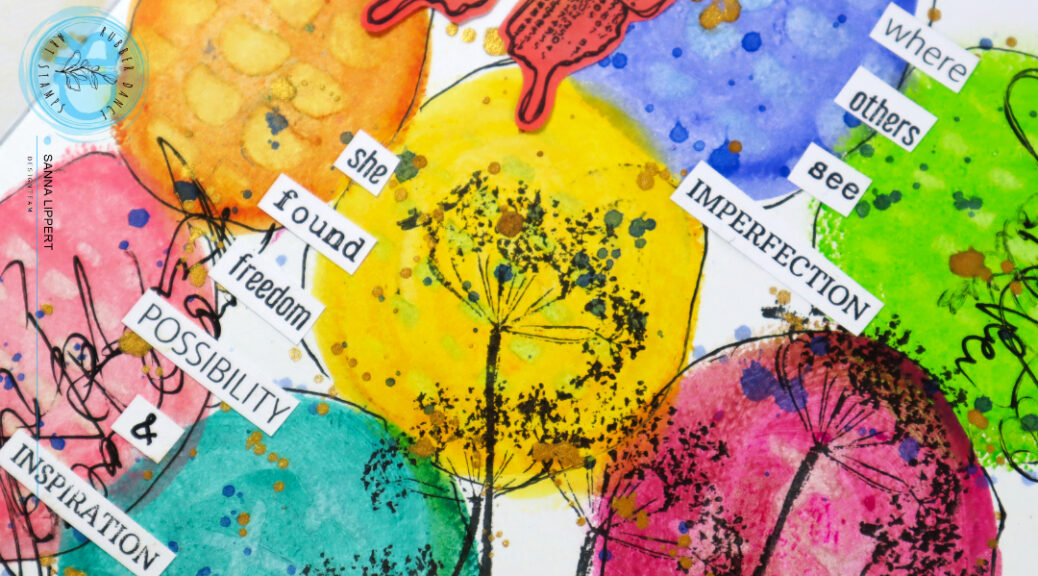
Hello, it´s again my turn to share a create project over at Rubber Dance blog today and I´m up with another art journal page share. I made this one inspired by the beautiful watercolor pages Susanne makes, only I used Distress Crayons and stencils on the circles instead of watercolors. The products I used here are Weed Love stamps and Cross It, Marks 2, Marks 3 stencils, Grungy Butterflies and Mix a Sentiment 2023 stamps.
I started by applying various tones of Distress Crayons onto the page in circular motion. After that I misted the areas with a little water spray and then, when still wet, place a stencil over them and using a baby wipe wiped some of the wet crayon away.
After that I added some black details around the circles and stamped with Weed Love some images onto the page. I also added some blue crayon droplets and golden pigments in droplets for additional interest to the page. Next I wrote some asemic writing here and there and finally decorated the page with a Grungy Butterfly and created a sentiment with Mix a Sentiment stamp set.
Here is a start-to-finish video for all the steps:
I hope you get inspired by some of the techniques and/or ideas and grab your art journal and start to create! Have fun! xxx, Sanna
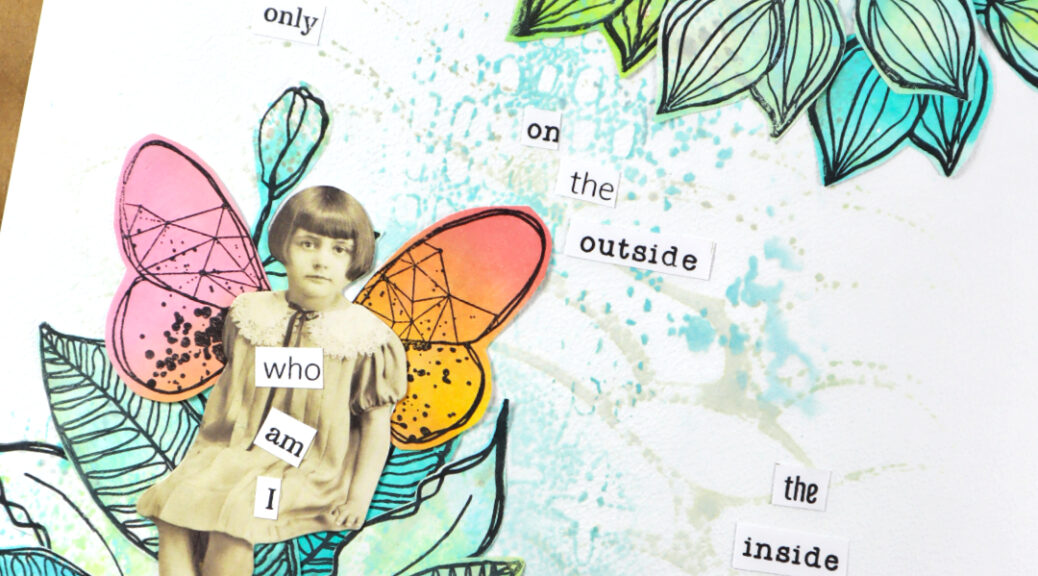
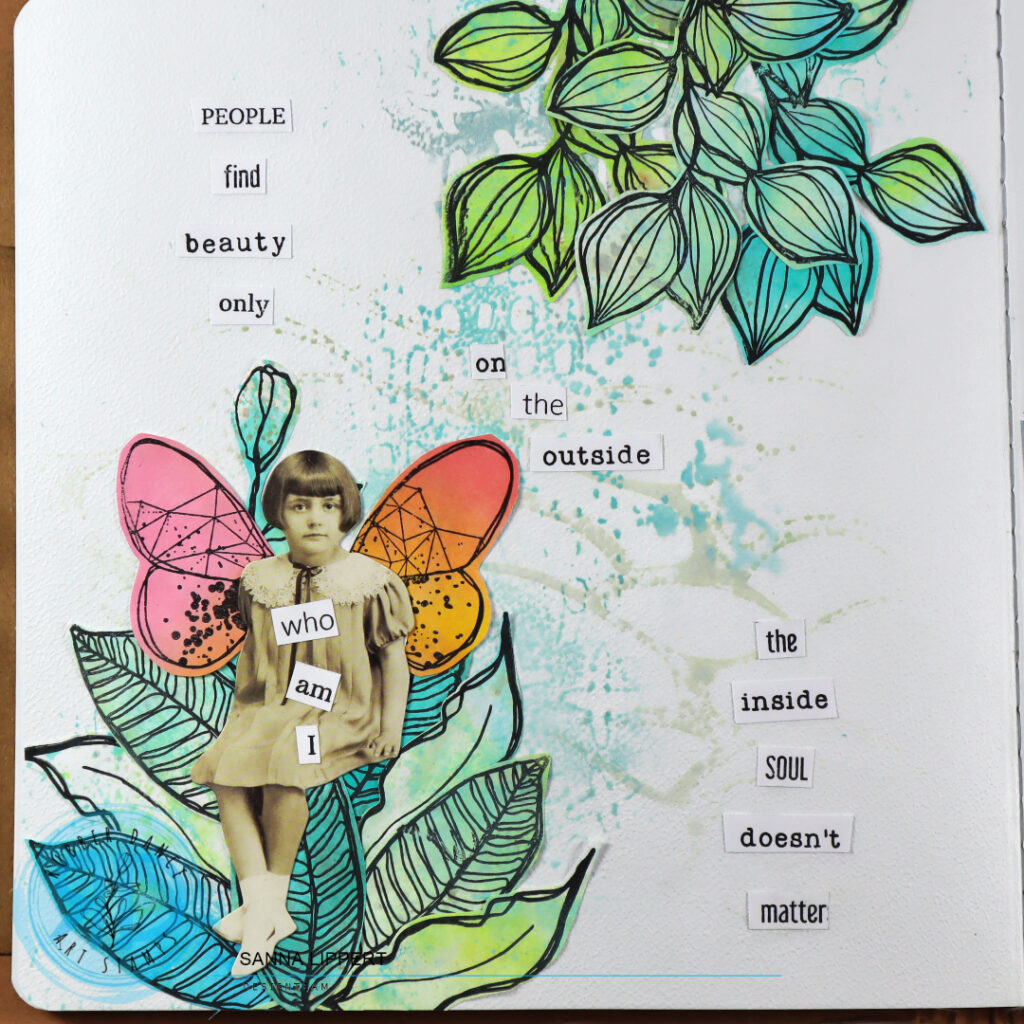
Hello everyone! I am again up overe at the Rubber Dance blog today with an art journal page share. For this page I used the Sketchy Leaves stamp set as well as the Organic 3, Cross It and Marks 3 stencils with Distress Oxide Inks.
I started by inking the stencils with various blue and green tones of Distress Oxide Inks and then misted them lightly with water mist. After that I just pressed small areas onto the page to create a very light and almost fading image of stencil patterns.
Next I took some premade (see my previous project for details) Sketchy Leaves fodder and arranged them onto the page in clusters.
Then I added a Tim Holtz paper doll and fussy cut wings for it from my Grungy Butterflies fodder bits. For finishing touches I created a sentiment with Mix a Sentiment 2023 words and the page was done. I really enjoy using white space on this journal page with the clusters of fodder to draw the eye towards to.
I hope you got inspired by this art journal page. Now grab your stamps and stencils and create something fun in your journal! Happy crafting, xxx, Sanna