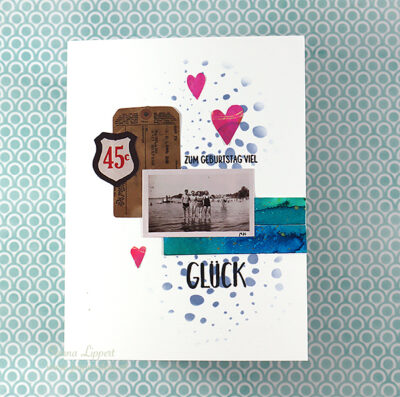
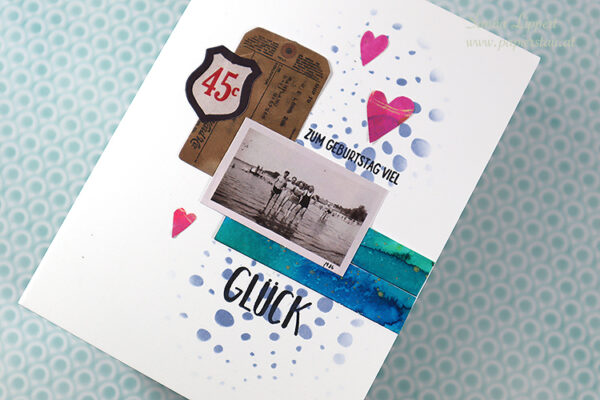
Hello and happy Friday! Here comes Day 41 of 365 days of daily art with the Artist Almanac 2022. It is kind of awesome that I have already come so far with it – I am a bit worried, though, if my journal will manage the total of 180 FILLED pages. We will see… might need a plan B in the middle of the year :).
For this page I used the almanac page again as a whole piece. I didn´ t want to wrip the beautiful bits apart, instead I added leftover bits from previous pages (the brusho-treated green book page) and some rice paper. The stamps are by STAMPlorations and the Denglisch stamp is by Klartext again. The gaffer tape is an old residue piece and has mists on it. Also the alphas are older – from my subscribtion time at Studio Calico. I wanted to add a pop of colour, so I took pink Posca for that.
The theme of this piece originated from the boy with the dog image. Throughout my childhood years I was surrounded by animals and I loved it. I noticed from this photo, how much I miss that, thus the title.
Hope you enjoyed today´ s take. See you again with another one tomorrow! xxx, Sanna
Hello everyone!! It is again time to share some Trifecta cardmaking fun with you. I have a set of Christmas cards created with stamps, stencils & stsickers (=Trifecta) for you today:
For the first card I used the Snowflakes stencil with white embossing ink to create resist areas. Next I applied Brusho´s onto the paper in blue and purple tones. Since the surface was very damp, I quickly pressed a second paper on top of the inked area to lift the ink off for my second card. This way I could create two backgrounds with one step. All the lift-ink paper residues served as my deer and sentiment background for this card too. I simply adhered the clear sticker sentiment onto the inked lift-ink paper piece as well as fussy cut a small piece as a background for the deer.
The deer image is stamped and heat embossed with silver embossing ink, then fussy cut and adhered on top of a layer of yarn. This adds a nice texture to the card. I finished the deer off with a craft drop red nose. For a funny card I could even have applied wobbly eyes on the deer, but for this one, I didn´t. This image is so versatile, because it is so simple in design. That way it can be altered for whatever look you need.
For my second card I used the “lift-off” ink background that resulted from my first card, then applied a DIY glitter paste thru the Snowflakes stencil on top. You can create the glitter paste from loose glitter and transparent texture paste really easy. Next I fussy cut a background paper piece to from a banner for the card and adhered the clear sticker onto it. Now to stamp and heat emboss a Sketchy Yule Tree for a focal point of the card and decorate with craft drops. This card has more texture due to the DIY glitter paste, but is still flat enough for easy postage.
For the third card I created another Brusho background. This time in green, red and purple tones and applied white gesso on top thru the Christmas Tree 1 stencil. I could not resist adding a die cut winter scenery to the card, so I used the Stitched Winter Landscape die an a wintery patterned paper for this purpose. For stamped detais I used the Art Marks 2 stamp set. If you look closely, you can see the darker blue dots on the trees, outlined with a white gel pen. That is done with one of the stamp in the stsamp set.
For the sentiment I chose the Merry clear sticker set, but cut the sentiment in half and used only the upper part of it. I also decorated the card with wood veneer stars and some glitter glue for additional detail. These are true mixed media Christmas cards this time. It was so much fun creating these and playing with colour, stamps, stencils and stickers! I hope this will inspire you to get your stash out and play a little yourself! If you do, please share with us at STAMPlorations, so we can come and admire your work.
Hello everyone and happy November! It´ s again my turn to share another Elizabeth Craft Designs guest team project with you today. This time I´ve got something fun to share: a clean and simple card that originated from last months card project´ s leftover pieces. This is a fun way to use up paper strips and create cool looking cards. Hope you like the idea!
Here is how I created this card:
Step 1: I had some colored paper strip (see my October card tutorial share) leftovers from the previous cards, so I took the Classic Christmas Special Kit snowflake die and arranged the snowflakes on a slimline card sized piece of white cardstock and die cut them with my die cutting machine. Step 2: I placed the die cut snowflakes aside and adhered the colored paper strips behind the negative snowflake areas to create the striped-snowflake-look. Step 3: Next I took some pearlescent blue watercolor and added random color splatters onto the white area of the background for additional detail. You could also use regular watercolors here or add ink spray splatters, for example. Whatever you have available. Step 4: Next arrange the die cut snowflake pieces into the center of the card in a row and adhere them on place. Step 5: Take a kraft cardstock piece and stamp a Christmas sentiment – stamp comes with the kit – and heat emboss it with white embossing ink. Adhere on place with 3D foam for additional dimension.
This is such a fun way to make a cheerful card. By the way, you could also replace the inked paper strips with leftover patterned papers. That would also create a fun look! For additional information, I´ve recorded a short video to give you a better idea of the steps. Hope you enjoy it!
I don´t know about you, but I just love playing with this Classic Christmas Special Kit so much! See you again next month with another card tutorial.
Hello everyone, it´ s my turn over at Elizabeth Craft Designs blog today to share a monthly guest team member card tutorial again. For today´ s card share I wanted to create a set of slimline Christmas cards in bold colours. I did that by using actually very little supplies, so these cards are easy to replicate and do multiples of.
I have again used the gorgeous Classic Christmas Special Kit for creating these cards and the only thing I added to the kit was Brusho´s, metallic watercolours, embossing powders and ink. If you don´t have Brusho´s, you can replace them with spray inks, watercolour palettes or even patterned papers. Here is how I did the cards:
Step 1: Take white plain cardstock and apply the Brusho powders onto the surface. Spray water mist on top and let the colors spread on paper. You can also help a little with a paint brush and then dry with a heat tool. Once you are at it, create several different toned ones, so you can create a series of cards in the end. Step 2: Next apply metallic or pearlescent watercolor splatters with a paint brush on top of the bold colored pieces and let dry.
Step 3: Now die cut the same amount of backgrounds using the background die from the Classic Christmas Special Kit and adhere it on top of the colorful piece. Step 4: Next stamp and heat emboss sentiments using the stamp set from the kit. I used white, red, blue and black embossing color tones for my cards, but you can take any colour you prefer. Step 5: Finally, fussy cut the sentiment pieces into right size and adhere them onto the card bases using 3D-foam. This adds nice dimension to the cards.
Now you have a fun set of Christmas cards, that are still flat enough to be mailed in an envelope, but will for sure cheer up the recipient with their strong colours.
I have again recorded a video for you to watch, so you get a better idea of each and every step. Enjoy!
While recording the tutorial, I created a total of six cards using the same basic technique, but just changing the color combinations. I did this to have a few more Christmas cards in my stash, because I always need so many every year. I also love how happy and bright there cards turned out.
I hope I could inspire you to give this idea a try and create a few clean and simple Christmas cards yourself. You can also divede the stept into several days. One day all you need to do is make the backgrounds, the next you die cut the white pieces and the day after you stamp and emboss the sentiments and on the final day you just adhere everything together. That way you could do a bigger batch of cards, too.
I´ ll be sharing another card tutorial with you again next month – so see you then! xxx, Sanna
Hello and happy Friday! Today´ s project share is another mixed media card with a funny sentiment. It says something like this translated: “It might not have been smart, but it was cool”.
I´ ve created the background with Scribble Sticks, Brusho´ s, Distress Paints and some Gainsai Tambi Starry Colors. I also added some stenciling with two of my STAMPlorations stencils. For finishing touches I added a stamped Klartext stamp sentiment.
I really like the gold watercolour as a contrast to the blues and purples. This is going to be a fun card to give to someone.